The Cinematic Camera
The garage camera is what makes the Tuner feel like a showroom instead of a menu: every category swings the view to a purpose-built shot, the player can orbit and zoom, and an idle camera slowly circles the car. This chapter explains how the takeover works, how to author the camera in your scene, and how to design your own shots.
How the Takeover Works
When the garage opens, RCCPT_CameraDirector takes over cleanly:
- It activates its own camera (an authored one if you provide it, else one spawned at runtime that copies your gameplay camera's settings).
- It disables your gameplay camera rig wholesale - it never fights another camera script frame-by-frame.
- It then switches off every other screen-rendering camera in the scene, and every foreign
AudioListener(the component that acts as the player's ears - a scene may only sensibly have one). Step 2 covers exactly one rig, the one the director resolved as the source; anything else still live would keep drawing over the garage and would leave two listeners running, which Unity warns about and which makes positional audio undefined. Cameras that render into a Render Texture - mirrors, minimaps, render-to-UI - are deliberately left alone, because they never compete for the screen. This is the Suppress Other Cameras switch, on by default. - On close, everything is restored exactly: the spawned camera is destroyed (or the authored one disabled again), the original rig is re-activated in its prior state, and every camera and listener suppressed in step 3 is switched back on.
All camera motion runs on unscaled time, and the director never touches Time.timeScale - the garage behaves identically in slow motion, pause menus, or bullet-time.
Zero-Setup vs Authored Camera
| Mode | How | When to use |
|---|---|---|
| Runtime spawn (default) | Have no RCCPT_CameraDirector in the scene (or one without a Scene Camera). A camera is created on open, copying the live gameplay camera's settings |
Drop-in setups; prototypes |
| Authored scene camera | Place an RCCPT_CameraDirector and assign a child camera to its Scene Camera slot (the demo scene does this - the child is RCCPT_GarageCamera) |
When you need control: post processing, culling mask, HDR settings, clear flags - author them directly on that Camera component |
You do not have to disable the authored camera yourself, and the demo scene ships it enabled so you can frame the shot in the Scene view. The director calls SetActive(false) on it in Awake, so it is asleep before the first frame renders and never fights your gameplay camera; it wakes on open and goes back to sleep on close. Assign the director to the controller's Camera Director slot, or just leave it in the scene - the controller finds it.
Director Settings
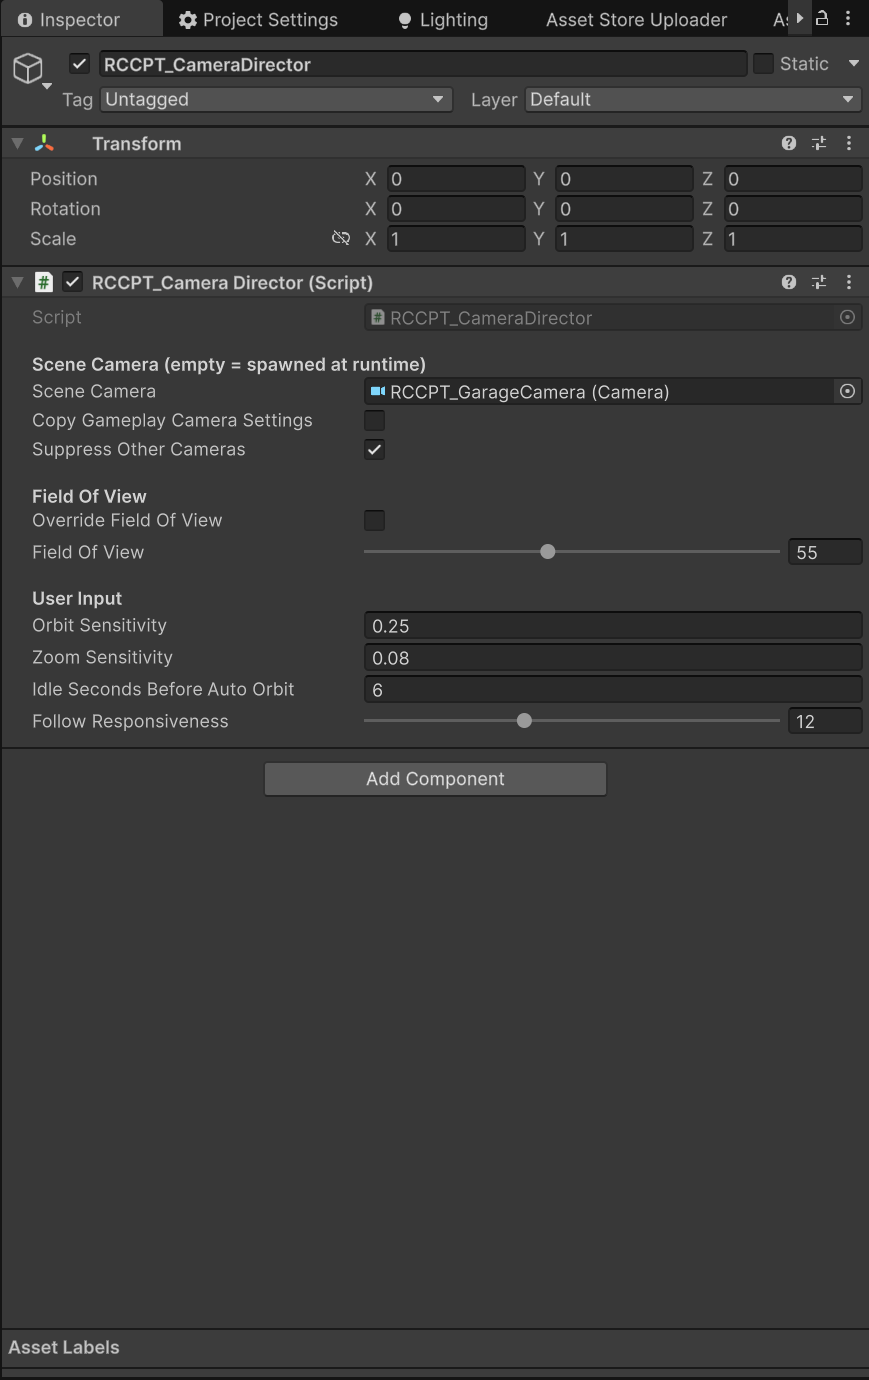
| Setting | Default | Description |
|---|---|---|
| Scene Camera | (empty) | Pre-placed garage camera. Empty = a camera is spawned at runtime, copying the gameplay camera's settings |
| Copy Gameplay Camera Settings | off | When a scene camera is assigned, still copy the gameplay camera's settings over it on takeover. Off = the scene camera keeps its authored settings |
| Suppress Other Cameras | on | While the garage is open, disable every other screen-rendering camera and every foreign AudioListener, then restore them on close. Cameras rendering into a Render Texture (mirrors, minimaps) are exempt. Turn it off only if your scene deliberately draws another camera on top of the garage |
| Override Field Of View | off | Use one fixed FOV for every shot instead of each shot's own value - the switch to flip if you just want to change the FOV globally |
| Field Of View | 55 (range 20-100) | The FOV used while the override is enabled |
| Orbit Sensitivity | 0.25 | Orbit degrees per pixel of pointer drag |
| Zoom Sensitivity | 0.08 | Zoom fraction applied per scroll step / pinch unit |
| Idle Seconds Before Auto Orbit | 6 | Seconds without input before idle-orbit shots start rotating |
| Follow Responsiveness | 12 (range 1-30) | How quickly the camera chases its target pose (higher = snappier, lower = floatier) |
Shots and the Shot Library
Three words do the work in this chapter, so pin them down first:
| Term | What it is |
|---|---|
| Category | One tab in the garage's left rail - Paint, Wheels, Engine and so on. There are 11 |
| Shot kind | A named framing slot - Overview, Front, FrontWheel, Hood... There are 10, and they are fixed by the RCCPT_ShotKind enum in code |
| Anchor | The world point a shot kind resolves to on the actual car - the bounds centre, a wheel model, the active spoiler |
The library maps category to shot kind; the shot kind then picks its anchor automatically on whatever vehicle is loaded.
A shot is one authored framing. The clever part: distances are expressed as multiples of the vehicle's bounds, so the same shot correctly frames a kart or a truck with zero per-vehicle setup.
The table below lists each field with the value a freshly added shot starts from (the shipped library authors different numbers per shot - open Resources/RCCPT_ShotLibrary_Default in the inspector to read them):
| Shot field | New-shot default | Meaning |
|---|---|---|
| Kind | Overview | Which auto-resolved anchor this shot frames (see below) |
| Distance Mul | 2.75 | Camera distance as a literal multiple of the vehicle's max bounds extent: distance = extent x distanceMul x zoom |
| Height Mul | 0.65 | Raises the camera above the shot pose. This is a weight, not a literal multiple like Distance Mul: the lift applied is extent x heightMul x 0.35, so 0.65 raises the camera by about 0.23 of the bounds extent, not 0.65 of it. The shot keeps aiming at its anchor, so higher values look down more |
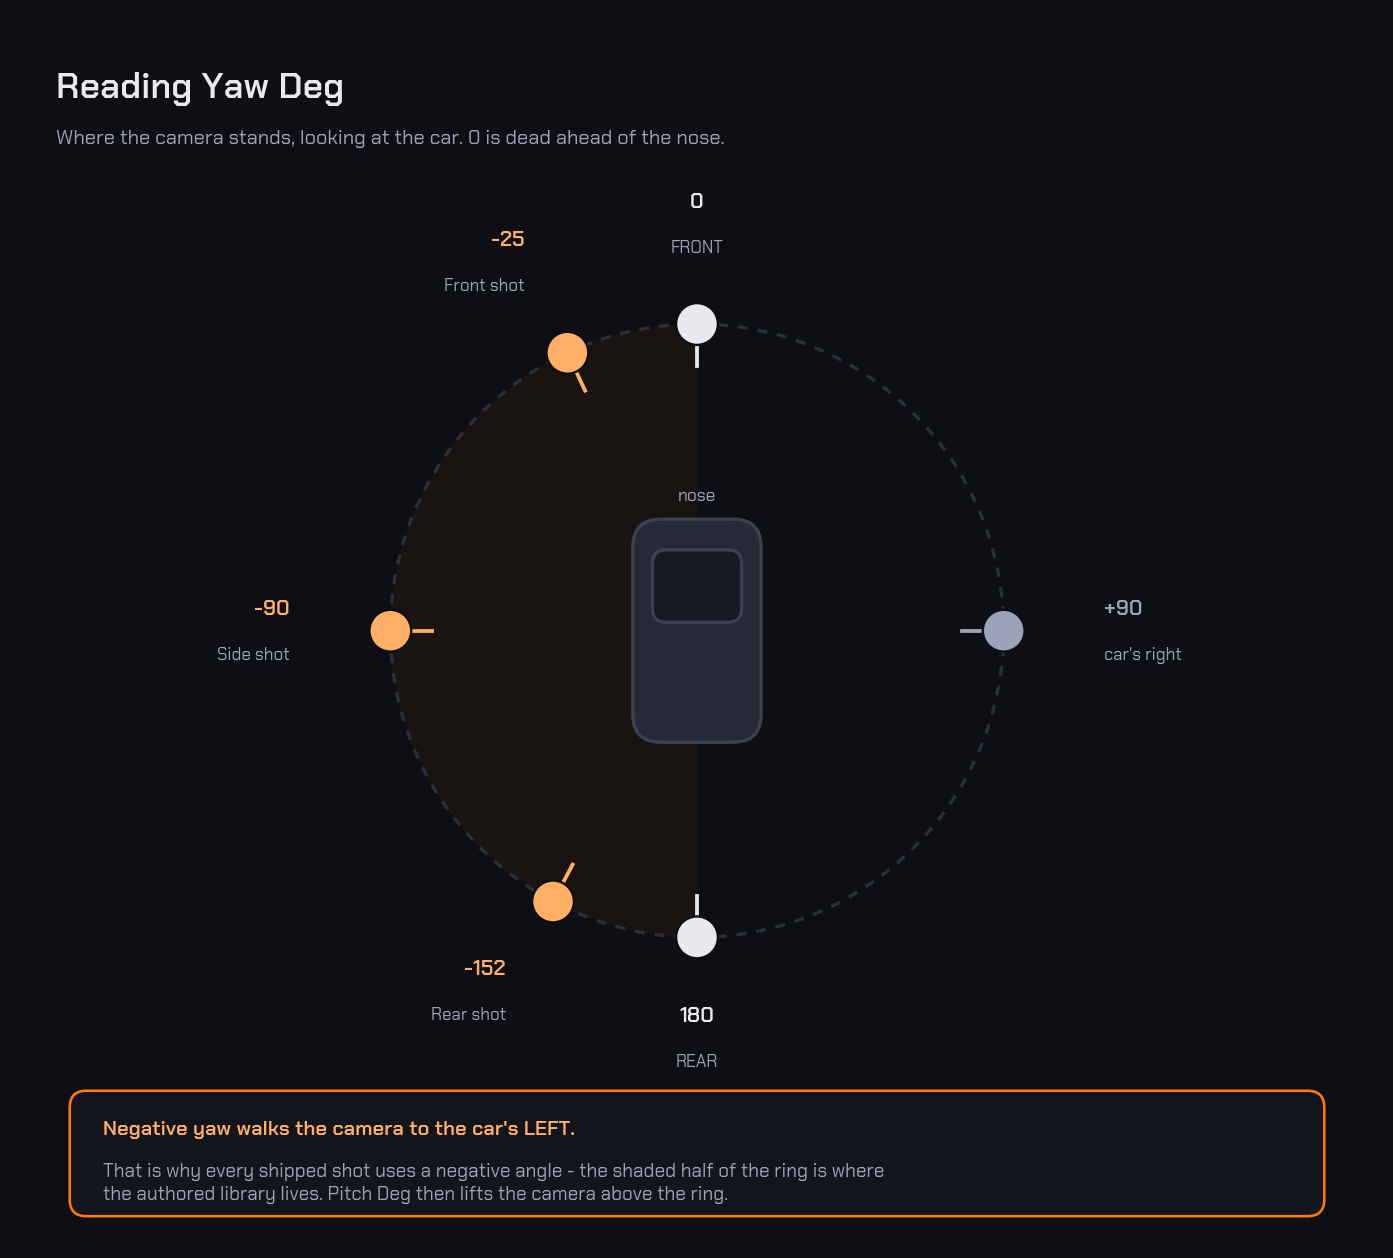
| Yaw Deg | -35 | Base yaw around the vehicle: 0 frames the front of the car, +/-180 the rear; negative values move the camera to the car's left side. See the diagram below |
| Pitch Deg | 12 | Base pitch (positive looks down) |
| Fov | 55 | Field of view for this shot |
| Orbit Yaw Range | -180 to 180 | How far the player may orbit around the base yaw |
| Orbit Pitch Range | -5 to 45 | Player pitch limits |
| Zoom Range | 0.6 to 1.6 | Player zoom multiplier limits on the shot distance |
| Blend Duration | 0.8 | Seconds to blend into this shot (unscaled) |
| Idle Auto Orbit | off | Slowly auto-orbit after the idle delay |
| Auto Orbit Speed | 4 | Idle orbit speed, degrees per second |
Yaw is the one value that trips everybody up, because 0 does not put the camera behind the car - it puts the camera in front of it, looking at its nose. This diagram is the whole rule:
Shots are collected in an RCCPT_ShotLibrary asset (Assets > Create > BoneCracker Games > RCCP Tuner > Shot Library) together with the category -> shot routing. Assign your library on RCCPT_Settings (project default) or the controller (per scene); the Settings inspector marks the slot with a status glyph and can find the asset for you with its Locate button, and the controller inspector shows which library each scene actually ends up using - see Editor Tools.
There are three fallbacks, and only the first two are gentle:
| What is missing | What happens |
|---|---|
| A category is not in the routing | That category is framed by the Overview shot |
| A shot kind is not in the library | Any category routed to it is framed by the Overview shot |
| No library resolves at all (no override, no project default) | Every category is framed by one built-in shot at the new-shot defaults above (distance 2.75, height 0.65, yaw -35, pitch 12, FOV 55), and switching categories no longer moves the camera at all |
⚠ That third case is silent - no error, no warning in the console, just a garage whose camera never reacts. If the camera feels dead, check the Shots row in the Tuner Controller inspector: it reads
none — the camera director uses built-in framingswhen nothing resolved.
An Overview shot is therefore load-bearing, because it is the target of the first two fallbacks. Author a library without one and every category that was relying on that fallback drops through to the built-in defaults instead - the categories you did route to authored shots still work, which is what makes the gap easy to miss. The library inspector flags a missing Overview as an error for exactly that reason.
What the Shipped Library Does
The default library (Resources/RCCPT_ShotLibrary_Default) authors 10 shots and routes all 11 categories like this:
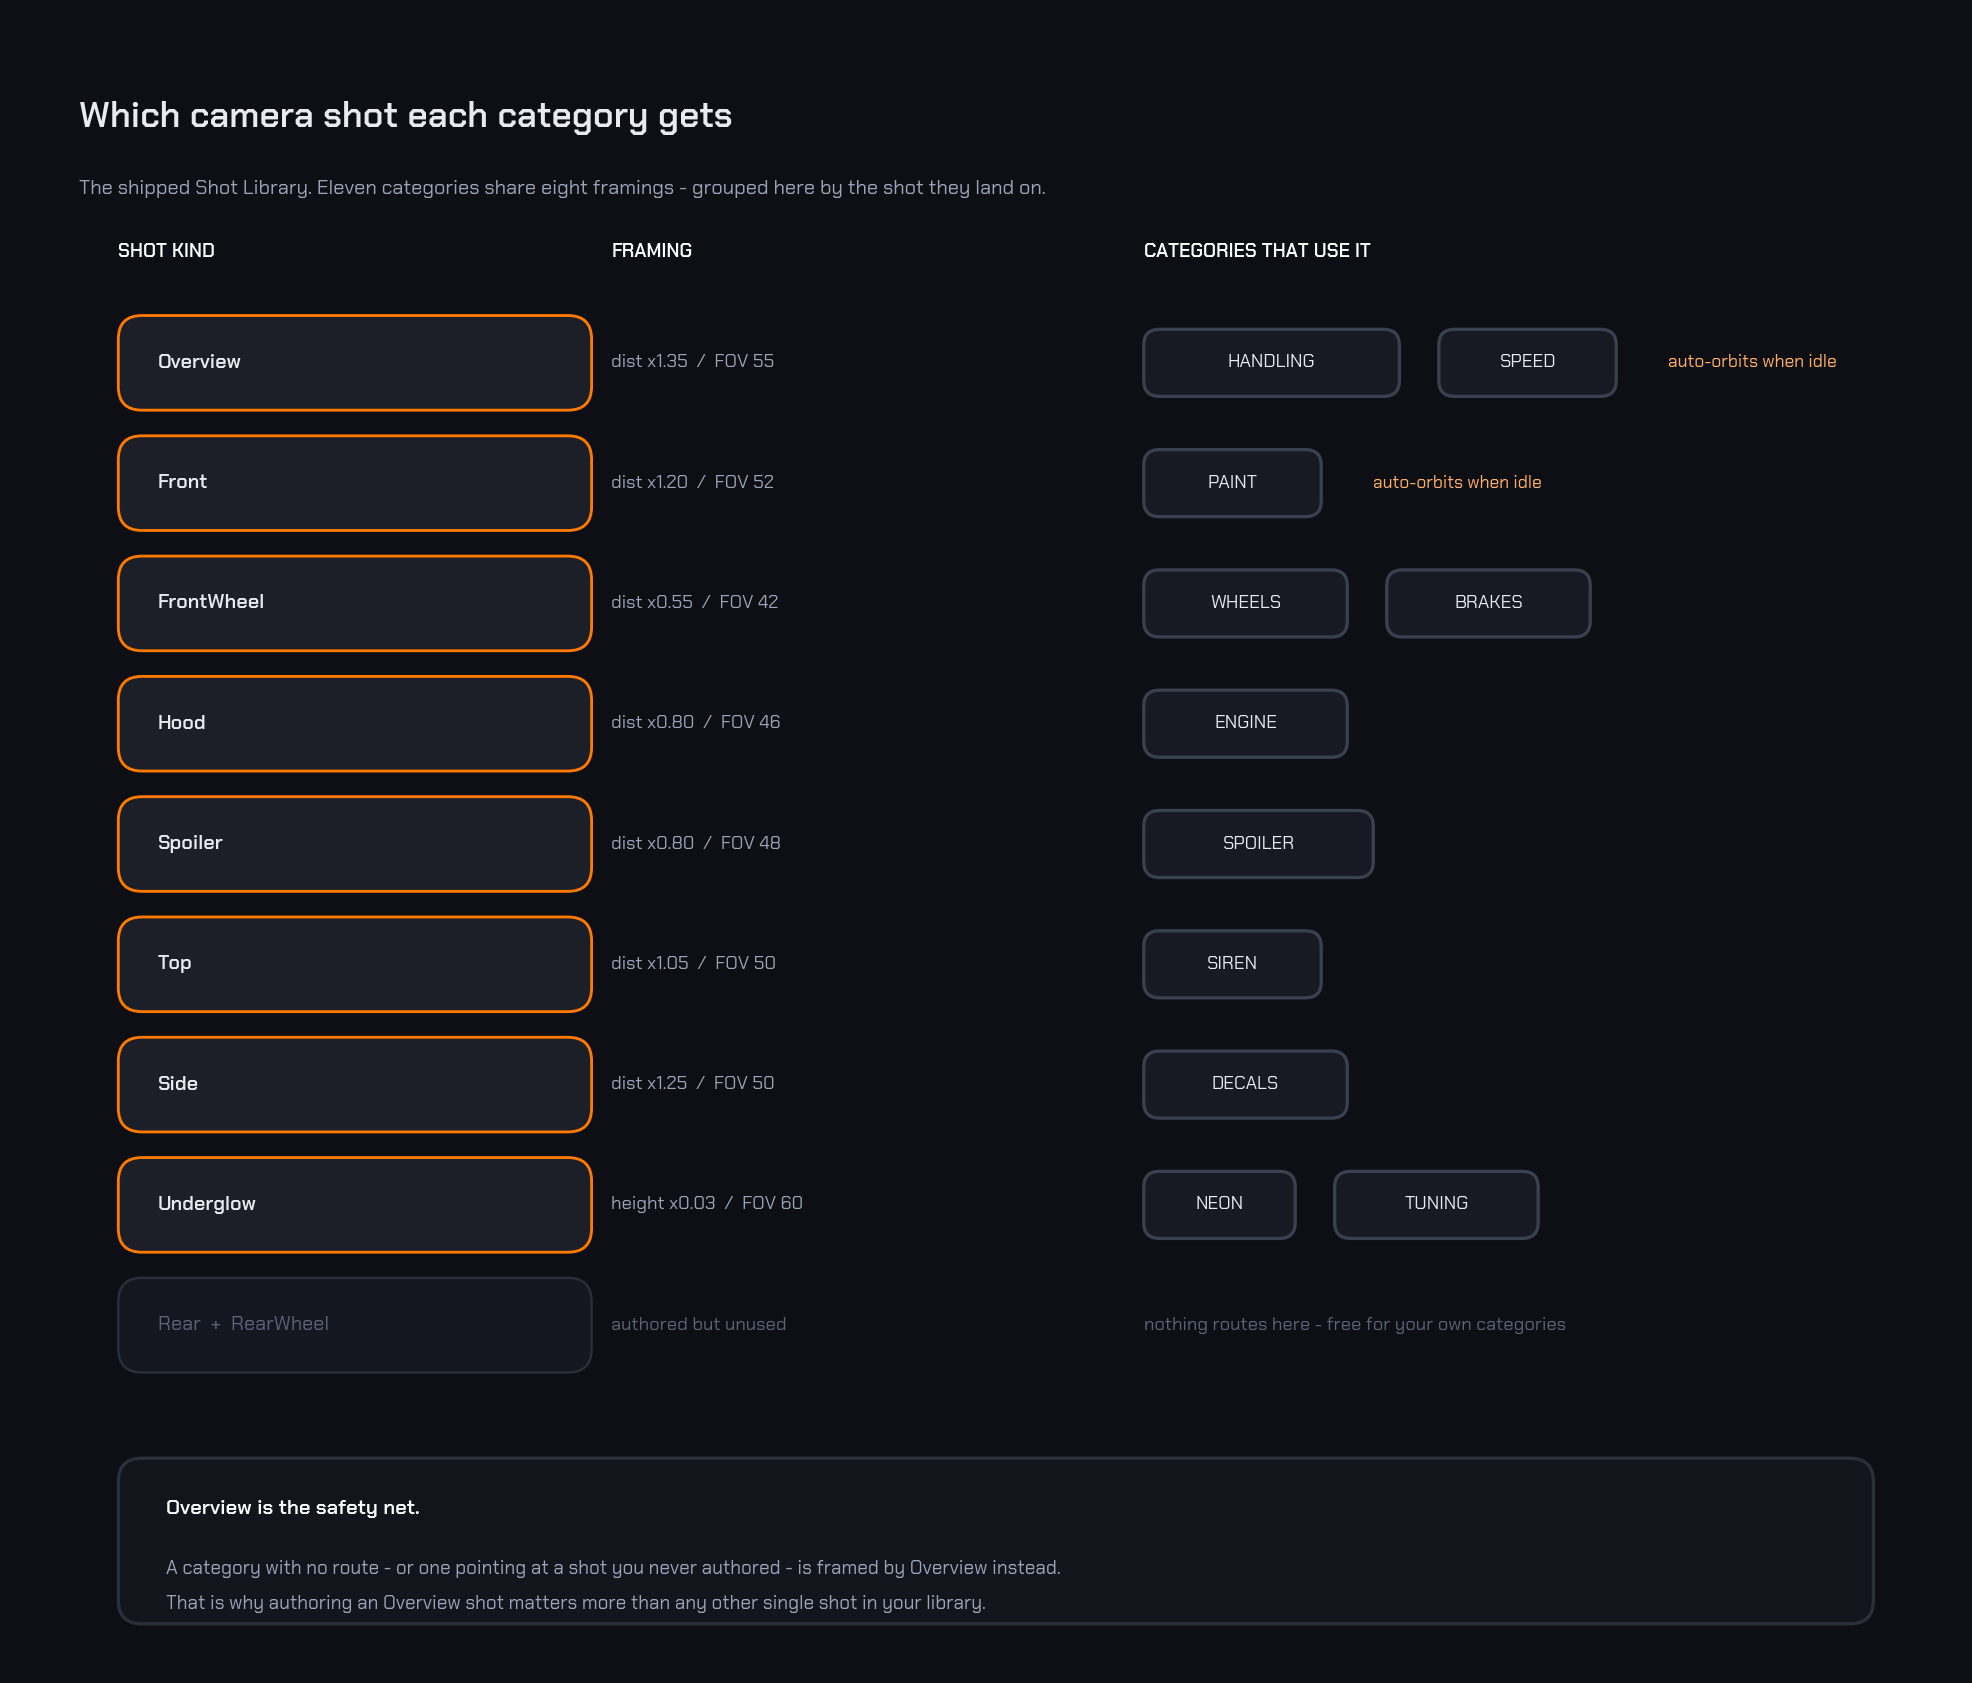
| Category | Shot | Character |
|---|---|---|
| Paint | Front | Front three-quarter, slow idle orbit |
| Wheels, Brake | Front Wheel | Low, close, at the actual front wheel |
| Engine | Hood | Over the hood |
| Handling, Speed | Overview | Wide three-quarter, slow idle orbit |
| Spoiler | Spoiler | Rear three-quarter at the active spoiler |
| Siren | Top | High look-down |
| Decal | Side | Broadside profile |
| Neon, Tuning | Underglow | Low and wide at the floor line |
Two things about that table are worth knowing before you author your own:
- Eleven categories collapse onto eight shots. The library authors ten, so Rear and Rear Wheel ship as spare framings that nothing routes to - they are there for you to point a category at.
- Only Overview and Front have Idle Auto Orbit switched on, which is why the car only starts turning by itself on the Paint, Handling and Speed tabs.
Where Shots Aim: Automatic Anchors
Each shot kind resolves its focus point on any RCCP vehicle automatically, with no per-vehicle setup. "Bounds" below means the combined world-space bounds of the vehicle's active mesh renderers:
| Shot kind | Aims at |
|---|---|
| Overview | The bounds centre |
| Front | Ahead of the centre, roughly at the nose |
| Rear | Behind the centre, roughly at the tail |
| Front Wheel | The front axle's actual wheel model transform, preferring the left wheel because the shipped shots orbit to the car's left. Falls back to the right wheel, then to a point derived from the bounds if the axle has no wheel model |
| Rear Wheel | The rear axle's wheel model, same preference and same fallbacks |
| Spoiler | The currently equipped spoiler object reported by RCCP's Spoiler Manager. With no spoiler fitted it falls back to the Rear anchor, raised |
| Underglow | A point just above the floor line, under the centre of the car |
| Top | The bounds centre (the shot's own high pitch does the looking-down) |
| Side | The bounds centre |
| Hood | Ahead of and above the centre, over the bonnet |
Two rules apply on top of the table:
- Bounds refresh on every shot change, so a wheel or spoiler swap that changes the car's silhouette re-frames correctly instead of using stale numbers.
- The camera never sinks below the vehicle's floor line, whatever the player does with orbit - so a low shot cannot end up rendering from under the showroom floor.
Per-Vehicle Fine-Tuning
For unusual vehicles (a limousine whose "spoiler" shot should frame something else, say), add the RCCPT_CameraAnchorOverride component to the vehicle and fill its rows: each row pairs a shot kind with a focus transform that wins over the auto-computed anchor for that kind. Vehicles without the component just use the automatic anchors.
Player Input
The invisible full-screen ViewportDrag layer behind the UI panels (component RCCPT_ViewportDrag) forwards input to the director: drag empty screen space (mouse or touch) to orbit, scroll or two-finger pinch to zoom - both clamped per shot. Pinch speed is tuned by Pinch Zoom Sensitivity on the ViewportDrag object (zoom units per screen-height of pinch travel, so it feels the same on every resolution); while two fingers are down the layer pinches only and never orbits. UI panels sit above it, so orbiting never fights buttons. After the idle delay, shots flagged with Idle Auto Orbit begin their slow rotation; any input pauses it again.
Recipe: Change the Whole Garage's FOV
- Select the
RCCPT_CameraDirectorin your scene (or add one). - Tick Override Field Of View, set Field Of View.
Done - every shot now uses that FOV, no library editing needed.
Recipe: Author a Custom Shot Set
- Assets > Create > BoneCracker Games > RCCP Tuner > Shot Library.
- Select the new asset. Its inspector opens on a Shot Coverage panel that reads out which of the ten shot kinds you have authored. Use its buttons rather than the raw list: Add Overview Shot (offered as an error while Overview is missing, because everything falls back to it) and Add Missing Shots append entries seeded with the new-shot defaults from the table above. Do not add rows with Unity's
+button - a hand-added list element arrives zero-filled, and a shot withDistance Mul0 puts the camera inside the car. - Tune each shot. Collapsed, every row titles itself with its own summary -
Front dist x1.2 · yaw -25° · FOV 52- instead of Unity'sElement 0..N, so you can audit a whole library without expanding anything. KeepDistance Mulbounds-relative thinking: around 0.55 is "right at a wheel", 1.35 is "the whole car with air around it". - Fill the Category Map - route each category you offer to a shot kind. The Category Routing panel below the coverage readout lists anything unrouted, anything pointing at a shot you never authored, and any category routed twice (only the first route is ever used). Full tour of the panel in Editor Tools.
- Assign the library on
RCCPT_Settings(or a controller's Shot Library Override), then confirm the Shots row in the controller inspector names your asset - an unassigned library is the silent third fallback described above. - Press Play and flip through categories to feel the framing; iterate.
Next Steps
- The garage's sound layer: UI Audio & Music.
- Driving the camera (and everything else) from code: Scripting API.