Editor Tools Reference
Everything RCCP Tuner adds to the Unity Editor, in one place: the menu items, the custom inspectors, and the one-click fixes they offer. You do not need to read this chapter front to back - it is a reference. Use it when you want to know what a button does before you press it.
Every menu item lives under one root:
Tools > BoneCracker Games > RCCP Tuner
The Menu Map
| Menu item | What it does | Watch out for |
|---|---|---|
| Welcome Window | Opens the install-status window (see below). | Opens by itself once ever on a machine - after that, use this menu item. |
| Setup > Install Bundled Realistic Car Controller Pro | Imports the copy of RCCP bundled with the Tuner, when RCCP is missing or older than the minimum. | One of only two items that appear before the Tuner has finished installing - if it and the Welcome Window are the only entries you see, RCCP is not in the project yet. |
| Setup > Create Tuner Canvas | Drops the RCCPT_TunerCanvas prefab into the open scene, wired and themed. |
Safe to re-run; it will not duplicate a canvas that is already there. |
| Setup > Add Vehicle Id To Selected Vehicle | Adds RCCPT_VehicleId (a stable save key) to the selected RCCP vehicle. |
Run it on the scene instance or in Prefab Mode - see Scene Setup. |
| Setup > Open Demo Scene | Opens the shipped showroom. | If the scene is missing it offers to build it. |
| Setup > Build Demo Scene | Rebuilds the showroom from scratch. | Destructive - read the warning below before using it. |
| Tools > Validate Catalogs | Checks your catalog set and prints a report to the Console. | Half the checks are skipped with no vehicle in the scene - see The Validator. |
| Tools > Generate Catalog Thumbnails From Selected Vehicle | Renders item icons from your real 3D models. | See Generating Item Icons. |
| Tools > Upgrade Tuner Canvas (Paint Studio) | Adds the Paint Studio panel to a canvas built before that feature existed. | Idempotent - running it twice changes nothing. |
| Tools > Upgrade Tuner Canvas (UI Audio) | Adds the Audio node to a canvas built before UI audio existed. |
Idempotent. See UI Audio & Music. |
| Documentation | Opens this documentation set in your browser. |
⚠ Build Demo Scene is destructive and cannot be undone. It asks first and lists exactly what it replaces: the showroom scene, the demo catalog assets under
Demo/Catalogs/, and the demo sky / floor materials. Asset writes are not covered by Ctrl+Z. If you have hand-edited any of those - including adding your own entries to the demo catalogs - they are gone. This is the reason the docs keep telling you to author content in your own catalog assets.
The Welcome Window
Three status rows tell you whether the install took:
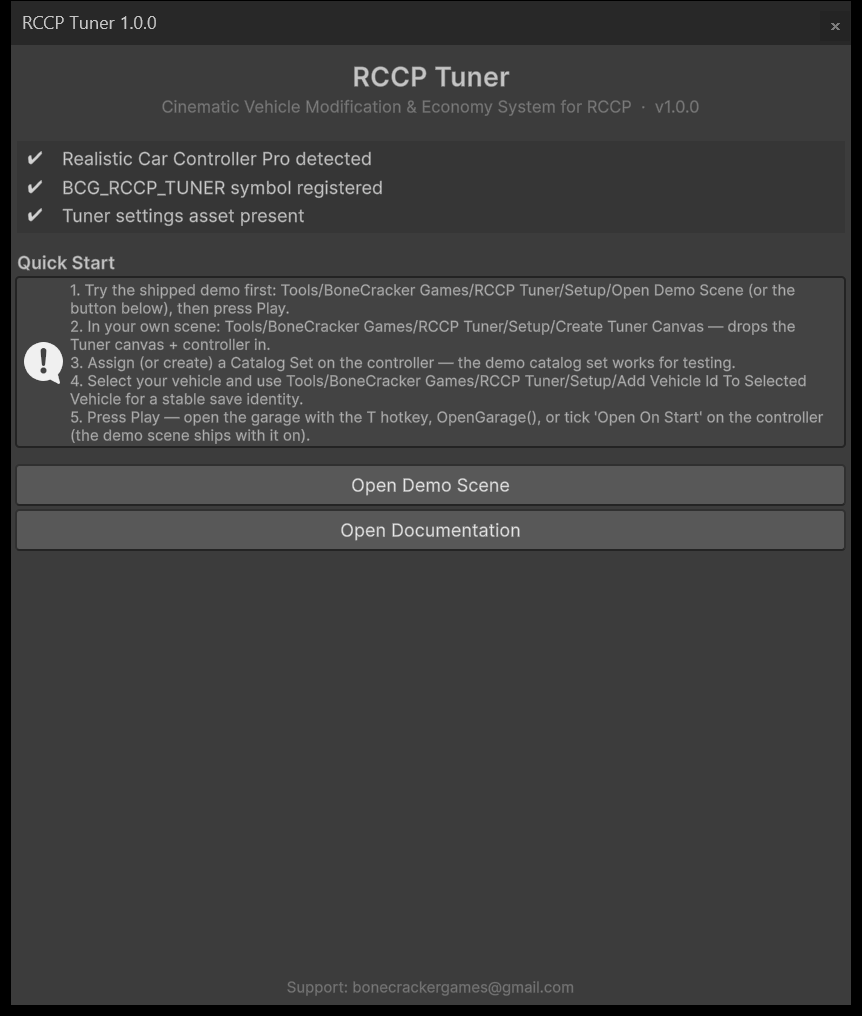
| Row | Green means |
|---|---|
| Realistic Car Controller Pro detected | RCCP's classes are actually compiled into the project right now, and its version is at least the required 3.0.0. The row also prints the detected version in brackets. |
BCG_RCCP_TUNER symbol registered |
The Tuner installed itself and its runtime code is compiled in |
| Tuner settings asset present | RCCPT_Settings was found at the expected place inside the install folder |
The first row does not simply read RCCP's scripting define. Defines are stored per build target and survive deleting the RCCP folder by hand, so a define only proves RCCP was here once. The Tuner looks for RCCP's compiled types instead, and reads
RCCP_Versionto compare against the minimum. That is why the row can show a cross on a project that still carries the define - and why an RCCP older than 3.0.0 shows a cross rather than a tick.
The window opens automatically once for the lifetime of the install on that machine - Unity stores the "already shown" flag per editor installation, not per project. Importing the Tuner into your second project will not pop it again. That is not a failed install; open it from the menu whenever you want it.
The Tuner Controller Inspector
This is the inspector you will look at most, and it changes depending on whether you are playing.
In Edit Mode: Setup Health
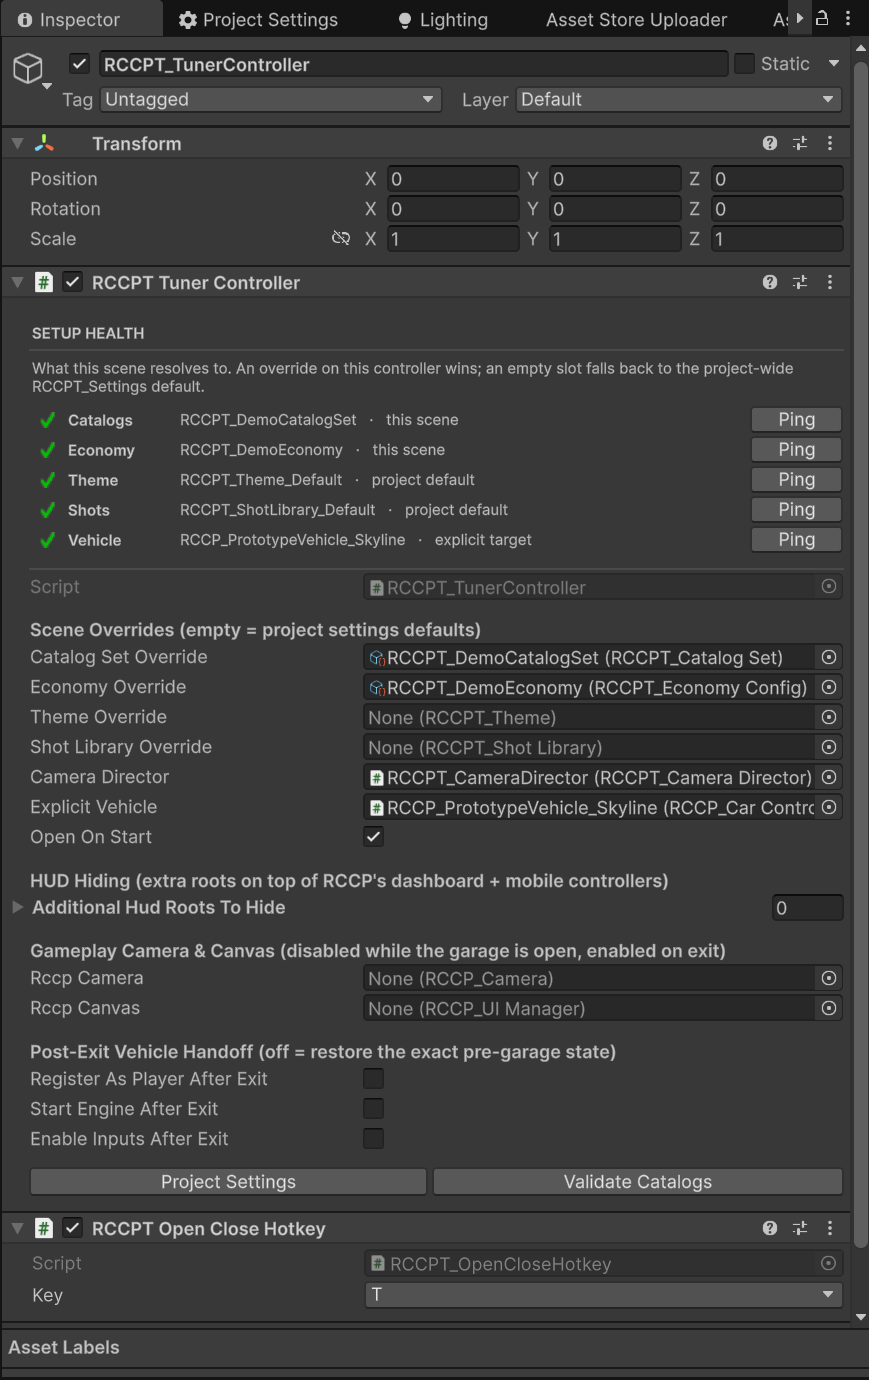
The block at the top answers one question the raw fields cannot: which asset is this scene actually going to use? Each of the four content slots is resolved for you, and each row tells you where the winner came from - this scene (you set an override here) or project default (it came from RCCPT_Settings).
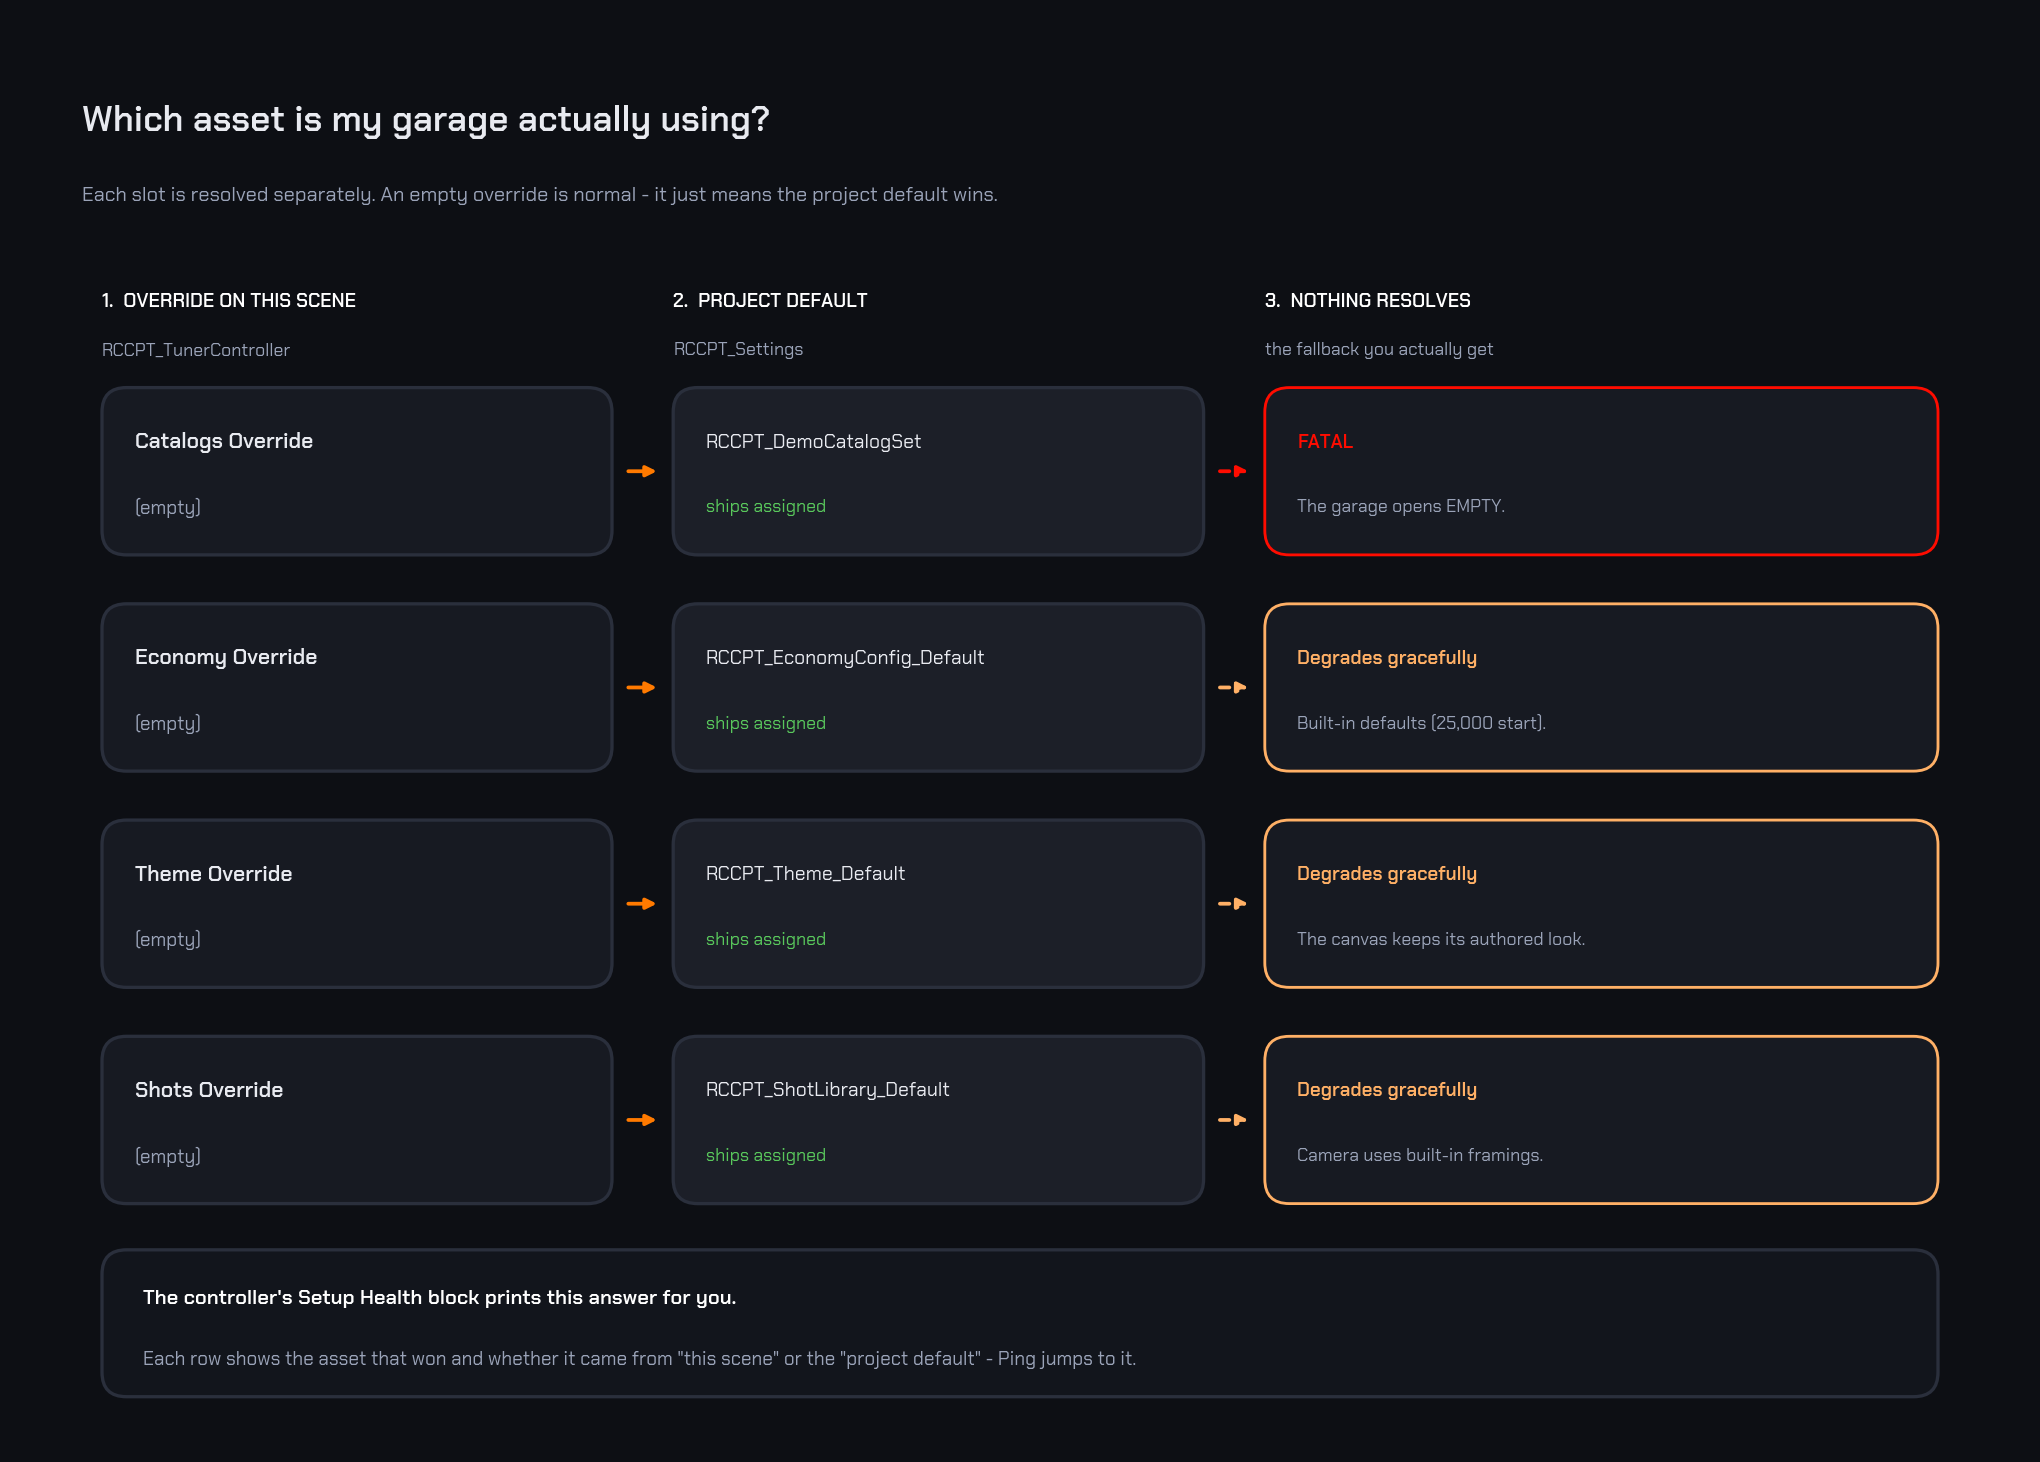
An empty override slot is the normal, healthy state. It does not mean anything is broken - it means the project default applies. The row's icon tells you the real story:
| Slot | If nothing resolves | Severity |
|---|---|---|
| Catalogs | The garage opens with nothing to buy | Error - this one actually breaks the garage |
| Economy | Built-in defaults (25,000 starting balance, authored prices) | Warning - degrades gracefully |
| Theme | The canvas keeps whatever look it was authored with | Warning - degrades gracefully |
| Shots | The camera uses built-in framings | Warning - degrades gracefully |
Each resolved row has a Ping button that highlights the asset in the Project window, so you can jump straight to the thing that won.
A fifth row shows which vehicle the garage will bind to. With no explicit target it reads "resolved at open: active player vehicle → first vehicle in the scene" - that is the actual runtime rule, not a guess.
Notices, With One-Click Fixes
When something is genuinely wrong the inspector says so and offers to fix it:
| Notice | Meaning | The button does |
|---|---|---|
| "N tuner controllers are loaded…" | You have more than one RCCPT_TunerController in the loaded scenes. The runtime binds to an arbitrary one, so their settings compete - with no error in the Console. Keep exactly one. |
Select All - selects every offender so you can delete the extras |
| "Without a catalog set the garage opens with nothing to buy…" | No catalog set resolves, here or in project settings | Locate Catalog Set - finds a catalog set in your project and assigns it |
In Play Mode: Live Session
While the game runs, the same inspector turns into a live readout plus a test panel - no code and no game UI required:
| Readout | Shows |
|---|---|
| State | Closed / Browsing / … |
| Vehicle | The bound car |
| Category | The open tab |
| Cart | How many items are staged and what they cost |
| Balance | The wallet, formatted the way the game formats it |
There is also a warning line when un-purchased work is staged, and four buttons:
| Button | What it does |
|---|---|
| Open Garage / Close Garage | Opens or closes the garage. Closing with a staged cart asks first. |
| Add \<amount> | Grants the economy config's debug reward - the same amount as the in-game + button. |
| Reset To Stock | Factory-resets the bound vehicle's RCCP loadout. Ownership is kept. Disabled while the garage is closed, because the call does nothing then. |
| Reset Progress | Wipes the whole economy save - balance, ownership, unlocks - and reseeds the starting balance. Asks first. RCCP loadouts are untouched. |
Reset Progress is the button you want when you change the Starting Balance and wonder why the player still has the old amount: existing saves keep their balance, and this wipes them.
Footer Buttons
Two shortcuts sit at the bottom of the inspector in both modes:
- Project Settings - selects the
RCCPT_Settingsasset. This is the easiest way to reach it; there is no menu item for it. (The other route isAssets/RCCP Tuner/Resources/RCCPT_Settings.assetin the Project window.) - Validate Catalogs - runs the same check as the menu item, without hunting for it.
The Project Settings Inspector
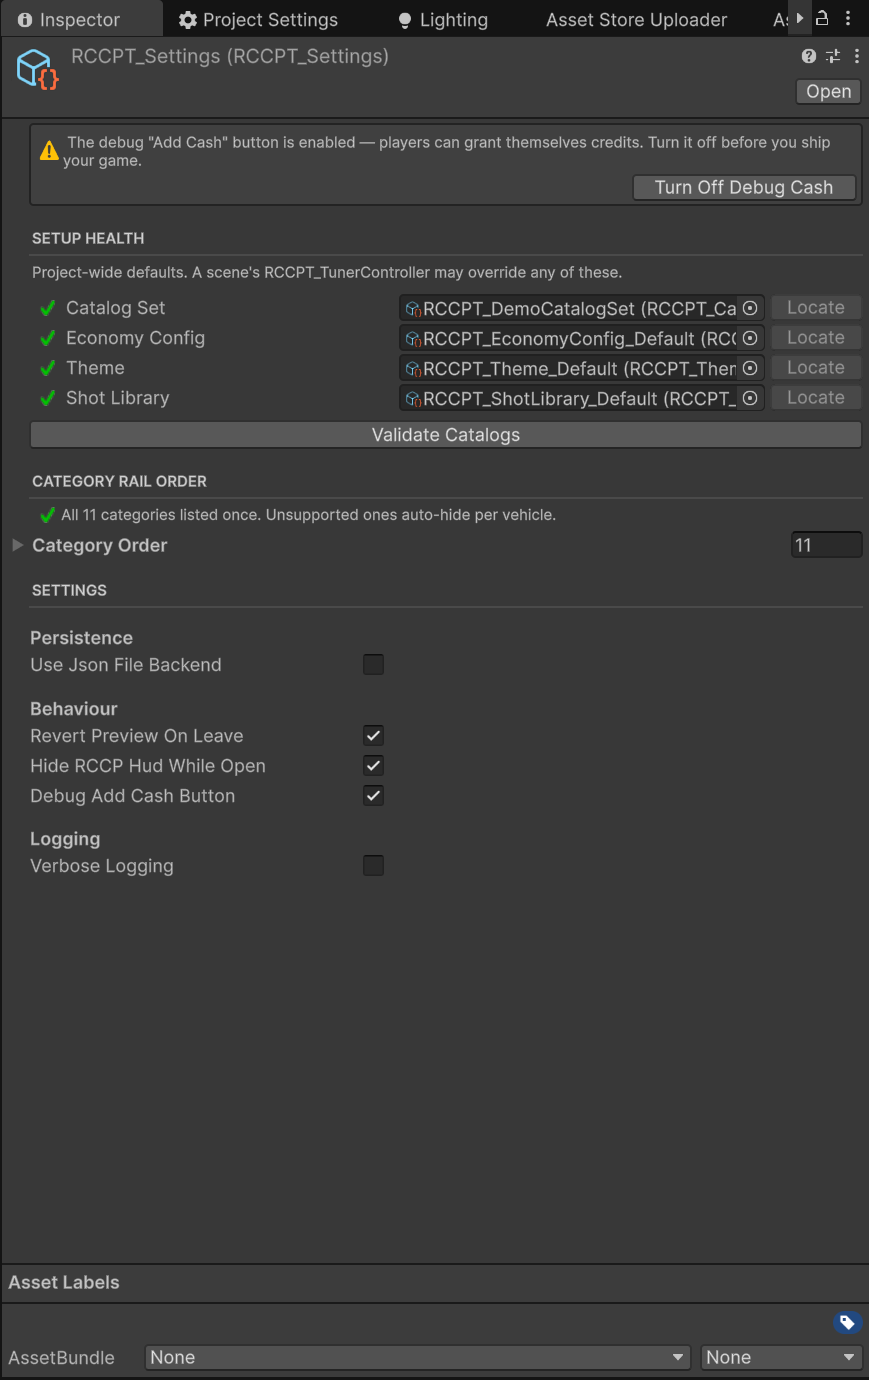
RCCPT_Settings holds the project-wide defaults and four switches that are easy to miss.
| Setting | Default | What it controls |
|---|---|---|
| Use Json File Backend | off | Saves to a JSON file instead of PlayerPrefs. Not WebGL-safe. |
| Revert Preview On Leave | on | Un-purchased previews revert when the garage closes. Recommended. |
| Hide RCCP Hud While Open | on | Hides RCCP's dashboard and mobile controls while shopping. Turning this off also disables the controller's Additional Hud Roots To Hide list. |
| Debug Add Cash Button | on | Shows the free-credits + button next to the wallet. Turn it off before you ship. |
| Category Order | all 11 listed | The order of the category rail - see below |
| Verbose Logging | off | Reserved for extra informational logging |
Ship-Readiness Notices
The inspector warns you about the settings that should not reach players, and fixes them in one click:
| Notice | Button |
|---|---|
| "The debug "Add Cash" button is enabled — players can grant themselves credits. Turn it off before you ship your game." | Turn Off Debug Cash |
| "Verbose logging is enabled — the Tuner will write informational lines to the player console." | Turn Off Verbose Logging |
| "The JSON file backend is not WebGL-safe and the active build target is WebGL. Saves will not persist." | Switch To PlayerPrefs |
The WebGL notice only appears once your active build target actually is WebGL, so do not expect to see it while building for desktop.
Category Rail Order
Category Order is the rail's running order, and nothing else in the docs will tell you it exists. Move an entry to move the tab; delete an entry and that category never appears in any scene. Categories the vehicle does not support still hide themselves automatically on top of this.
The inspector checks the list for you and reports either "All 11 categories listed once. Unsupported ones auto-hide per vehicle." or a warning naming what is missing or duplicated, with a Rebuild Order button that repairs it.
The Catalog Set Inspector
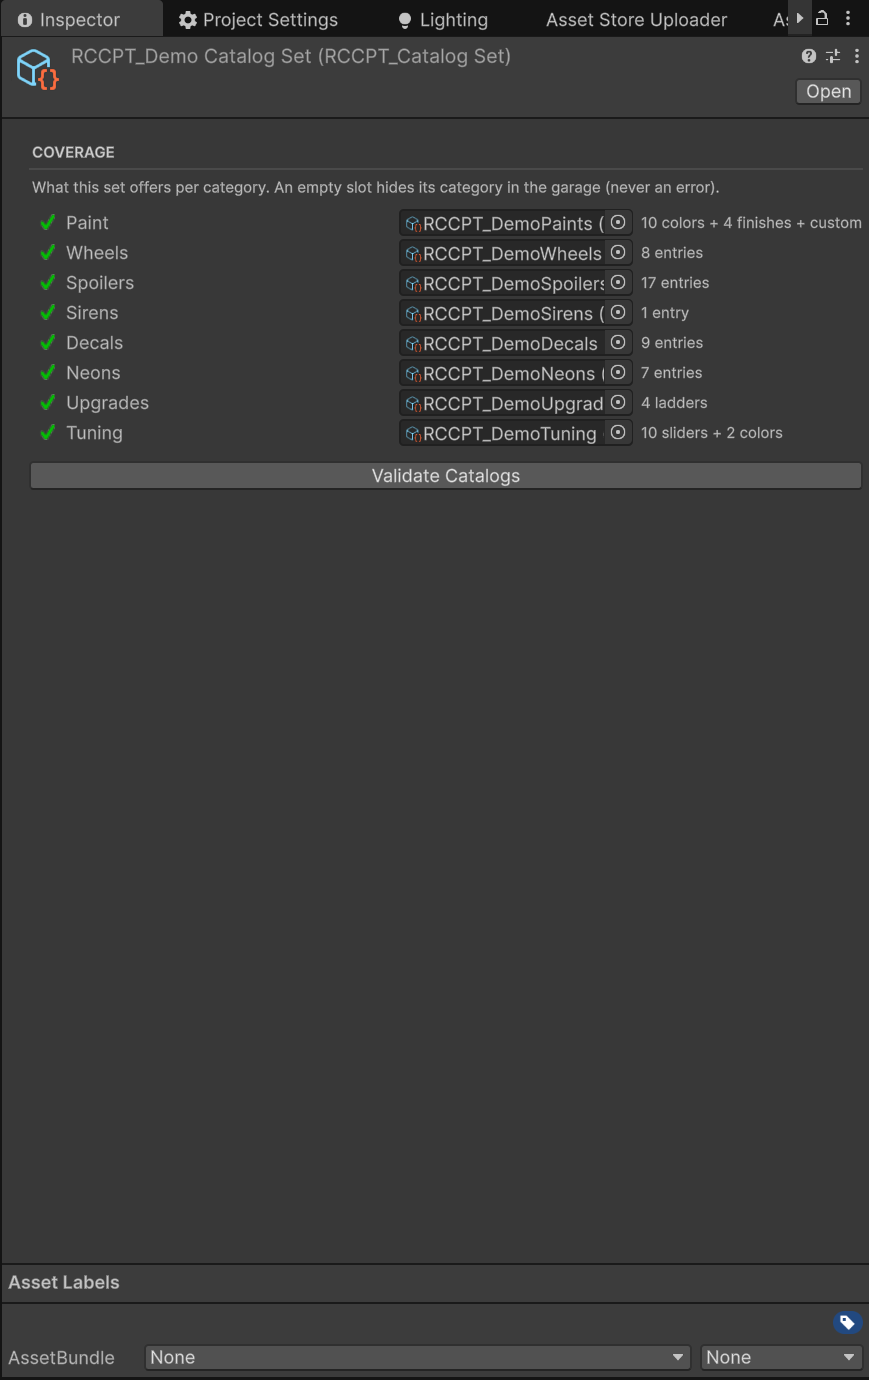
The Coverage block turns eight object fields into an answer to "did my content actually take?", without entering Play Mode. Each slot shows a status icon and a one-line summary of what is inside:
| Slot | Summary looks like |
|---|---|
| Paint | 10 colors + 4 finishes + custom |
| Wheels / Spoilers / Sirens / Decals / Neons | 8 entries, or empty — nothing to offer |
| Upgrades | 4 ladders, or 3/4 ladders intact when a rung is missing or zero |
| Tuning | 10 sliders + 2 colors |
The panel states the rule in its own header: an empty slot hides its category in the garage, and that is never an error. Only when every slot is empty does it escalate to an error, because then the garage has nothing at all to show.
A Validate Catalogs button sits at the bottom of the same inspector.
Content-Titled List Rows
Unity normally shows list entries as Element 0, Element 1, … The Tuner replaces those headers with the entry's actual content, so you can audit a 17-entry spoiler catalog without expanding anything:
| List | Collapsed row reads |
|---|---|
| Catalog entries | Bayside Blue 2,600 (paint rows also draw a colour chip at the end of the row) |
Stock FREE · stock |
|
Decal 0 500 · Decal_0, or NO MATERIAL when the reference is missing |
|
Matte 1,600 · met 0.1 · smooth 0.35 |
|
| Tuning slider rows | Front Camber -10 … 5, plus · HIDDEN when the row is disabled |
| Camera shots | Front dist x1.2 · yaw -25° · FOV 52 |
| Camera anchor overrides | UNSET — row is ignored when nothing is assigned |
NO MATERIAL and UNSET are the two labels worth scanning for - both mean that row will silently do nothing at runtime.
The Economy Inspector
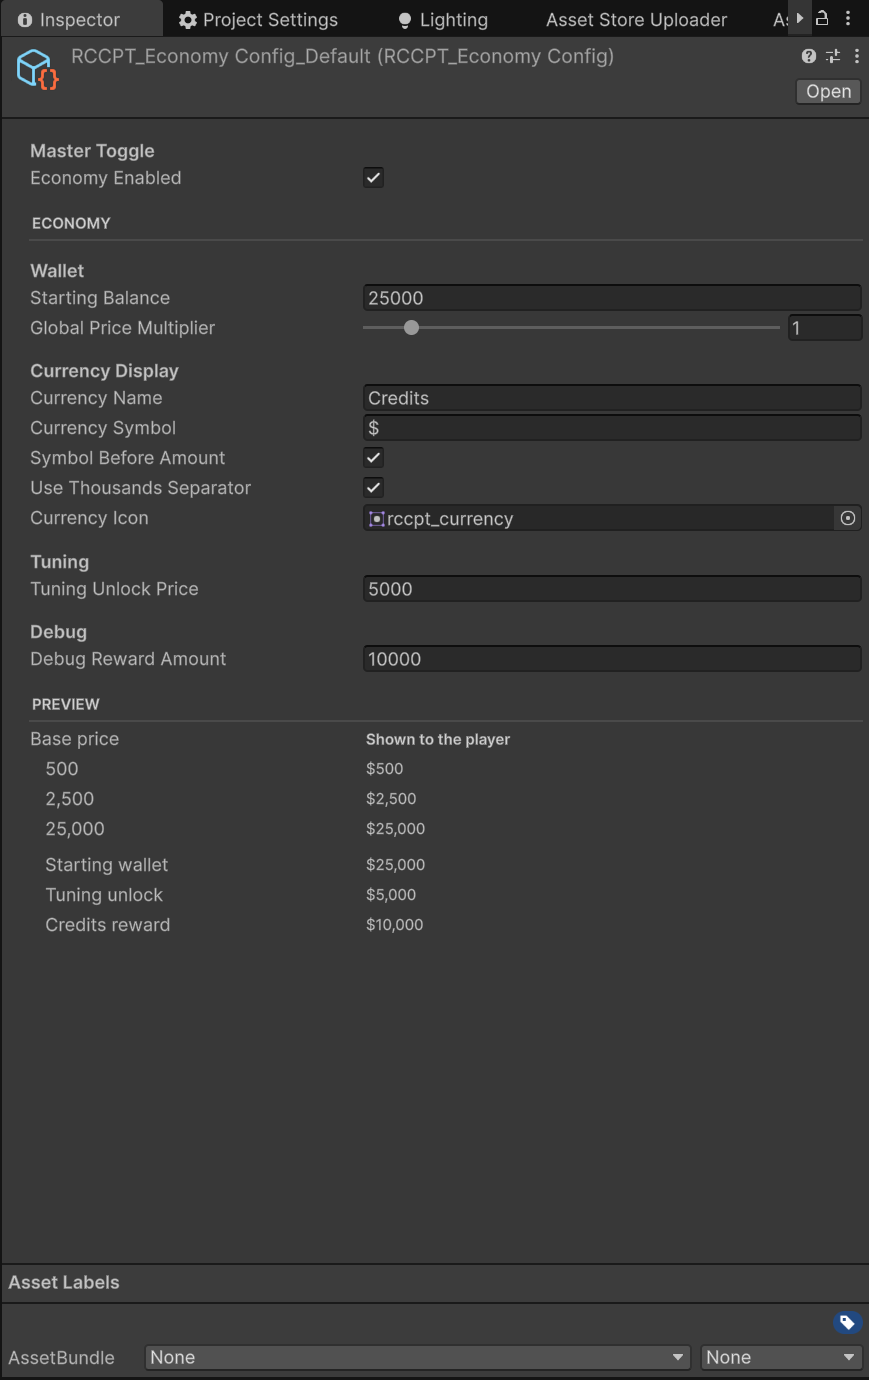
Beyond the fields (Prices & Economy covers what they mean), this inspector adds:
- A Preview block that runs your real settings over sample prices and prints the exact strings the player will see - plus the starting wallet, the tuning unlock and the debug reward. Currency symbol, separator and multiplier interact in ways you cannot picture from the raw fields; this shows the result without entering Play Mode.
- A warning when Global Price Multiplier is 0, because that silently makes everything free while the economy still reads as enabled, with a Reset To 1 button.
- When Economy Enabled is unticked, the rest of the asset greys out and the panel explains that every item now reads as owned and free, and all wallet UI hides.
The Shot Library Inspector
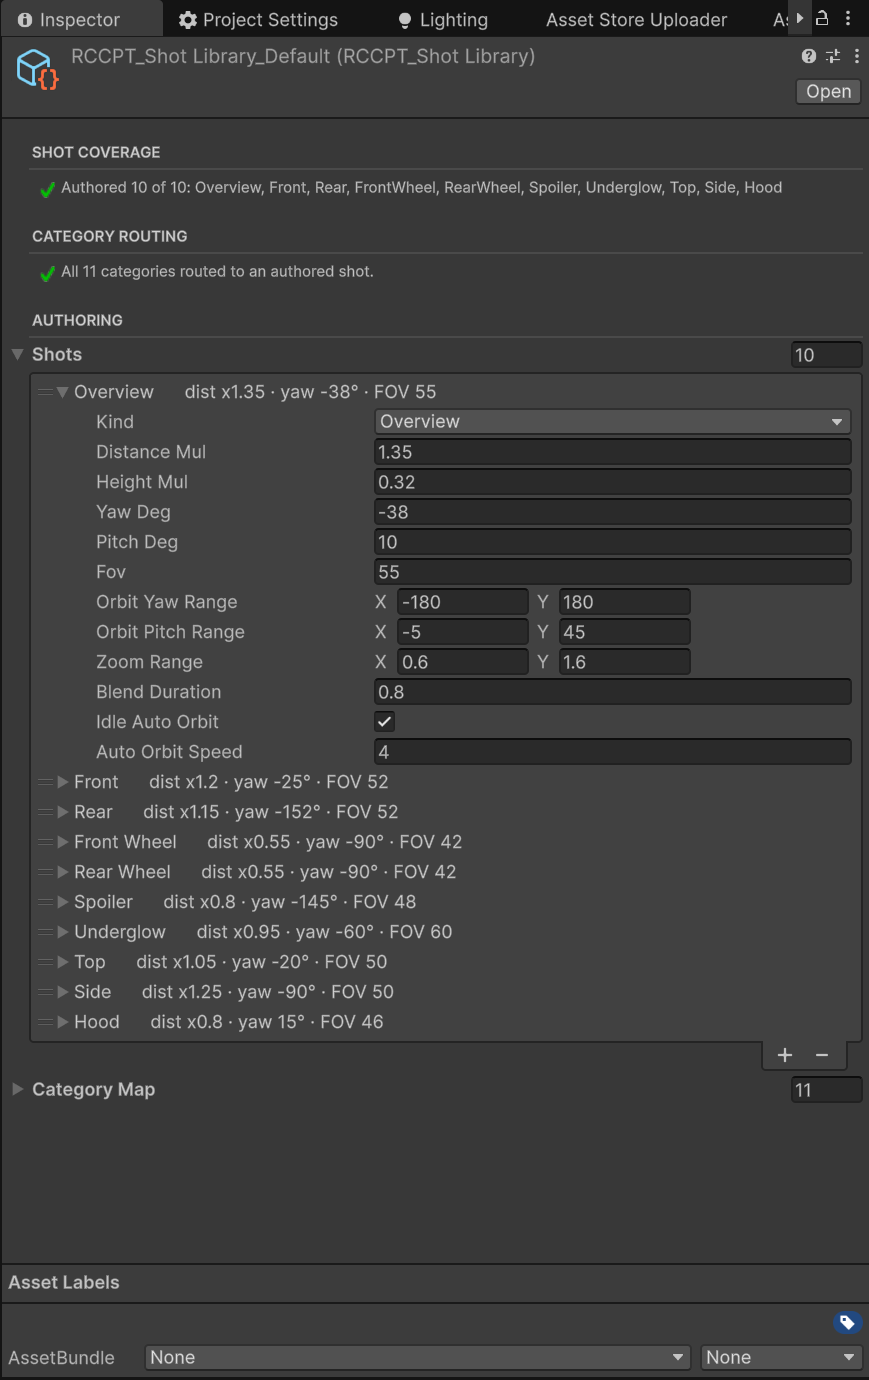
Camera authoring is the least intuitive part of the Tuner, and this inspector does the reasoning for you. A healthy library reports Authored 10 of 10 and All 11 categories routed to an authored shot, and every repair button stays out of your way.
Shot Coverage reports which of the ten shot kinds you have authored, and offers:
| Situation | Button |
|---|---|
| No Overview shot authored - and Overview is the fallback for every other kind, so everything would use built-in framing | Add Overview Shot |
| Some kinds not authored (they fall back to Overview) | Add Missing Shots |
| A kind authored twice - only the first is ever used | Remove Duplicates |
Category Routing does the same for the category → shot map: it names categories that are unrouted, routes that point at a shot you never authored, and duplicate routes.
Use Add Missing Shots rather than pressing + on the list. A hand-added Unity list element arrives zero-filled, which would put the camera inside the car; the button seeds a proper starting shot instead.
The Theme Inspector
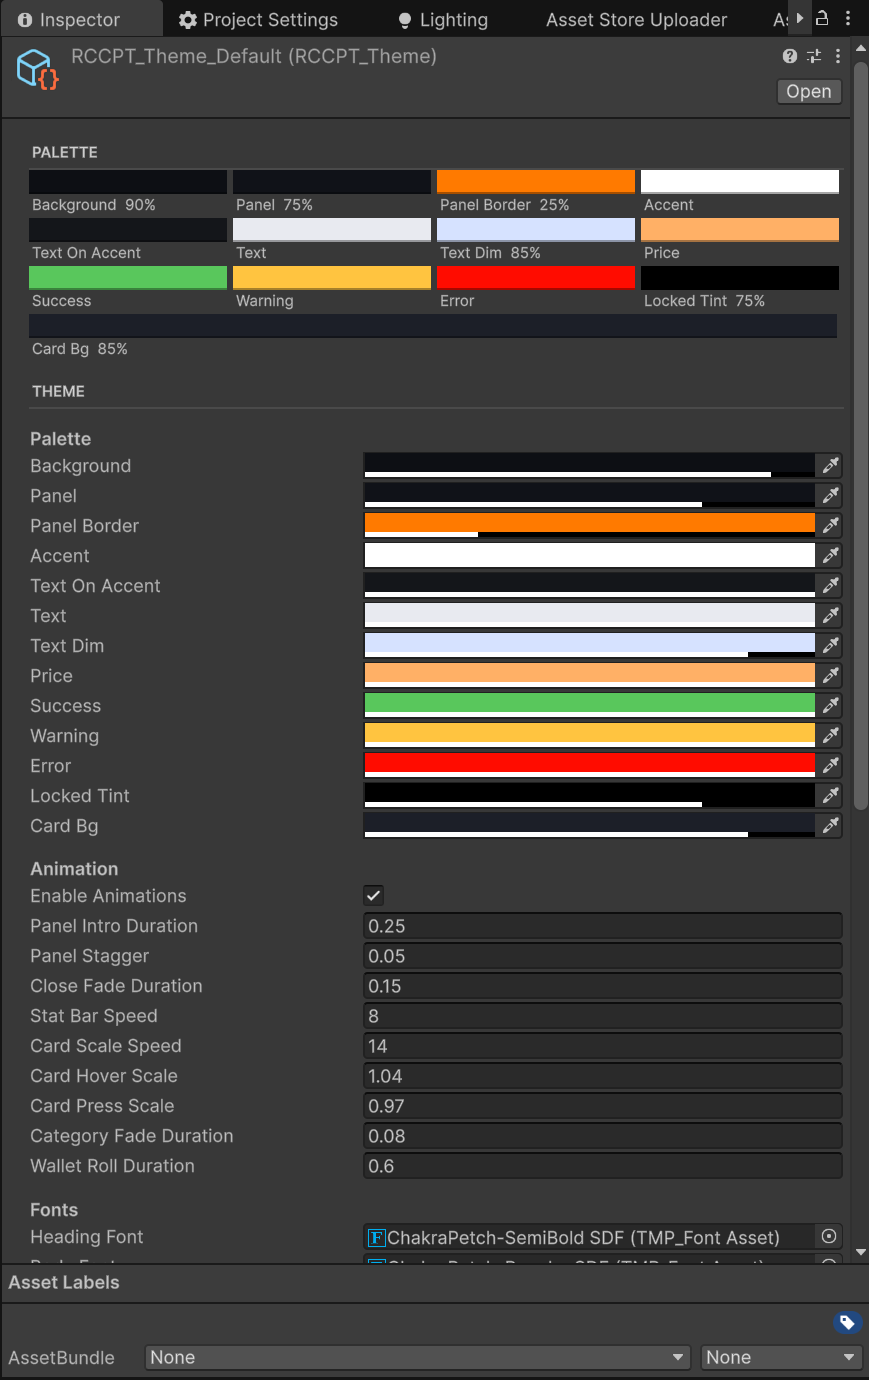
- A Palette strip previews every colour in the theme as a labelled swatch, so you can see the scheme instead of reading hex. Colours that are not fully opaque also print their alpha (
Panel 75%); fully opaque ones just show the name. - Category Icons is drawn with each slot labelled by its category name - drop a sprite next to "Spoiler" instead of counting to element 6. If the array length ever drifts from the number of categories, a warning with a Resize To 11 button appears.
Generating Item Icons
Tools > BoneCracker Games > RCCP Tuner > Tools > Generate Catalog Thumbnails From Selected Vehicle
Blank grey cards are the number-one cosmetic complaint when you first author your own catalog. You do not have to draw icons: this tool renders them from the actual 3D models, in Edit Mode, through your project's own render pipeline - so a card looks like the part looks in game.
Before you run it:
- Select a vehicle in the Hierarchy that has an
RCCP_Customizer(the demo showroom car works). - Make sure the catalog set you want to fill is the one that resolves - the tool writes into the scene controller's catalog set, or failing that the project default on
RCCPT_Settings.
⚠ Check which catalog set that is before you press the button. On a fresh project the project default is the demo catalog set, and Build Demo Scene regenerates those assets - so icons written there can be wiped later. Assign your own catalog set on the scene's
RCCPT_TunerControllerfirst.
What it asks. A three-way dialog protects icons you assigned by hand:
| Button | Effect |
|---|---|
| Keep Them (fill empty only) | Only entries with no icon get one. Your hand-picked icons are untouched. |
| Overwrite All | Every wheel / spoiler / siren entry is re-rendered. |
| Cancel | Nothing happens. |
What it covers:
| Category | Source of the model | Notes |
|---|---|---|
| Wheels | RCCP's project-global changeable-wheels list | Same for every car in your project |
| Spoilers | The selected vehicle's spoiler objects | Car-specific |
| Sirens | The selected vehicle's siren objects | Car-specific |
Paint, decal, neon, upgrade and tuning entries are not processed - paint draws colour swatches instead of icons, and decals/neons use their own artwork.
Things worth knowing:
- Output is 256 x 256 PNG with a transparent background, written to
Demo/Thumbnails/inside the install folder and imported as sprites automatically. - Entries whose index is -1 are skipped - that is your "Stock" wheel and "No Spoiler" entry. They are meant to have no icon.
- It is cancellable, and anything already rendered stays.
- ⚠ Because spoilers and sirens come from the vehicle you had selected, those icons are only as universal as that car. In a multi-car game, generate per car into per-car catalogs, or accept that the icon shows one car's part.
The Validator
Tools > BoneCracker Games > RCCP Tuner > Tools > Validate Catalogs checks the resolved catalog set against the open scene's vehicle and prints a full report to the Console, with a summary dialog.
⚠ The validator needs a vehicle in the open scene. With no RCCP vehicle loaded it skips every vehicle-dependent check - indices, decal/neon materials, category support - and still reports Errors: 0. The dialog says so ("No vehicle in scene — vehicle-dependent checks skipped."), but a green result from an empty scene is not proof your catalogs are shippable.
| Severity | What it checks |
|---|---|
| Error | Wheel / spoiler / siren index out of range · decal or neon material not present in the vehicle's manager array · an upgrade ladder with fewer than 5 rungs · an upgrade rung with no price · an entry with no price that is not marked Is Free · an empty entry id (in memory, or empty on disk) |
| Warning | Content authored for a category the vehicle or render pipeline cannot support (the panel auto-hides) · the vehicle supports a category but nothing is authored · finishes authored but the body shader exposes no metallic/smoothness · an upgrade level with no description · no upgrade catalog at all |
Errors break purchases and should be fixed before shipping. Warnings are honesty notices about content that will not appear.
"entry id(s) EMPTY ON DISK"
This error deserves its own note because the fix is unusual. Entry ids are auto-filled in the editor, but a player build cannot fill them - an entry whose id was never saved to disk can never be purchased in a build.
To fix it:
- Select the flagged catalog asset in the Project window.
- Change any field (re-type a Display Name, for instance) so Unity marks the asset dirty.
- File > Save Project.
Re-run the validator to confirm.
Empty Slots and the "Locate" Button
Wherever the Tuner asks for an asset reference, an empty slot shows a status icon and a Locate button that searches your project and assigns the best match. Its preference is simple: assets inside the RCCP Tuner folder win, and names ending _Default win. If several candidates exist it logs which one it picked, so double-check the choice if you have authored your own.
If no asset of that type exists yet, it tells you to create one via Assets > Create > BoneCracker Games > RCCP Tuner.
Next Steps
- Author the content these tools check: Creating Items.
- Diagnose a garage that misbehaves: Troubleshooting & FAQ.