Installation
This page walks you through getting Traffic Overtaker from a freshly imported package to a playable build. Because Traffic Overtaker is a complete project (not a drop-in library), the goal of installation is not to wire components together by hand — it is to confirm the environment matches the project's requirements, let the one-time editor bootstrap run, and add the scenes to Build Settings so the menu-to-gameplay flow works. Most of this is automated by the Welcome Window, which opens by itself the first time the editor compiles the project. Follow the steps below in order and you will have the game running within a couple of minutes.
Requirements
Traffic Overtaker ships pre-configured for a specific Unity environment. The project was authored and verified on the versions in the table below; opening it on a meaningfully older editor (for example a Unity 2022 LTS) will trigger an API-upgrade pass and is not supported. The render pipeline, color space, and input backend are already set in the project's ProjectSettings, so you do not configure them manually — but you should confirm they survived your import, especially if you dragged the Assets/TO/ folder into an existing project rather than opening this project directly.
| Requirement | Value | Notes |
|---|---|---|
| Unity Editor | 6000.3.6f1 (Unity 6) |
The version the project was built and verified on. |
| Render pipeline | Universal Render Pipeline (URP) | URP assets and renderer are pre-assigned in Graphics settings. |
| Color space | Linear | Required for the lighting and post-processing to look correct. |
| Input backend | New Input System | Used for both desktop and mobile controllers. |
| UI text | TextMeshPro | Font assets and SDF atlases ship with the project. |
| Scripting define | BCG_TO |
Set automatically on first load (see below). |
| Physics engine | Realistic Car Controller Pro (RCCP) | Bundled — do not import RCCP separately. |
The physics engine is bundled — do not import RCCP
Traffic Overtaker uses Realistic Car Controller Pro (RCCP) as its vehicle physics layer, and a full copy lives under Assets/TO/Realistic Car Controller Pro/. You do not need to own or import RCCP from the Asset Store — importing a second copy on top of the bundled one will produce duplicate-type compile errors. Every RCCP class keeps its original RCCP_ prefix (the game's own code uses the TO_ prefix instead), so the two are easy to tell apart in the Project window. If you ever update the bundled RCCP, re-check the two small non-stock patches noted in the project documentation, because a package update will overwrite them.
First-time setup: the Welcome Window
The first time Unity compiles the project, an editor bootstrap class named TO_InitOnLoad runs through EditorApplication.delayCall. It checks whether the BCG_TO scripting define is present; if it is missing (the signal that this is a fresh import), it calls TO_SetScriptingSymbol.SetEnabled("BCG_TO", true) — which adds the define for the Standalone, Android, iOS, and WebGL build targets — and then opens the Welcome Window. Adding the define forces one more domain reload, after which all #if BCG_TO guarded code is live. The same bootstrap also runs CheckPlayerVehicles(), which validates and, if needed, repairs the TO_Player setup on every roster prefab, so a freshly imported car is play-ready without manual fixing.
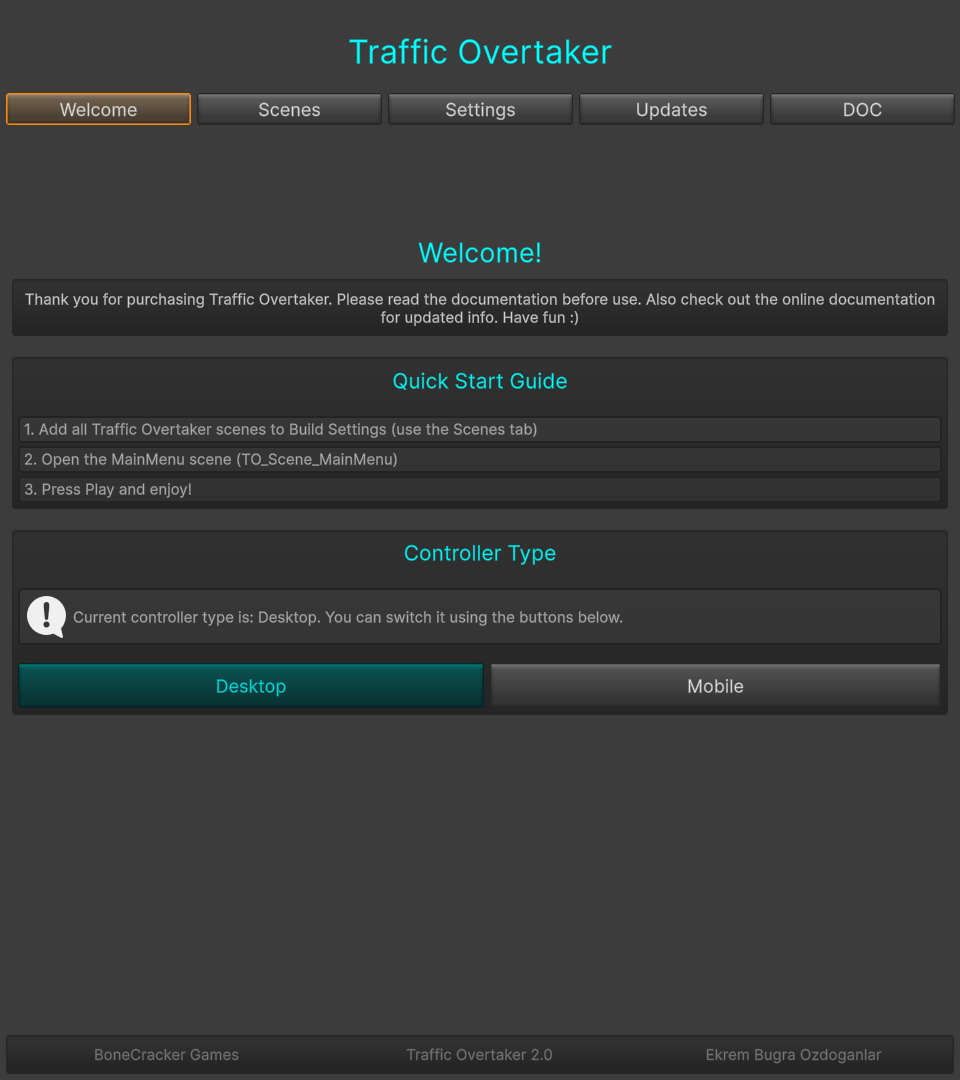
The Welcome Window with its tab bar — Welcome, Scenes, Settings, Updates, and DOC — and the footer showing the version string.
If the window does not appear (for example you closed it before the second reload finished, or you are returning to the project later), reopen it from the menu Tools > BoneCracker Games > Traffic Overtaker > Welcome Window. The same item also exists under GameObject > BoneCracker Games > Traffic Overtaker > Welcome Window. The window is organized into five tabs:
| Tab | Purpose |
|---|---|
| Welcome | The Quick Start Guide plus the Desktop/Mobile controller switch. |
| Scenes | One-click Add All Traffic Overtaker Scenes To Build Settings, plus buttons to open each scene. |
| Settings | Shortcuts to TO_Settings, TO_PlayerCars, RCCP_Settings, Upgradable Wheels, and the asset folders. |
| Updates | Shows the installed version (1.0.0) and the update procedure. |
| DOC | Opens this documentation, the RCCP vehicle-setup guide, tutorials, and contact links. |
Quick Start
The Welcome tab presents a three-step Quick Start Guide. These steps, quoted verbatim from the in-editor guide, are all you need to reach gameplay:
1. Add all Traffic Overtaker scenes to Build Settings (use the Scenes tab)
2. Open the MainMenu scene (TO_Scene_MainMenu)
3. Press Play and enjoy!
Step 1 — Add the scenes to Build Settings
Open the Scenes tab and click Add All Traffic Overtaker Scenes To Build Settings. This is important because the game changes scenes at runtime through TO_API using build indices: the main menu loads a gameplay scene, and the game-over flow returns to the menu. If a scene is not registered in Build Settings, those transitions fail. The button is non-destructive — it preserves any scenes already in your Build Settings and only appends the Traffic Overtaker scenes that are missing, reporting how many it added. The scenes it manages are:
| Scene | Path (under Assets/TO/Scenes/) |
Shipped Build state |
|---|---|---|
TO_Scene_MainMenu |
TO_Scene_MainMenu.unity |
Enabled (build index 0) |
TO_Scene_Sunny |
TO_Scene_Sunny.unity |
Enabled |
TO_Scene_Rainy |
TO_Scene_Rainy.unity |
Enabled |
TO_Scene_Night |
TO_Scene_Night.unity |
Enabled |
TO_Scene_CarCreate |
TO_Scene_CarCreate.unity |
Present but disabled |
TO_SceneTemplate_Mainmenu |
TO_SceneTemplates/TO_SceneTemplate_Mainmenu.unity |
Present but disabled |
TO_SceneTemplate_Gameplay |
TO_SceneTemplates/TO_SceneTemplate_Gameplay.unity |
Present but disabled |
The four playable scenes — the main menu plus the Sunny, Rainy, and Night gameplay environments — are the enabled set that ships in a final build. TO_Scene_CarCreate is a sandbox scene for authoring and previewing a new player car, and the two entries under TO_SceneTemplates/ are blank starting points for building your own menu and gameplay scenes; all three are present so you can open them, but they are left unticked so they do not bloat a shipping build. Leave them disabled unless you specifically want one in your build. For more on each scene's role, see 05_Scenes.md.
Step 2 — Open the Main Menu scene
The game is designed to be entered from the menu, which is where the player picks a car and a track and where the cross-scene PlayerPrefs keys (SelectedPlayerCarIndex, SelectedModeIndex) are written. Open it with the Main Menu button on the Scenes tab, or directly at Assets/TO/Scenes/TO_Scene_MainMenu.unity. Always start a play session here rather than from a gameplay scene, because a gameplay scene loaded cold has no selected-car index to read and will fall back to defaults.
Step 3 — Press Play
With TO_Scene_MainMenu open, press the editor Play button. You should see the showroom with a selectable car, the currency display, and a track picker. Select a track to load one of the gameplay scenes, hold the Overtake button, and the on-car AI driver takes over steering, throttle, and braking while you choose when to commit to the oncoming lane.
Desktop vs. mobile controls
Traffic Overtaker can be configured for either keyboard/desktop input or on-screen mobile controls, and the switch is a single flag (RCCP_Settings.mobileControllerEnabled) that the project flips for you. The Welcome tab's Controller Type section shows the current mode and offers Desktop and Mobile buttons; the active mode is highlighted in cyan. These buttons call the same code as the menu items Tools > BoneCracker Games > Traffic Overtaker > Quick Switch To Desktop and Quick Switch To Mobile. Each switch records an Undo step, marks the settings dirty, and confirms with a dialog. Choose Desktop when testing in the editor with a keyboard; choose Mobile before building for Android or iOS. The specific touch methods (Touch, Gyro, Steering Wheel, Joystick) are covered in 11_ControllerTypes.md.
Verification
Before you start reskinning or building, confirm the install is healthy. Each of these checks isolates a different part of the setup, so if one fails you know where to look rather than guessing.
- Compile is clean. Open the Console and confirm there are no compile errors after the initial domain reloads settle. Duplicate-type errors usually mean a second copy of RCCP was imported.
- The define is set. Open Edit > Project Settings > Player > Scripting Define Symbols and confirm
BCG_TOis present. If it is missing, re-trigger the bootstrap by reopening the Welcome Window, or run Tools > BoneCracker Games > Traffic Overtaker > Welcome Window and let it re-add the symbol. - Scenes are registered. Open File > Build Settings (or Build Profiles) and confirm the four playable scenes are listed and ticked, with
TO_Scene_MainMenuat index 0. - The menu plays. With
TO_Scene_MainMenuopen, press Play and confirm the showroom appears with a selectable car and no missing-script warnings. - A gameplay scene loads. From the menu, pick a track and confirm the chosen gameplay scene loads, the countdown runs, and the AI driver controls the car.
If all five pass, the project is correctly installed and you are ready to explore the structure and start customizing.
Next Steps
- 01_Overview.md — What Traffic Overtaker is and how its one-button overtake loop works.
- 03_ProjectStructure.md — Where everything lives under
Assets/TO/. - 05_Scenes.md — The menu, gameplay, sandbox, and template scenes in detail.
- 12_EditorTools.md — The Welcome Window, menu items, and custom inspectors.
- 13_FAQ.md — Common first-run problems and their fixes.