Scenes & Scene Flow
Traffic Overtaker ships as a small set of self-contained scenes: one main-menu showroom, three themed gameplay levels, a car-authoring sandbox, and two reusable scene templates. Understanding how these scenes are organized, which ones go into Build Settings, and how data is handed off between them is the foundation for reskinning the game — almost every visual change you will make starts by opening one of these scenes and editing it in place. This page documents each shipped scene, the runtime flow from menu to crash to game-over, and the exact contents of a gameplay scene so you know what must be present for a level to function.
All scenes live under Assets/TO/Scenes/, with the two templates nested in Assets/TO/Scenes/TO_SceneTemplates/. Scene names use the TO_Scene_ prefix; the gameplay scenes are differentiated only by environment art and a day/night flag — the manager stack inside them is identical, which is what makes adding a new themed level a copy-and-reskin job rather than a rebuild.
The Shipped Scenes
The product contains five working scenes plus two templates. The table below lists each one, its on-disk path, its role, and whether it is enabled in File > Build Settings. The enabled/disabled status is taken from the live Build Settings configuration; "present, disabled" means the scene is listed in Build Settings but its checkbox is off, so it is excluded from a player build.
| Scene | Path (under Assets/TO/Scenes/) |
Role | In Build Settings |
|---|---|---|---|
| TO_Scene_MainMenu | TO_Scene_MainMenu.unity |
Car showroom — selection, purchase, customization, scene/level pick | Enabled (index 0) |
| TO_Scene_Sunny | TO_Scene_Sunny.unity |
Daytime overtake gameplay level | Enabled |
| TO_Scene_Rainy | TO_Scene_Rainy.unity |
Wet-weather overtake gameplay level | Enabled |
| TO_Scene_Night | TO_Scene_Night.unity |
Night overtake gameplay level (headlights on) | Enabled |
| TO_Scene_CarCreate | TO_Scene_CarCreate.unity |
Sandbox for building/previewing a new player car in a live drive | Present, disabled |
| TO_SceneTemplate_Mainmenu | TO_SceneTemplates/TO_SceneTemplate_Mainmenu.unity |
Clean main-menu template to clone for a new menu | Present, disabled |
| TO_SceneTemplate_Gameplay | TO_SceneTemplates/TO_SceneTemplate_Gameplay.unity |
Clean gameplay template to clone for a new level | Present, disabled |
The main-menu scene must be the first enabled entry (index 0) because TO_Settings.mainMenuSceneIndex is 0 and the in-game "Main Menu" button loads the scene at that build index. The three gameplay scenes are interchangeable as far as the runtime is concerned — the only differences are the environment objects and the dayOrNight flag on the gameplay manager. The two template scenes are deliberately left out of the build because they are authoring starting points, not shippable levels; clone one when you need a fresh scene rather than editing it directly (see 10_ReskinningScenes.md).
Registering scenes in Build Settings
You do not have to add scenes by hand. The Welcome Window (open via Tools > BoneCracker Games > Traffic Overtaker > Welcome Window) has a Scenes tab with an Add All Traffic Overtaker Scenes To Build Settings button. That button registers five scenes in order — TO_Scene_MainMenu, TO_Scene_Sunny, TO_Scene_Night, TO_Scene_Rainy, and TO_Scene_CarCreate — while preserving any scenes you already added, so it is safe to re-run. The same tab has individual Main Menu / Sunny / Night / Rainy / Car Create buttons that open each scene (prompting to save unsaved changes first). The Welcome Window's Quick Start Guide reflects this exact order: add the scenes, open TO_Scene_MainMenu, then press Play.
Note that the helper adds TO_Scene_CarCreate to the list as well; if you do not want the sandbox scene shipping in your build, disable its checkbox in Build Settings after running the helper. The scene templates are never added automatically.
Scene Flow at Runtime
The game runs as a simple two-scene loop with a sandbox scene off to the side. The player always starts in the menu, picks a car, drops into a gameplay level, drives until a crash ends the run, and then chooses to restart the same level or return to the menu. This is intentionally minimal — there is exactly one game mode, Overtake, so there is no mode-selection branching to manage.
TO_Scene_MainMenu  (showroom: select car, buy, customize, pick level)
        │  writes PlayerPrefs: SelectedPlayerCarIndex (+ SelectedModeIndex)
        │  loads the chosen gameplay scene by build index
        ▼
TO_Scene_Sunny / _Rainy / _Night
        │  countdown (4 s) ──▶ overtake run ──▶ head-on or side-swipe crash
        │                                              │
        │                                     game-over panel
        │                              ┌───────────────┴───────────────┐
        ▼                              ▼                               ▼
   back to menu                   Restart (reload                 (high score saved
   (TO_API.MainMenu)              same scene)                      to bestScoreOvertake)
From menu to gameplay
In TO_Scene_MainMenu the player browses the 14-car roster, buys and customizes a vehicle, and starts a run. The selection is persisted to PlayerPrefs so it survives the scene load: the key SelectedPlayerCarIndex holds the chosen roster index, and SelectedModeIndex holds the mode index. The menu then loads the chosen gameplay scene by its build index.
When the gameplay scene loads, TO_GamePlayManager.Start() reads the handoff back out with PlayerPrefs.GetInt("SelectedPlayerCarIndex") and uses that index to spawn the matching prefab from the roster. The mode is not read back from SelectedModeIndex; the manager hard-sets mode = Mode.Overtake because Overtake is the only mode (enum Mode { Overtake }). SelectedModeIndex is still written for forward compatibility and for any UI that reads it, but the gameplay manager ignores it. This is the key cross-scene contract to remember when reskinning: the menu and the gameplay scene communicate only through these PlayerPrefs keys, never through scene references.
The gameplay run
Once a gameplay scene is live, TO_GamePlayManager drives the sequence:
- Spawn.
SpawnPlayer()instantiates the selected vehicle at thespawnLocationtransform (theTO_SpawnLocationobject) viaRCCP.SpawnRCC(...), gives it an initial forward velocity ofminimumSpeedAtStart(90 km/h, applied as90 / 3.6m/s), loads or saves its customization, hands input authority to the AI by addingTO_OvertakeAI, and firesTO_Events.Event_OnPlayerSpawned. - Countdown.
StartRaceDelayed()firesTO_Events.Event_OnCountDownStarted, waits4seconds, setsgameStarted = true, enables vehicle control withRCCP.SetControl(...), and firesTO_Events.Event_OnRaceStarted. Audio is faded up from zero over the first ~2 seconds. - Drive. The on-car AI handles all inputs; the player only holds the Overtake button. The run continues until a collision ends it.
- Crash.
CrashedPlayer(player, scores)setsgameStarted = false, firesTO_Events.Event_OnPlayerDied, and schedulesFinishRaceDelayed(1f). - Game over.
FinishRace()saves the endless high score by keeping the maximum of the existing value and the run's score under the keybestScoreOvertake. The game-over UI then offers Restart (RestartGame()→TO_API.RestartGame(), which reloads the current scene) or Main Menu (MainMenu()→TO_API.MainMenu(), which loads the menu scene).
The day/night appearance of a level is controlled by the dayOrNight field on TO_GamePlayManager (enum DayOrNight { Day, Night }). When set to Night, the manager turns on the spawned vehicle's low-beam headlights after the first fixed update; this is the runtime difference between TO_Scene_Night and the daytime levels, on top of the environment art and lighting. For the full risk/scoring model behind the run, see 04_SystemArchitecture.md.
Inside a Gameplay Scene
Every gameplay scene contains the same set of root objects — the manager stack, the player support objects, the UI canvases, and the environment. The screenshot below shows the Hierarchy of TO_Scene_Sunny; the other gameplay levels and the gameplay template are structured identically.
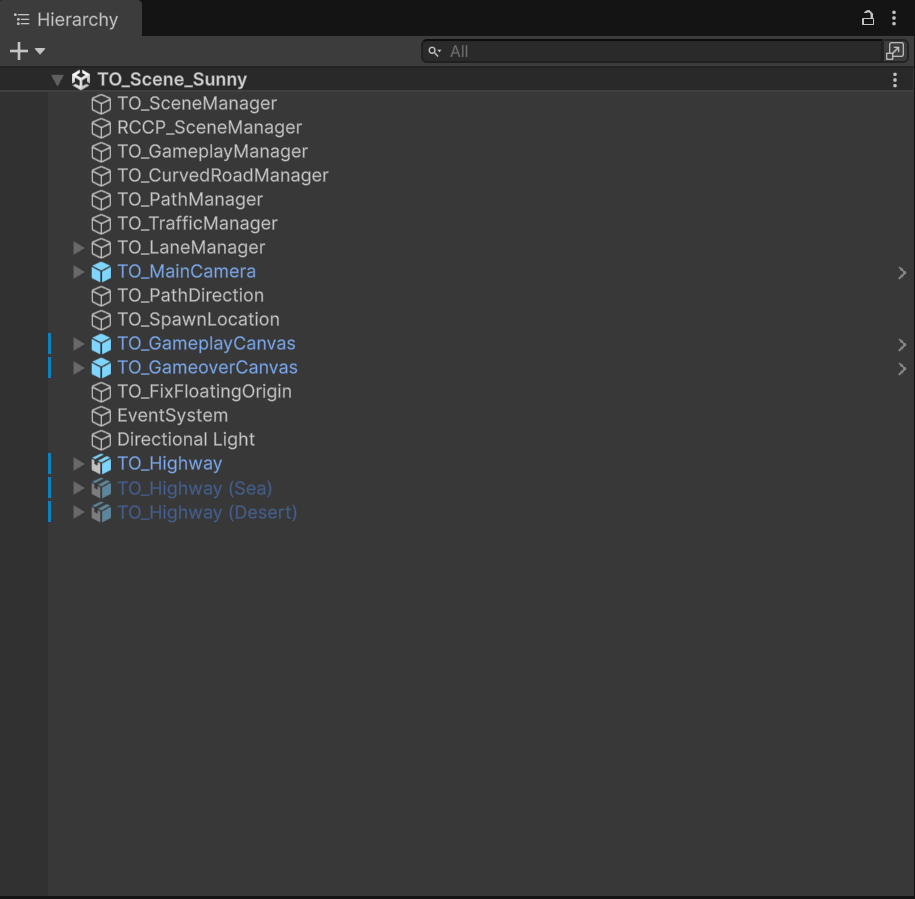
The Hierarchy of a gameplay scene: the TO_ manager stack, the camera, spawn/path helpers, the two UI canvases, and the TO_Highway environment with its variants.
The root objects in a gameplay scene are:
| Root object | Purpose |
|---|---|
| TO_SceneManager | Central service locator; lazy-finds every other manager. Level Type must be Gameplay here |
| RCCP_SceneManager | RCCP's own scene-level manager for vehicle physics |
| TO_GameplayManager | Orchestrates spawn, countdown, pause, crash, game over, and the day/night flag |
| TO_CurvedRoadManager | Road-segment treadmill pooling and spawning |
| TO_PathManager | Collects road waypoints; finds the closest path point to the player |
| TO_TrafficManager | Spawns and pools traffic cars; provides the nearest-car-ahead query |
| TO_LaneManager | Defines the two lanes (right = your direction, left = oncoming) |
| TO_MainCamera | The gameplay camera (TO_Camera) |
| TO_PathDirection | Direction reference object for the path/road system |
| TO_SpawnLocation | The transform the player vehicle is instantiated at |
| TO_GameplayCanvas | In-race HUD (overtake count, threat indicator, Overtake button) |
| TO_GameoverCanvas | Game-over panel (score, restart, main menu) |
| TO_FixFloatingOrigin | Recenters the world to avoid floating-point precision drift on long runs |
| EventSystem | Unity UI input event system |
| Directional Light | Scene key light (tuned per theme) |
| TO_Highway | The road/environment model, with TO_Highway (Sea) and TO_Highway (Desert) environment variants |
The manager stack is what TO_SceneManager expects to find. Its custom inspector shows a Level Type dropdown (Gameplay / Mainmenu) and a row of per-manager status buttons — Gameplay Manager, Curved Road Manager, Path Manager, Traffic Manager, Lane Manager, Player Camera, UI Gameplay, UI Gameover, UI Event System, RCCP Scene Manager — that render green when the manager is present in the scene and red when it is missing (click a red one to create it). A Check & Create All Managers button builds the entire stack in one action. When you clone the gameplay template or hand-assemble a level, use these buttons to confirm nothing is missing — a red button is a guaranteed runtime failure. See 12_EditorTools.md for the full editor tooling.
TO_SceneManager.GetAllComponents() only resolves the managers relevant to its Level Type: in Gameplay mode it fetches the gameplay manager, RCCP scene manager, road/path/traffic/lane managers, and the player camera; in Mainmenu mode it fetches only the main-menu manager. This is why the Level Type dropdown must match the scene's purpose — a gameplay scene whose manager is set to Mainmenu will not wire up its level systems.
The Car Create Sandbox
TO_Scene_CarCreate is a sandbox gameplay scene whose purpose is authoring and previewing a new player car in a live drive context before it is added to the roster. As the Welcome Window's own help text puts it, it is "a sandbox gameplay scene for building, previewing and tuning a new player car in a live drive context before adding it to the roster." Rather than guessing whether a freshly built RCCP vehicle handles correctly at speed, you drop it into this scene, drive it through the same road/traffic systems the real levels use, and tune the physics until it feels right.
Because it is a full gameplay scene, the Car Create level contains the same manager stack as TO_Scene_Sunny, so the car behaves exactly as it would in a shipping level — the AI driver, the curved road, the traffic, and the camera all run. This makes it the recommended workflow target when following the How To Build An RCCP Vehicle guidance (the bundled RCCP vehicle-setup doc, surfaced from the Welcome Window's DOC tab, the Configure Player Cars error state, and the TO_Player inspector). Once the car drives well in the sandbox, register it in the roster via Configure Player Cars; see 06_PlayerVehicles.md for the roster workflow.
The scene is added to Build Settings by the "Add All Scenes" helper but ships disabled by default, so it does not appear in a player build unless you enable its checkbox. Keep it disabled for release builds — it is a development tool, not a player-facing level.
Scene Templates
The two template scenes under TO_SceneTemplates/ are clean, manager-complete starting points referenced by TO_Settings:
TO_Settings.templateScenePath_MainMenu→Assets/TO/Scenes/TO_SceneTemplates/TO_SceneTemplate_Mainmenu.unityTO_Settings.templateScenePath_Gameplay→Assets/TO/Scenes/TO_SceneTemplates/TO_SceneTemplate_Gameplay.unity
These templates exist so you can create a brand-new menu or level without stripping art out of an existing themed scene. The intended workflow is to duplicate the relevant template, rename the copy (e.g. TO_Scene_Desert), drop in your environment art, set the dayOrNight flag on TO_GameplayManager, and add the new scene to Build Settings. Because both templates already contain the full manager stack with TO_SceneManager configured for the correct Level Type, a cloned template is playable immediately. Both are present in Build Settings but disabled — leave them that way; they are authoring sources, not shippable scenes. The end-to-end cloning and reskinning procedure is documented in 10_ReskinningScenes.md.
See Also
- 04_SystemArchitecture.md — the manager stack, event bus, and the Overtake AI/risk model that runs inside a gameplay scene.
- 10_ReskinningScenes.md — step-by-step cloning of the scene templates and reskinning a level into your own game.
- 06_PlayerVehicles.md — building a car, the roster, and how Car Create fits the vehicle workflow.
- 12_EditorTools.md — the Welcome Window, the
TO_SceneManager"Check & Create All Managers" tool, and the rest of the editor tooling.