Editor Tools & Settings Reference
Traffic Overtaker ships a small but complete set of Unity Editor tools so you rarely have to hunt through the Project window for a configuration asset. Everything is reached from one place — the Tools > BoneCracker Games > Traffic Overtaker menu — plus a docked Welcome Window that bundles the most common first-run actions (build settings, scene opening, controller switching, documentation). This page is the reference for that menu and window, and for the central TO_Settings configuration asset they point at. If you are reskinning the project, these tools are how you flip the game between Desktop and Mobile, register your own vehicles, retune scoring economy, and swap audio without editing code.
All of this editor logic lives under Assets/TO/Editor/. The three files that drive this page are TO_EditorWindows.cs (the menu items), TO_WelcomeWindow.cs (the tabbed window), and TO_SettingsEditor.cs (the custom inspector for TO_Settings). The bundled physics engine (Realistic Car Controller Pro, the RCCP_ prefix) has its own menu and settings asset; a few Traffic Overtaker tools deliberately reach into RCCP — for example the Desktop/Mobile switch flips an RCCP flag — and those crossings are called out below.
The BoneCracker Games Editor Menu
Every authoring action is exposed under Tools > BoneCracker Games > Traffic Overtaker in the main Unity menu bar. Two of the entries (Welcome Window and Create > TO Scene Manager) are mirrored under GameObject > BoneCracker Games > Traffic Overtaker as well, so you can reach them from the Hierarchy context flow too. The table below lists every item, what it selects or runs, and any side effect on disk — note that most items simply set Selection.activeObject, which pings the relevant asset in the Project window and opens its inspector.
| Menu item | What it does |
|---|---|
| Welcome Window | Opens the tabbed TO_WelcomeWindow (see below). The recommended starting point. |
| Create > TO Scene Manager | Selects the scene's TO_SceneManager (creating it on access via TO_SceneManager.Instance). The central service locator for all gameplay managers. |
| TO Settings | Selects the TO_Settings asset (Resources/TO_Settings) and opens its custom inspector. |
| Quick Switch To Desktop | Sets RCCP_Settings.mobileControllerEnabled = false (keyboard/desktop input), shows a confirmation dialog, then reselects TO_Settings. |
| Quick Switch To Mobile | Sets RCCP_Settings.mobileControllerEnabled = true (touch input), shows a confirmation dialog, then reselects TO_Settings. |
| Configure Player Cars | Selects the TO_PlayerCars roster asset so you can edit vehicles, prices, and unlock states. |
| Configure Upgradable Wheels | Selects the RCCP_ChangableWheels asset (the shared wheel-model list used for upgrades). |
| Highlight Player Cars Folder | Pings Assets/TO/Prefabs/Player Vehicles in the Project window. |
| Highlight Wheels Folder | Pings Assets/TO/Prefabs/Wheels in the Project window. |
| Highlight Traffic Cars Folder | Pings Assets/TO/Prefabs/Traffic Vehicles in the Project window. |
| Documentation | Opens the local documentation bundled in Assets/TO/Documentation (PDF first, HTML fallback) straight from disk; never downloads. |
| Help | Shows a contact dialog and opens https://www.bonecrackergames.com/contact/. |
| Validate Script Execution Order | Applies the pinned script execution orders for the TO_* managers (see below). |
| Reset Script Execution Order | Resets every managed TO_* script back to execution order 0. |
| Show Script Execution Order | Logs each managed script's current order vs. its target to the Console (OK / MISMATCH). |
The Quick Switch pair is the one-click way to retarget the whole project between input schemes; both items only toggle a single boolean on RCCP_Settings and record it with Undo, so they are safe to flip back and forth while testing. Because they touch an RCCP_ asset rather than a TO_ one, the change persists in the RCCP settings — see 11_ControllerTypes.md for what each mode actually changes in the input pipeline.
Script Execution Order tools
The three Script Execution Order items are backed by TO_ScriptExecutionOrderManager, which also runs automatically on every assembly reload via [InitializeOnLoad], so in normal use you never need to touch them. They exist for the rare case where a script order gets clobbered (for example after a manual reorder in Project Settings > Script Execution Order) and you want to restore the shipping timing. The manager pins a deliberate hierarchy: TO_SceneManager runs first at -30 (it is the service locator everything else queries), TO_PathManager and TO_OvertakeAI at -20 (path subscription and fixed-step AI input authoring before RCCP reads inputs), TO_LaneManager at -10, then TO_Camera at 5, TO_PlayerStabilizer at 10, TO_SoundtrackManager at 15, and TO_LaneFollowingTelemetry last at 20. The FindScript lookup is scoped to Assets/TO/ and explicitly skips the bundled Realistic Car Controller Pro folder, so running Validate never disturbs RCCP's own execution orders.
The Welcome Window
The Welcome Window (TO_WelcomeWindow) is the friendliest entry point and the first thing the project encourages you to open. It is a fixed-size (640x720) utility window with five tabs along the top — Welcome, Scenes, Settings, Updates, and DOC — and a footer that reads BoneCracker Games | Traffic Overtaker [Version] | Ekrem Bugra Ozdoganlar, where the version string is pulled live from TO_Version.version. Open it from Tools > BoneCracker Games > Traffic Overtaker > Welcome Window (or the mirrored GameObject menu).
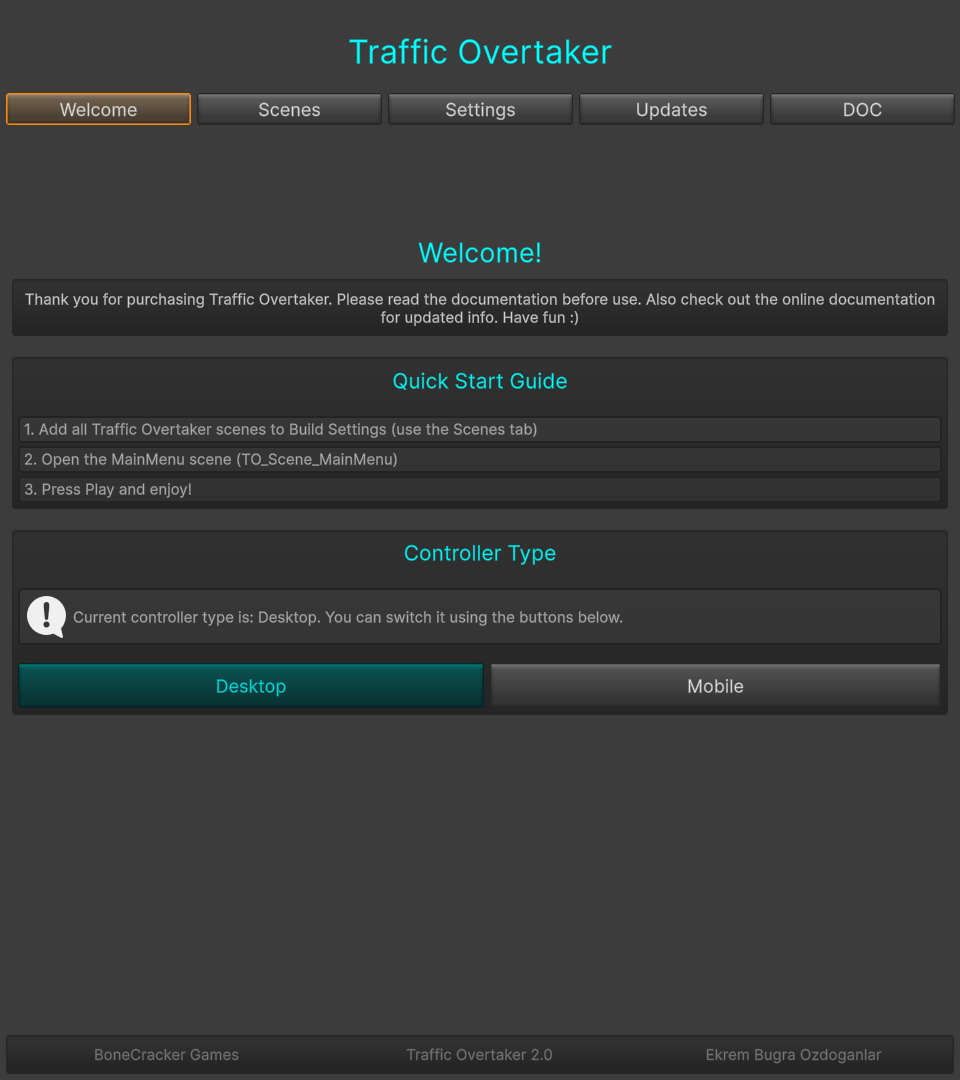
The Welcome Window with its five tabs; the footer shows the installed product version.
Welcome tab
The Welcome tab is a quick-start landing page. It prints a three-step getting-started checklist — (1) add all scenes to Build Settings via the Scenes tab, (2) open TO_Scene_MainMenu, (3) press Play — which mirrors the minimal path to a running game. Below that is a Controller Type box that reads the current state of RCCP_Settings.mobileControllerEnabled and labels it Mobile or Desktop, with two large buttons that call the same QuickSwitchToDesktop / QuickSwitchToMobile logic as the menu items. The active mode's button is tinted cyan so you can see at a glance which scheme is live.
Scenes tab
The Scenes tab handles Build Settings registration and quick scene opening, which is the single most common setup chore. Its top button — Add All Traffic Overtaker Scenes To Build Settings — appends TO_Scene_MainMenu, TO_Scene_Sunny, TO_Scene_Night, TO_Scene_Rainy, and TO_Scene_CarCreate to the build list without removing any scenes already there, then reports how many were newly added. Below that, individual Open Scene buttons load the Main Menu, the three gameplay scenes (Sunny / Night / Rainy), and the Car Create sandbox; each first prompts you to save unsaved changes via SaveCurrentModifiedScenesIfUserWantsTo(). Note that of the five scenes added to Build Settings, only the first four are enabled for builds out of the box — Car Create is a tuning sandbox and ships disabled. See 05_Scenes.md for the full scene roster.
Settings tab
The Settings tab is a launcher for the four configuration assets you edit most. Each is a labeled box with a one-line description and a button: TO Settings (game configuration), TO Player Cars (vehicle roster, prices, unlocks), RCCP Settings (the physics engine's global settings), and Upgradable Wheels (RCCP_ChangableWheels). At the bottom an Asset Folders row gives one-click ping buttons for the Player Cars, Wheels, and Traffic Cars prefab folders — the same destinations as the Highlight … Folder menu items. This tab is essentially the whole configuration surface of the project collected into one screen.
Updates tab
The Updates tab shows the installed version (again from TO_Version.version) and the recommended update procedure, which matters because the project is a complete game folder rather than a UPM package. The documented steps are: back up the project, move any custom assets (your own vehicles, scenes) out of the Assets/TO folder, delete the entire Assets/TO folder, then import the new package from the Asset Store. A Check For Updates button opens the asset's store page (https://u3d.as/3meY). Following the "delete the whole folder" guidance avoids the stale-file problems that come from importing a new version on top of an old one.
DOC tab
The DOC tab collects every documentation and support link. It offers Open Documentation (the same local-disk opener as the menu's Documentation item), How To Build An RCCP Vehicle, YouTube Tutorial Videos, Contact / Help, and Other Assets. The How To Build An RCCP Vehicle button is new in this update: it opens the bundled RCCP guide at Assets/TO/Realistic Car Controller Pro/Documentation/HTML/03_vehicle_setup.html, falling back to the online RCCP docs only if that file has been removed. Because authoring an RCCP vehicle is the prerequisite for adding a car to the roster, this same button now also appears in two other places — at the Configure Player Cars "Select A RCC Based Car" error and on the TO_Player component inspector — so the pointer to vehicle-setup reading is never more than one click away. For the full vehicle workflow see 06_PlayerVehicles.md.
Folder highlight shortcuts
The three Highlight … Folder menu items (and the Asset Folders buttons in the Settings tab) are pure navigation helpers — they call AssetDatabase.LoadMainAssetAtPath on a fixed folder and set it as the active selection so the Project window scrolls to and highlights it. They map to Assets/TO/Prefabs/Player Vehicles, Assets/TO/Prefabs/Wheels, and Assets/TO/Prefabs/Traffic Vehicles respectively. When you are reskinning and dropping in your own prefabs, these are the three folders the roster, wheel-upgrade, and traffic systems expect to find content in, so the shortcuts double as a reminder of where new art belongs.
The TO Settings Asset
TO_Settings is the project's single game-wide configuration ScriptableObject, loaded at runtime with Resources.Load("TO_Settings") and never moved out of a Resources/ folder (the inspector warns you about this explicitly). It holds the score thresholds, the money economy, the first-launch defaults, the audio clips, and the prefab/object references the managers spawn. Open it with Tools > BoneCracker Games > Traffic Overtaker > TO Settings, the Welcome Window's Settings > TO Settings button, or by selecting the asset in Resources/.
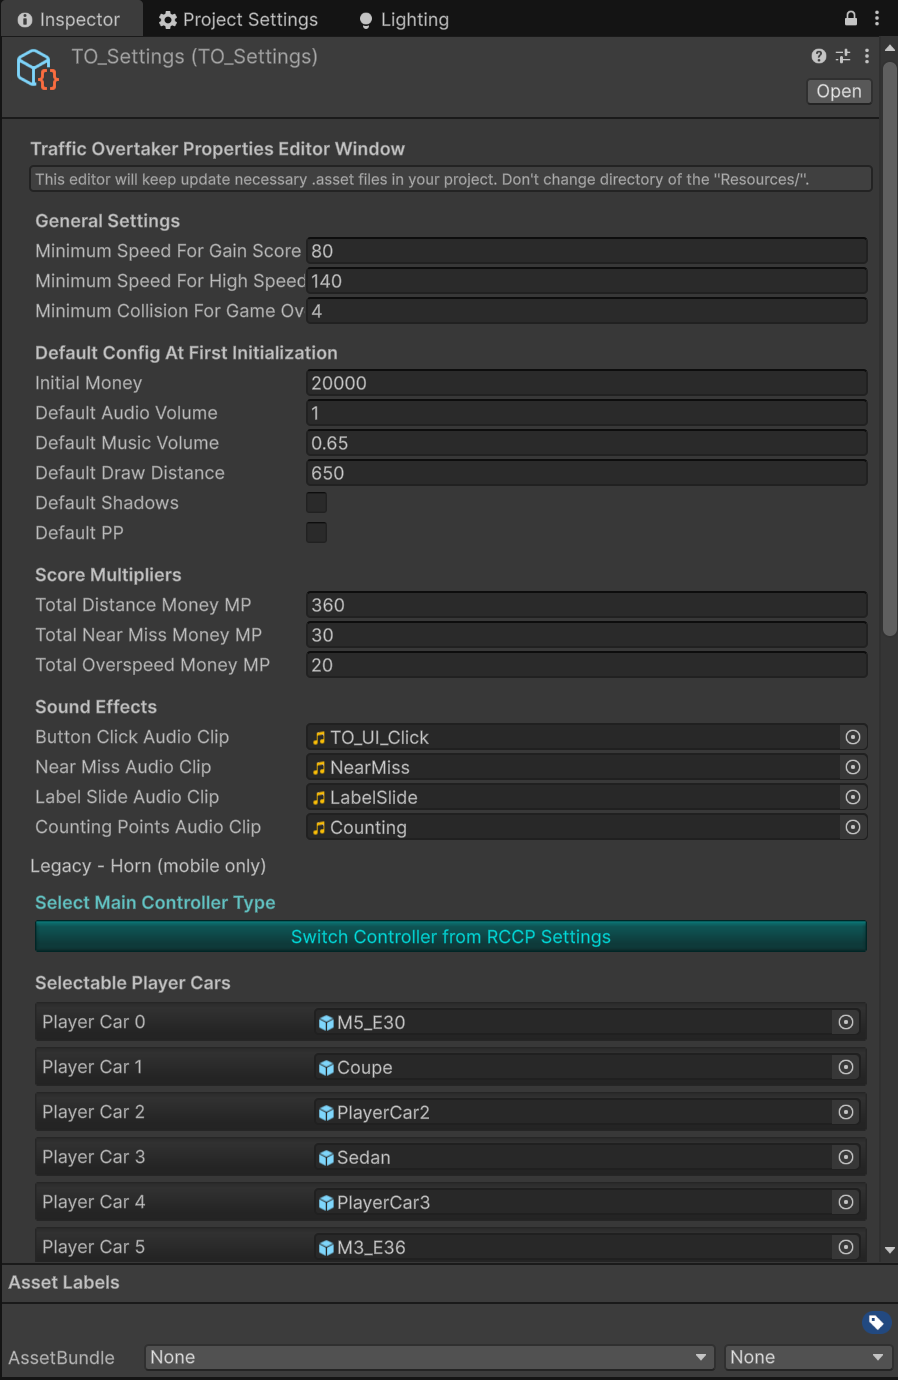
The custom TO_Settings inspector, organized into General Settings, first-launch defaults, Score Multipliers, Sound Effects, and Resources.
The asset has a custom inspector (TO_SettingsEditor) that groups fields into labeled sections and adds convenience buttons (it embeds the player-car and upgradable-wheel lists, plus a Switch Controller from RCCP Settings shortcut). The inspector draws every serialized field on TO_Settings — and it is self-protecting: any field that isn't explicitly placed in a section falls through to an Other (unmapped) group at the bottom, so a newly-added field can never silently vanish. All default values listed are the live values shipped in TO_Settings.asset, which in a few cases differ from the C# field initializers.
General Settings
These three fields gate scoring and crashes and are the most likely tuning targets for difficulty. minimumSpeedForGainScore is the speed floor below which you bank no score at all, minimumSpeedForHighSpeed is the threshold for the high-speed bonus, and minimumCollisionForGameOver is the collision-impulse magnitude that registers as a damaging hit. All three are surfaced at the top of the custom inspector under the General Settings header.
| Setting | Type | Default | Range/Valid | Description |
|---|---|---|---|---|
minimumSpeedForGainScore |
int |
80 |
km/h | Minimum speed the player must reach to start gaining score. |
minimumSpeedForHighSpeed |
int |
140 |
km/h | Minimum speed for the high-speed bonus to activate. |
minimumCollisionForGameOver |
int |
4 |
impulse magnitude | Minimum collision impulse required to register a crash or damage. |
Economy & first-launch defaults
This group seeds a brand-new player's profile and graphics/audio preferences on the very first launch. They are written into PlayerPrefs once (when no saved profile exists) and then never read again, so changing initialMoney only affects players who have not run the game before — clearing PlayerPrefs re-applies them. The custom inspector draws all of these except mainMenuSceneIndex and trafficCarsLayer, which it places in different spots: trafficCarsLayer is drawn lower, near the Resources section, and mainMenuSceneIndex in the Scene Setup subsection under Resources.
| Setting | Type | Default | Range/Valid | Description |
|---|---|---|---|---|
initialMoney |
int |
20000 |
currency | Starting currency given to the player on first launch. |
defaultAudioVolume |
float |
1 |
0–1 | Default master audio volume applied on first launch. |
defaultMusicVolume |
float |
0.65 |
0–1 | Default music volume applied on first launch. |
defaultDrawDistance |
float |
650 |
meters | Default camera draw distance applied on first launch. |
defaultShadows |
bool |
false |
true/false | Whether shadows are enabled by default on first launch. |
defaultPP |
bool |
false |
true/false | Whether post-processing is enabled by default on first launch. |
mainMenuSceneIndex |
int |
0 |
Build Settings index | Build Settings index of the main menu scene. Drawn in the Scene Setup subsection. |
trafficCarsLayer |
string |
"TO_TrafficCar" |
a layer name | Physics layer assigned to all traffic cars for raycasts and collision detection. |
Score Multipliers
The custom inspector's Score Multipliers section exposes four fields — the money multipliers applied at game over to convert your run stats into currency. overtakeMoneyMP multiplies your successful-overtake count (the dominant coin source), totalNearMissMoneyMP multiplies your near-miss count, totalDistanceMoneyMP multiplies total distance travelled, and totalOverspeedMoneyMP is a legacy multiplier for high-speed time (no longer converted to currency — see below). These are the safe, designer-facing economy knobs: raising them makes runs more lucrative without changing the gameplay rules.
| Setting | Type | Default | Range/Valid | Description |
|---|---|---|---|---|
overtakeMoneyMP |
int |
120 |
multiplier | Money multiplier applied to total overtakes at game over — the dominant coin source. |
totalNearMissMoneyMP |
int |
30 |
multiplier | Money multiplier applied to total near-miss count at game over. |
totalDistanceMoneyMP |
int |
40 |
multiplier | Money multiplier applied to total distance travelled at game over. |
totalOverspeedMoneyMP |
int |
20 |
multiplier | Legacy high-speed-time multiplier; high-speed time is no longer converted to currency, so this is currently unused. |
Overtake Scoring & Risk
The inspector's Overtake Scoring & Risk section holds the five fields that drive the in-run score and the head-on risk model (the Score Multipliers above only affect the end-of-run cash conversion). overtakePoints is the primary per-pass score, overtakeChainCap limits how high the consecutive-pass chain multiplier can climb, oncomingNearMissMultiplier rewards squeezing back in just ahead of an oncoming car, passiveScoreRate is the tiny passive trickle applied while cruising above the min-score speed, and headOnFrontalDot sets how narrow the frontal cone is that turns an oncoming collision fatal.
| Setting | Type | Default | Range/Valid | Description |
|---|---|---|---|---|
overtakePoints |
int |
250 |
points | Base score per successful overtake, before the chain multiplier. |
overtakeChainCap |
int |
10 |
multiplier cap | Maximum chain multiplier applied to overtake points before it caps. Near-misses use their own combo curve and ignore this. |
oncomingNearMissMultiplier |
float |
4 |
multiplier | Extra score multiplier for a near-miss against an oncoming (left-lane) car vs. a same-direction one. |
passiveScoreRate |
float |
0.01 |
rate | Passive score trickle rate while cruising above the min-score speed (score += speed * passiveScoreRate * deltaTime). Small on purpose — overtakes are the real income. |
headOnFrontalDot |
float |
0.5 |
0–1 |
Forward-cone dot above which an oncoming collision counts as a fatal head-on. Higher = narrower frontal cone. |
Audio & Sound Effects
The Sound Effects section of the inspector wires the UI and gameplay SFX. Swapping any of them is the simplest reskin task in the project: select TO_Settings, then drag your own AudioClip into the matching field — no code changes are needed because every system reads its clip from TO_Settings.Instance at runtime. The inspector draws five of the clips directly (buttonClickAudioClip, buttonHoverAudioClip, nearMissAudioClip, labelSlideAudioClip, countingPointsAudioClip); the horn and siren clips are tucked under a collapsed Legacy - Horn (mobile only) foldout because the single-button Overtake loop and the desktop control scheme do not use them — they are retained only for mobile builds that mount a Horn button.
| Setting | Type | Default clip | Inspector location | Description |
|---|---|---|---|---|
buttonClickAudioClip |
AudioClip |
TO_UI_Click |
Sound Effects | Played on UI button clicks. |
buttonHoverAudioClip |
AudioClip |
TO_UI_Hover |
Sound Effects | Played when a UI button is hovered. |
nearMissAudioClip |
AudioClip |
NearMiss |
Sound Effects | Played when the player narrowly avoids a traffic car. |
labelSlideAudioClip |
AudioClip |
LabelSlide |
Sound Effects | Played when UI labels slide in or out. |
countingPointsAudioClip |
AudioClip |
Counting |
Sound Effects | Played during the score-counting animation at game over. |
hornClip |
AudioClip |
CarHorn |
Legacy - Horn (mobile only) | Default horn clip when the player honks. |
sirenAudioClip |
AudioClip |
PoliceHorn |
Legacy - Horn (mobile only) | Siren clip used when the siren upgrade is equipped. |
Resources
The Resources section holds the prefab and object references the managers instantiate at runtime — the camera rigs, the road, the UI canvases, the explosion VFX, and the scene templates. You generally only touch these when reskinning the spawned content (for example pointing road at your own curved-road prefab, or UI_GameplayPanel at a restyled HUD canvas). UI_EventSystem and the two templateScenePath_* strings are also drawn here — the template paths under a Scene Setup subsection. The defaults below are the live referenced asset names.
| Setting | Type | Default reference | Inspector location | Description |
|---|---|---|---|---|
gameplayCamera |
TO_Camera |
TO_MainCamera |
Resources | Gameplay camera prefab instantiated during races. |
showroomCamera |
TO_Camera_Showroom |
TO_ShowroomCamera |
Resources | Showroom camera used in the main-menu vehicle display. |
road |
TO_CurvedRoad |
TO_Highway (Prototype) |
Resources | Curved-road prefab used for road-segment spawning. |
UI_GameplayPanel |
GameObject |
TO_UI_GameplayCanvas |
Resources | Gameplay HUD canvas displayed during races. |
UI_GameoverPanel |
GameObject |
TO_UI_GameoverCanvas |
Resources | Game-over panel shown when the player crashes. |
UI_MainmenuPanel |
GameObject |
TO_UI_Canvas_MainMenu |
Resources | Main-menu UI canvas displayed in the showroom scene. |
explosionEffect |
GameObject |
TO_Explosion |
Resources | Explosion VFX instantiated at a fatal head-on crash. |
resetDecal |
TO_ResetDecal |
TO_ResetDecal |
Resources | Decal spawned at the player's position on vehicle reset. |
UI_EventSystem |
EventSystem |
TO_UI_EventSystem |
Resources | Unity EventSystem prefab for UI input. |
templateScenePath_MainMenu |
string |
Assets/TO/Scenes/TO_SceneTemplates/TO_SceneTemplate_Mainmenu.unity |
Scene Setup | Template path used for main-menu scene creation. |
templateScenePath_Gameplay |
string |
Assets/TO/Scenes/TO_SceneTemplates/TO_SceneTemplate_Gameplay.unity |
Scene Setup | Template path used for gameplay scene creation. |
Changing scoring rules vs. multipliers
It is worth being precise about what TO_Settings can and cannot retune. The multipliers and thresholds in this asset are parameters — they scale or gate an existing formula but do not change its shape. If you want to change the rules of scoring — how an overtake is detected, when a near-miss counts, how the chain combo accumulates, or how distance converts to score — you must edit TO_Player.cs, where the run-time scoring logic lives. A practical reskin reaches for TO_Settings first (free, no recompile) and only drops into TO_Player.cs when the parameters cannot express the change you want. The persisted outputs (currency, high score, ownership) are keyed in PlayerPrefs; their exact key names are listed in 14_APIReference.md.
See Also
- 06_PlayerVehicles.md — adding RCCP vehicles to the roster (the destination of Configure Player Cars and the How To Build An RCCP Vehicle button).
- 10_ReskinningScenes.md — using the scene templates and Resources references to restyle the game.
- 11_ControllerTypes.md — what the Quick Switch To Desktop / Mobile items change in the input pipeline.
- 14_APIReference.md — the
TO_APIpersistence layer and the fullPlayerPrefskey table behind the economy and scoring.