Player Vehicles
Player vehicles are the cars you actually drive in Traffic Overtaker. Every player car is a fully-built Realistic Car Controller Pro (RCCP) vehicle prefab with a TO_Player component bolted on top, registered in a single roster ScriptableObject. The roster defines what appears in the main-menu showroom, what each car costs, and which cars are unlocked from the start. Because the on-car AI driver (TO_OvertakeAI) works at the input level and lets RCCP's real physics drive the car, the choice of vehicle genuinely matters: engine torque, handling, top speed, and upgrades all flow through to gameplay. This page explains the roster system and walks through the complete workflow for adding your own car when you reskin the project.
The game ships with 14 player vehicles. The roster lives in Assets/TO/Resources/TO_PlayerCars.asset (the TO_PlayerCars ScriptableObject), and is edited through the custom Player Cars Editor rather than the raw inspector.
The Vehicle Roster
The roster is a flat array of TO_PlayerCars.Cars entries. Each entry is defined in Assets/TO/Scripts/Scriptable/TO_PlayerCars.cs and carries exactly four serialized fields:
| Field | Type | Default | Purpose |
|---|---|---|---|
vehicleName |
string |
"" |
Display name shown in the showroom and UI. Also the base of the {VehicleName}Owned PlayerPrefs key. |
playerCar |
GameObject |
null |
The RCCP vehicle prefab. Must carry RCCP_CarController (and gains TO_Player automatically). |
unlocked |
bool |
false |
If true, the car is available from the start with no purchase. |
price |
int |
25000 |
In-game Currency price to unlock. Set to 0 for free cars. |
Two rules are enforced automatically by the editor and are worth internalizing before you start editing prices. First, any entry whose price is 0 or below is forced to unlocked = true — you cannot ship a free-but-locked car. Second, the roster's order is meaningful: it is the order cars appear in the showroom, and index 0 is the default selection a new player sees (the editor writes SelectedPlayerCarIndex = 0 whenever the roster changes). The very first car should therefore always be a free, unlocked starter.
Shipped Roster
The table below is the live shipping roster. Note that several vehicleName display names differ from the underlying prefab name (the Prefab column) — the display name is purely cosmetic, while the prefab name is what TO_PlayerEditor matches against when checking whether a vehicle is already in the list. Prices are in the in-game Currency (shown here with the in-game ₵ symbol).
| Index | Vehicle Name | Prefab | Price | Unlocked |
|---|---|---|---|---|
| 0 | E30 | M5_E30 |
₵0 | Yes (free starter) |
| 1 | Coupe | Coupe |
₵15,000 | No |
| 2 | Sierra | PlayerCar2 |
₵17,500 | No |
| 3 | Sedan | Sedan |
₵22,500 | No |
| 4 | Muscle_1 | PlayerCar3 |
₵28,000 | No |
| 5 | E36 | M3_E36 |
₵32,000 | No |
| 6 | Pickup | Pickup |
₵26,000 | No |
| 7 | SUV | SUV2 |
₵32,000 | No |
| 8 | Muscle_2 | Muscle |
₵30,000 | No |
| 9 | E46 | M3_E46 |
₵35,000 | No |
| 10 | Jeep | Jeep |
₵29,000 | No |
| 11 | Van | PlayerCar4 |
₵25,000 | No |
| 12 | Sports_1 | PlayerCar5 |
₵38,000 | No |
| 13 | CTR | CTR |
₵45,000 | No |
All player-vehicle prefabs live under Assets/TO/Prefabs/Player Vehicles/. The starting currency a new player has to spend is 20000 (from TO_Settings.initialMoney), which is enough to buy one of the cheaper cars immediately. See 09_Customization.md for how purchased cars are then upgraded and customized, and 14_APIReference.md for the TO_API currency and ownership calls.
Prerequisite: A Fully-Built RCCP Vehicle
A player car is not something you build from scratch inside Traffic Overtaker — it starts as a complete RCCP vehicle. The roster's playerCar field is validated against the presence of an RCCP_CarController component, and TO_Player itself declares hard requirements:
[RequireComponent(typeof(Rigidbody))]
[RequireComponent(typeof(RCCP_CarController))]
[RequireComponent(typeof(TO_PlayerStabilizer))]
public class TO_Player : MonoBehaviour { ... }
If you assign a prefab that lacks an RCCP_CarController, the editor refuses it with the error "Select A RCC Based Car" and offers a How To Build An RCCP Vehicle button. That button (added in this update) calls TO_EditorWindows.OpenRCCPVehicleSetupDoc(), which opens the bundled RCCP guide at Assets/TO/Realistic Car Controller Pro/Documentation/HTML/03_vehicle_setup.html. The same button is also surfaced on the TO_Player component inspector and in the Welcome Window DOC tab, so you can reach the vehicle-setup walkthrough from wherever you happen to be working.
The practical takeaway when reskinning: model and rig your car as a standard RCCP vehicle first (mesh, wheels, colliders, engine/drivetrain, lights, optional Customizer and NOS), confirm it drives correctly in RCCP's own demo, and only then bring it into the Traffic Overtaker roster. Trying to register a half-built vehicle just produces an error and a broken showroom entry.
How To Add a Player Car
There are two supported entry points, and they converge on the same roster. Use whichever matches where you are: the roster editor when you already have a finished prefab, or the per-component path when you are working inside a vehicle's own inspector in a scene.
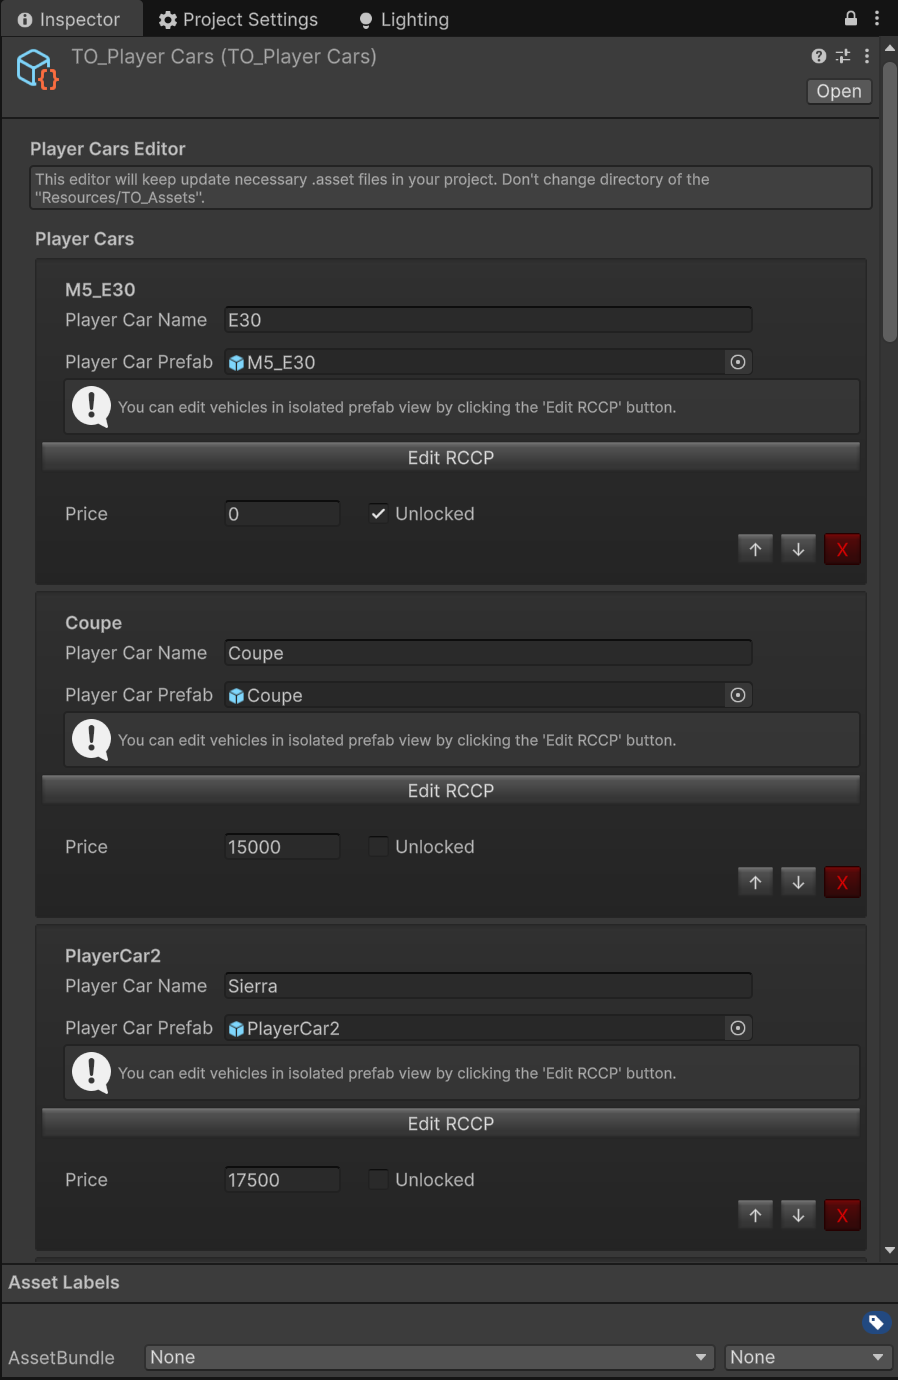
The Player Cars Editor, opened from Tools > BoneCracker Games > Traffic Overtaker > Configure Player Cars.
Path A — From the Roster Editor
Open the roster with Tools > BoneCracker Games > Traffic Overtaker > Configure Player Cars (this selects TO_PlayerCars.asset and shows the custom Player Cars Editor from TO_PlayerCarsEditor.cs). For each car the editor renders, in order:
- A Player Car Name text field bound to
vehicleName. - A Player Car Prefab object field bound to
playerCar. Its tooltip reminds you to assign a fully-built RCCP vehicle prefab. - An Edit RCCP button that selects the assigned prefab so you can open it in isolated Prefab Mode and tune its RCCP components.
- A validity check: if the assigned prefab has an
RCCP_CarControllerbut noTO_Player, the editor auto-addsTO_Playerfor you (with Undo). If it has noRCCP_CarController, you get the "Select A RCC Based Car" error and the How To Build An RCCP Vehicle button described above. - A Price integer field and an Unlocked toggle, shown side by side (remember: price ≤ 0 silently forces Unlocked on).
- Reorder and delete controls: ↑ moves the entry up, ↓ moves it down, and the red X removes it.
To add a brand-new slot, click Create Player Car at the bottom. This appends a fresh empty Cars entry (no prefab, default price 25000, locked) and resets SelectedPlayerCarIndex to 0; you then drag your RCCP prefab into the new Player Car Prefab field. The Check All Vehicle Setups button re-runs the physics normalization across every car in the roster (described in the next section). The --< Return To General Settings button jumps back to the TO_Settings asset. Note that the editor also runs the vehicle-setup check automatically once each time you open the inspector, so cars stay normalized without you having to remember the button.
Path B — From the Vehicle's Own Inspector (TO_Player)
When you have a vehicle GameObject in a scene (for example, dragged in from RCCP's prefab tooling) and select it, the TO_Player component renders the custom Player Vehicle Editor (TO_PlayerEditor.cs). Alongside the default fields it gives you a prefab-and-register workflow that adapts to the object's current state:
- Create Prefab — shown (as a red danger button) when the object is not yet a prefab instance. It calls
PrefabUtility.SaveAsPrefabAssetAndConnectand writes the asset toAssets/TO/Prefabs/Player Vehicles/<name>.prefab. - Save Prefab — shown (as a green success button) when the object is already connected to a prefab, reminding you with "Don't forget to save changes." It re-saves to the same path.
- Add Prefab To Player Vehicles List — shown when the vehicle is not yet in the roster (matched by transform name against every
playerCarinTO_PlayerCars.Instance.cars). Clicking it first creates or saves the prefab as needed, then registers it: it builds a newCarsentry named"New Player Vehicle <random>", points itsplayerCarat the prefab asset, stashes it inTO_PlayerCars.lastAdd, and selects the roster asset. The next time the Player Cars Editor draws, it consumeslastAddand appends the entry — so this button effectively hands you off to Path A with the car already added. Rename it there and set its price.
There is also a Show Info About Upgrades toggle that expands four help boxes explaining where to tune engine torque, handling/stability, brake, and top speed (via the RCCP Engine, Stability, and Differential components), plus reminders that customization requires an RCCP_Customizer and NOS requires the NOS add-on. These point you at RCCP's components rather than any Traffic-Overtaker-specific field.
What CheckVehicleSetup() Normalizes
Both editors call TO_Player.CheckVehicleSetup() — the roster editor runs it for every car on open and via Check All Vehicle Setups, and it is the safety net that makes an arbitrary RCCP vehicle behave correctly under the input-level AI driver. It is an editor-only (#if UNITY_EDITOR) pass that walks the vehicle's RCCP component tree and corrects any value that is wrong, returning true if it changed anything (so the prefab can be marked dirty and saved). Understanding what it touches tells you exactly which RCCP settings the game depends on:
| Component | Field | Forced value | Why |
|---|---|---|---|
RCCP_CarController |
ineffectiveBehavior |
false |
Keeps full physics fidelity; the "ineffective" simplified mode would undercut the AI's control. |
Rigidbody |
linearDamping |
0.01 |
Consistent low drag so the ACC throttle/brake model behaves the same across all cars. |
Rigidbody |
angularDamping |
0.35 |
Consistent rotational damping for stable lane-keeping. |
RCCP_Customizer |
autoSave |
false |
Customization is saved explicitly by the menu flow, not auto-persisted at runtime. |
RCCP_Customizer |
autoLoadLoadout |
false |
The game controls when a loadout is applied. |
RCCP_Nos |
torqueMultiplier |
3.5 |
Uniform NOS boost strength across the roster. |
RCCP_Input |
applyBrakeOnDisable |
false |
The AI owns braking; auto-brake-on-disable would fight it. |
RCCP_Input |
applyHandBrakeOnDisable |
false |
Same reason for the handbrake. |
RCCP_Clutch |
clutchInput |
0 |
Clutch fully engaged so AI throttle reaches the wheels. |
RCCP_Clutch |
engageRPM |
engine.minEngineRPM |
Aligns clutch engagement with the engine's idle so launches are clean. |
RCCP_AeroDynamics |
autoReset |
false |
The game handles stuck/out-of-bounds resets (TO_Player.ResetVehicle), not RCCP's auto-reset. |
RCCP_AeroDynamics |
ignoreRigidbodyDragOnAccelerate |
false |
Keeps drag consistent with the tuned linearDamping above. |
RCCP_Axle (all) |
maxBrakeTorque |
15000 |
Uniform, predictable braking authority for the ACC controller. |
Because this runs over the whole tree (using GetComponentInChildren/GetComponentsInChildren), it works regardless of how deep RCCP nests its sub-components. If you import a vehicle and it drives oddly — won't accelerate, brakes by itself, or auto-resets mid-run — running Check All Vehicle Setups is the first thing to try; it almost always reconciles a stray RCCP default.
Runtime Behavior of TO_Player
Once registered and spawned, TO_Player (in Assets/TO/Scripts/TO_Player.cs) is the per-vehicle gameplay brain. It tracks score, distance, nearMisses, combo/maxCombo, overtakes, and damage, and reads speed from CarController.speed each FixedUpdate. It handles the core risk model: a head-on hit against an oncoming (left-lane) car at a frontal angle (Settings.headOnFrontalDot) is instantly fatal and spawns Settings.explosionEffect, while lighter side-swipes accumulate damage until 100. It also detects completed overtakes (a same-direction car that goes from clearly ahead to clearly behind within a lateral corridor) and awards Settings.overtakePoints scaled by the combo chain. A few inspector knobs are worth knowing when tuning a specific car's feel:
canCrash(defaulttrue) — toggle off to make a vehicle invulnerable, useful for testing.lowSpeedResetThreshold(10km/h) andlowSpeedResetDelay(3s) — if the car sits stuck at or below the threshold for the full delay, it is auto-reset to the path; this prevents a permanent stall behind a lead car.overtakeAheadThreshold/overtakeBehindThreshold(5m each) andovertakeLateralGate(5m) — the geometry that defines when a pass counts.
The required TO_PlayerStabilizer is a legacy human-driving lane assist; under AI control (CarController.externalControl == true) TO_Player.Stability() early-outs so the stabilizer never stacks a second lateral force onto RCCP's tire physics. You normally leave these defaults alone; they are documented here so you know which values are safe to adjust per car versus which belong to the controller. For currency, scoring multipliers, and the full economy, see 14_APIReference.md.
Next Steps
- 09_Customization.md — equip wheels, paint, spoilers, sirens, and NOS on the cars you just added (requires an
RCCP_Customizeron the prefab). - 13_FAQ.md — common questions and fixes, including "my new car won't drive" and RCCP setup gotchas.
- 12_EditorTools.md — the full Tools > BoneCracker Games > Traffic Overtaker menu, including Configure Player Cars and Configure Upgradable Wheels.
- 14_APIReference.md —
TO_APIcurrency, ownership, and the PlayerPrefs keys (Currency,{VehicleName}Owned,SelectedPlayerCarIndex) that the roster reads and writes.