Cities and Districts
This is the page most people need. It covers generating a whole city in one press, then breaking that down into districts you can style individually — a dense downtown here, houses over there.
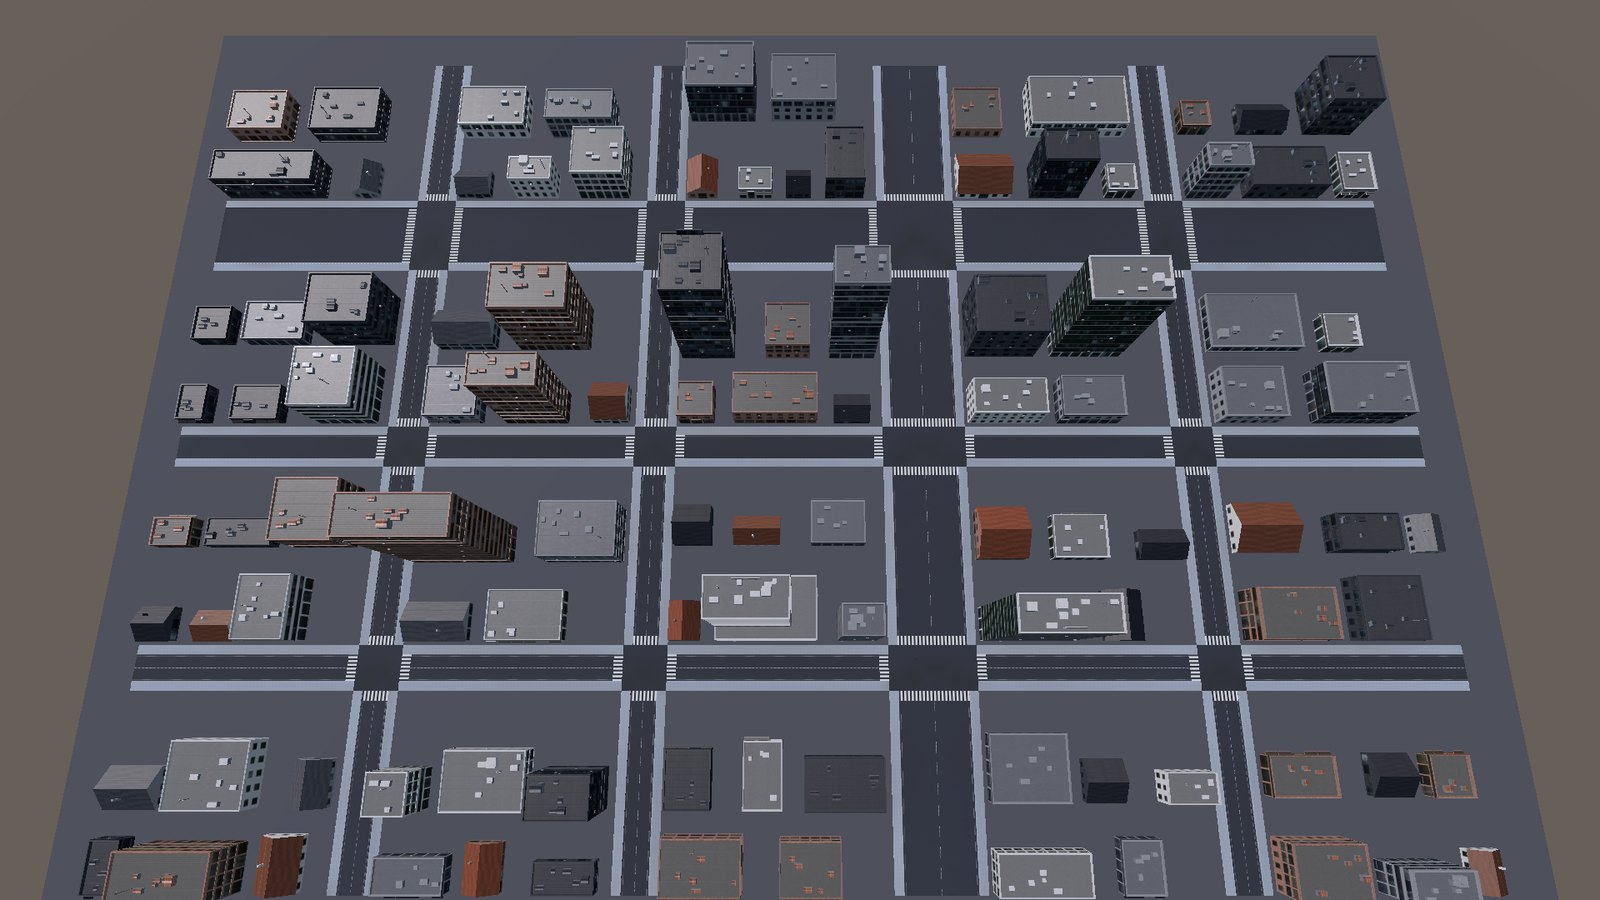
The one-button city
Open 1 Plan ▸ City Grid, press Generate City, and you get a complete city: a grid of district blocks separated by streets, roads and pavements filling the gaps, a skyline that peaks in the middle, and a ground plane under the whole thing.
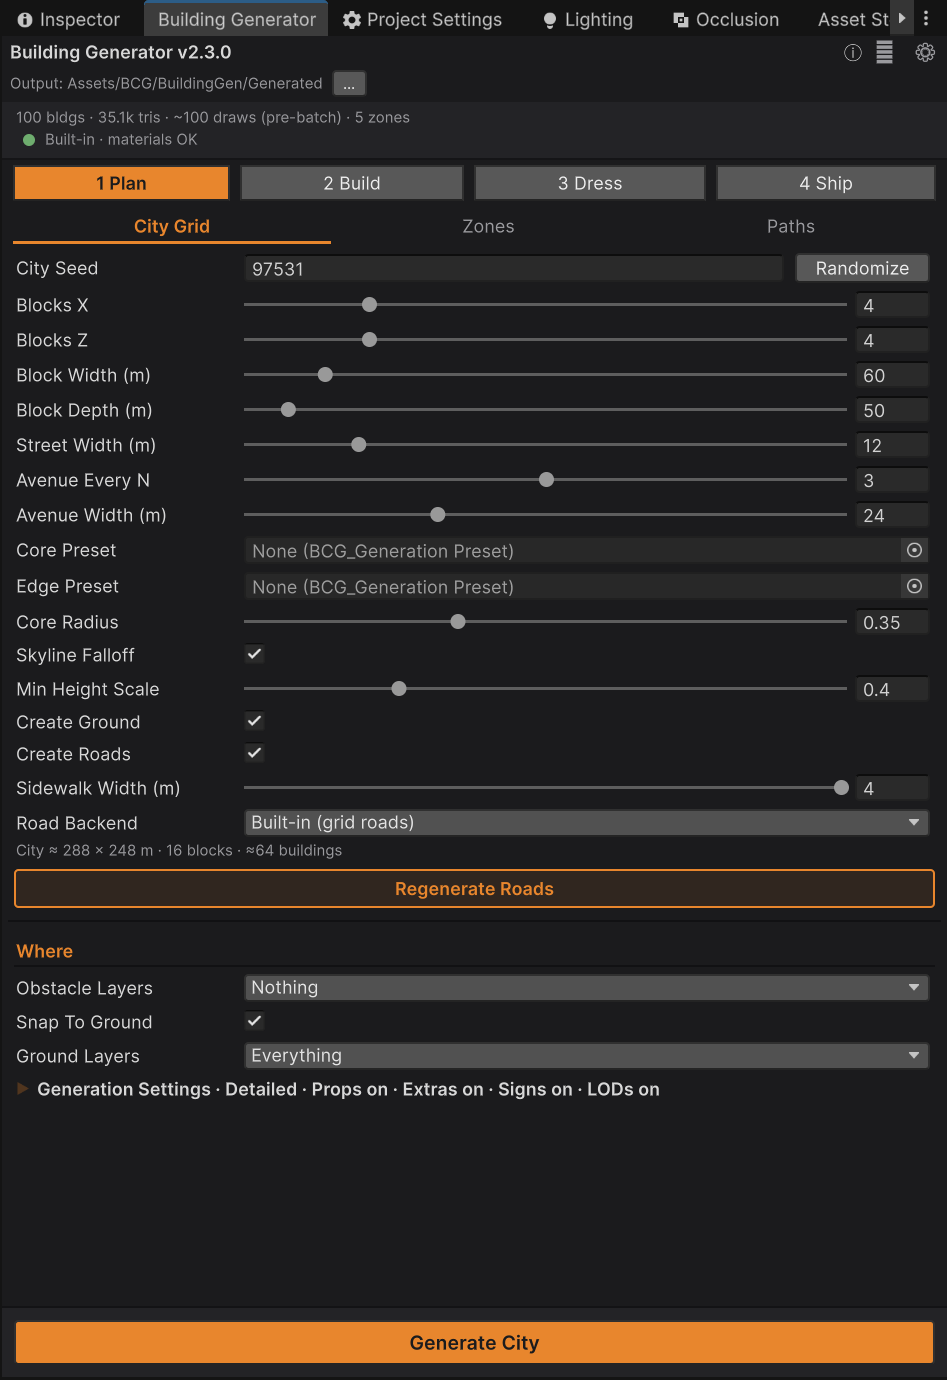
Above the button, a readout tells you what you are about to get — the city's footprint in metres, the block count, and a rough building estimate — so you can adjust before committing. Grids larger than 10 blocks a side ask for confirmation first.
Ctrl+Z once removes the buildings; twice removes the grid itself.
The settings
| Setting | Default | Range | What it does |
|---|---|---|---|
| City Seed | 97531 | — | Reproduces the whole city. Each block derives its own stable seed from this |
| Blocks X / Blocks Z | 4 / 4 | 2 – 12 | How many district blocks in each direction |
| Block Width (m) | 60 | 40 – 200 | Size of each block |
| Block Depth (m) | 50 | 40 – 200 | Size of each block |
| Street Width (m) | 12 | 8 – 30 | The gap between ordinary blocks |
| Avenue Every N | 3 | 0 – 6 | Every Nth street is widened into an avenue. 0 disables avenues |
| Avenue Width (m) | 24 | 12 – 50 | The gap for those wider streets |
| Core Preset | (none) | — | District style used near the centre |
| Edge Preset | (none) | — | District style used on the outer blocks |
| Core Radius | 0.35 | 0 – 1 | How far the core reaches, measured in rectangular rings |
| Skyline Falloff | on | — | Scale building heights down with distance from the centre |
| Min Height Scale | 0.4 | — | The height multiplier at the city edge |
| Create Ground | on | — | One flat ground plane under the whole city |
| Create Roads | on | — | Fill every street and avenue gap with real road geometry |
| Sidewalk Width (m) | 2.5 | 1 – 4 | Pavement width per side. Only active while Create Roads is on |
Making it look like a real city
Three of those settings do most of the work:
Avenues. A grid of identical streets reads as a spreadsheet. Widening every third one gives the city a hierarchy — main roads and side streets — which is most of what makes an aerial view read as a city rather than a pattern.
Skyline falloff. Real cities are tall in the middle and low at the edges. With falloff on, each block's buildings are scaled down by distance from the centre, bottoming out at Min Height Scale. Buildings never drop below one floor and never grow taller than their drawn height, so this only ever removes height, never adds it.
Core and Edge presets. This is the big one. Assign BCG_Preset_Downtown as the Core Preset and
BCG_Preset_Suburbs as the Edge Preset, and the city genuinely changes character as you drive out
of the middle — glass towers give way to brick apartments give way to houses with gardens. Core
Radius controls where the changeover happens. Either slot may be left empty; with both empty,
every block uses the zone defaults.
Regenerating parts of it
Each block is a real district with its own stable seed, so you can refill one block without touching its neighbours. For that to work, leave Markers After (on 2 Build ▸ Districts) set to Disable rather than Delete — Delete removes the block markers, and with them any possibility of a per-block repopulate.
Regenerate Roads, also on this pane, rebuilds every road network in the open scene from its stored layout. See Roads.
Districts: zones you can shape
A district is a box in your scene that gets filled with buildings. Everything the City Grid does is made of these, and you can make them by hand wherever you want a controlled neighbourhood.
Creating one
- Go to 1 Plan ▸ Zones and press Create Zone Marker. A 40 × 30 m marker drops at your
scene-view pivot, already carrying the
BCG_BuildingZonecomponent. (Any GameObject with aBoxCollideralso works, if you would rather size one yourself.) - Move and scale the box over the area you want filled. The wire cube in the Scene view is cyan while the zone is empty and turns green once it has been filled, so you can see at a glance what is done.
- Select it, switch to 2 Build ▸ Districts, and press Populate Selected Zones.
Buildings are placed in alternating rows — one row facing out, then back-to-back pairs — the way a
real city block is organised, with random alleys between rows. Output lands under a parent named
BCG_Zone_{markerName}_{seed}.
The layout settings
| Setting | Default | What it does |
|---|---|---|
| Zone Seed | 24680 | Reproduces the block. 0 on a district means "assign me a stable seed on first fill" |
| Edge Margin (m) | 1 | How far buildings stay from the zone's edges (range 0 – 8) |
| Row Gap (m) | 6 – 10 | Random alley or street width between rows |
| Gap Range (m) | 4 – 10 | Random spacing between neighbours along a row |
| Markers After | Disable | What happens to the marker once its area is filled |
Markers After deserves a note. Disable keeps the marker but switches off its collider — the bounds stay visible and you can refill or clear the district later. Delete removes the marker GameObject entirely, which is tidier but permanent. Buildings are unaffected either way; they live in their own object.
Each district's card on 2 Build ▸ Districts also carries Select output and Clear output for that district alone, and there is a Populate All In Scene button that refills every district in the open scene using each one's own settings (it asks for confirmation past ten zones).
Per-district style
Select a district and its component gives that neighbourhood its own character, independent of every other district:
| Setting | Default | What it does |
|---|---|---|
| Tower / Shop / Apartment / House weight | 0.35 / 0.30 / 0.35 / 0.25 | Relative chance of each kind. Normalised internally, so all-1.0 is an even mix |
| Variant A / B / C / D | all on | Which palettes this district is allowed to use |
| Height Falloff | flat | A curve: X is distance from the district centre (0 centre, 1 edge), Y is a floor multiplier. Slope it down to peak the skyline at the district's core |
| Detail | Standard | Geometry tier for this district — see Customising |
| Facade Extras | on | Air-conditioning units and wall vents |
| Obstacle Layers | Nothing | Layers this district treats as "don't build here" |
| Snap To Ground | off | Place buildings on the ground surface instead of the zone floor |
| Ground Layers | Everything | What counts as ground when snapping |
A district always uses its own obstacle mask — the window-wide one never cascades into it.
District presets
Presets save a complete district style as an asset you can reuse. Four ship with the package:
| Preset | Style |
|---|---|
BCG_Preset_Downtown |
Dense high-rise core — towers and graphite curtain glass, tight plots, wide avenues, skyline peaking at the centre |
BCG_Preset_Suburbs |
Residential sprawl — gabled houses with corner shops, roomy plots |
BCG_Preset_OldTown |
Historic quarter — mid-rise brick and plaster apartments over shops, narrow alleys |
BCG_Preset_CommercialStrip |
Roadside retail — low storefront boxes with wide parking gaps |
The District Presets section on 1 Plan ▸ Zones is where you use them:
- The preset popup lists every preset asset in your project. The dropdown hides the
BCG_Preset_prefix, so Downtown isBCG_Preset_Downtown.asseton disk. - Apply to Selected Zones copies the preset onto every selected district, as one Undo step.
- Save As Preset… captures the first selected district (or, with nothing selected, the window's
current settings) into a new asset under
Assets/BCG/BuildingGen/Presets/.
A preset captures the archetype mix, palettes, margins, gap ranges, obstacle layers, height falloff curve and ground-snap settings. It deliberately never captures the seed, so applying a new style to a district you have already laid out keeps the same layout and just re-skins it.
Placing buildings on uneven ground
By default buildings sit at a flat height. Turn on Snap To Ground — in the Where section for
the Single, Row and Street tools and plain box zones, or the district's own snapToGround field —
and each building is placed on the ground surface beneath it.
How it works, and why it behaves differently on slopes:
- Five downward rays probe the building's footprint (four corners plus the centre) against Ground Layers. The tool's own buildings, roads and zone markers are always ignored, so nothing ever snaps onto itself.
- Colliders are not required. Each probe tries physics first; where nothing answers, it raycasts the visible meshes on those layers instead. Display-only ground — an imported city mesh, a landscape whose collision comes later — snaps just as well.
- On flat-enough ground the base lands on the lowest hit, so a building never floats and its uphill side sinks in slightly. If the corners differ by more than half a metre, a foundation skirt — a concrete plinth using the same facade atlas — automatically fills the gap on the downhill side.
- On real slopes (steeper than 5°) the base rises to the highest hit instead, and the skirt grows into a full basement wall filling the cut below. This is what stops ground-floor windows and doors being buried in a hillside. The basement is solid, with a collider per ground-touching block, so the exposed downhill face is not drive-through scenery.
- Where no ground is found at all, the building keeps its flat placement, and a district fill that missed the ground under some plots says so in the Console rather than failing quietly.
The skirt is a scene-only child object. No asset is written for it, and the tool's marker-driven commands ignore it.
Buildings that were placed before you had a slope there — or moved by hand onto one — can be repaired without regenerating. The health dashboard flags them and its Skirts button fixes them in one Undo-able step. See Finishing and Shipping.
Common questions
My city generated but the blocks are empty. The blocks are probably too small for the archetype mix — a building needs roughly 7.8 m of frontage. Increase Block Width/Depth, or lower Edge Margin.
Buildings are sitting on my roads. The tool avoids its own buildings automatically, but not your scenery. Point Obstacle Layers at the layer your roads are on.
How do I make a district that is only houses? Set the Tower, Shop and Apartment weights to 0 and
leave House above 0, or apply BCG_Preset_Suburbs.
Can I get the same city back later? Yes — the City Seed reproduces it exactly, provided the block dimensions and presets are the same.
Where to go next
- Paths and Roads — road geometry, curved streets and the Road Constructor bridge.
- Customising Buildings — archetypes, detail levels and props.
- Materials and Lighting — night look, probes, baked lighting.
- Reference ▸ BCG_BuildingZone — every district field with its type, default and range.