Creating & Reskinning Scenes
This page is the practical, end-to-end workflow for two related tasks that every reskin eventually needs: building a brand-new playable scene from scratch, and restyling an existing gameplay scene (new sky, lighting, and environment art) without breaking the game logic. Both tasks lean on a single editor tool — the TO_SceneManager component and its custom inspector — which acts as a one-click bootstrap for the entire manager and UI stack. The reason this matters for reskinning is that a Traffic Overtaker level is not a hand-wired scene; it is a fixed set of cooperating manager singletons plus an endless road treadmill, and TO_SceneManager knows how to assemble that set for you. Once you understand that the scene is "managers + road art," reskinning becomes mostly an art job rather than a wiring job.
Throughout, remember the project convention: the game's own code uses the TO_ prefix and lives only under Assets/TO/, while the bundled physics engine (Realistic Car Controller Pro) uses the RCCP_ prefix. The only ground-truth values quoted here come from Assets/TO/Editor/TO_SceneManagerEditor.cs, Assets/TO/Scripts/Managers/TO_SceneManager.cs, and the live TO_Settings asset.
What TO_SceneManager Does
TO_SceneManager is the central service locator for a scene. It is a TO_Singleton<TO_SceneManager>, and it lazily finds every other manager through cached properties — GameplayManager, CurvedRoadManager, PathManager, TrafficManager, LaneManager, PlayerCamera, GameplayPanel, GameoverPanel, and the UI EventSystem for a gameplay level, or MainMenuManager, MainMenuPanel, ShowroomCamera, and the EventSystem for a menu level. Each getter calls FindFirstObjectByType<T>() and caches the result, so the manager does not require you to drag references into the inspector; it discovers them at Awake() via GetAllComponents(). This is why a Traffic Overtaker scene can be assembled simply by placing the right manager GameObjects somewhere in the hierarchy — the locator wires itself.
The single most important authored field on the component is levelType, an enum LevelType { MainMenu, Gameplay } that defaults to Gameplay. This flag decides which family of managers the locator looks for and, crucially, which scene template the inspector pulls from when you ask it to build everything. Because the gameplay branch of GetAllComponents() also resolves the RCCP_SceneManager, the physics engine's own scene controller is part of the expected stack and is created/checked right alongside the TO_ managers. The custom inspector additionally forces RCCP_SceneManager.Instance.registerLastVehicleAsPlayer = false, so the player car is owned by TO_GamePlayManager, not auto-registered by RCCP.
The Scene Manager Inspector
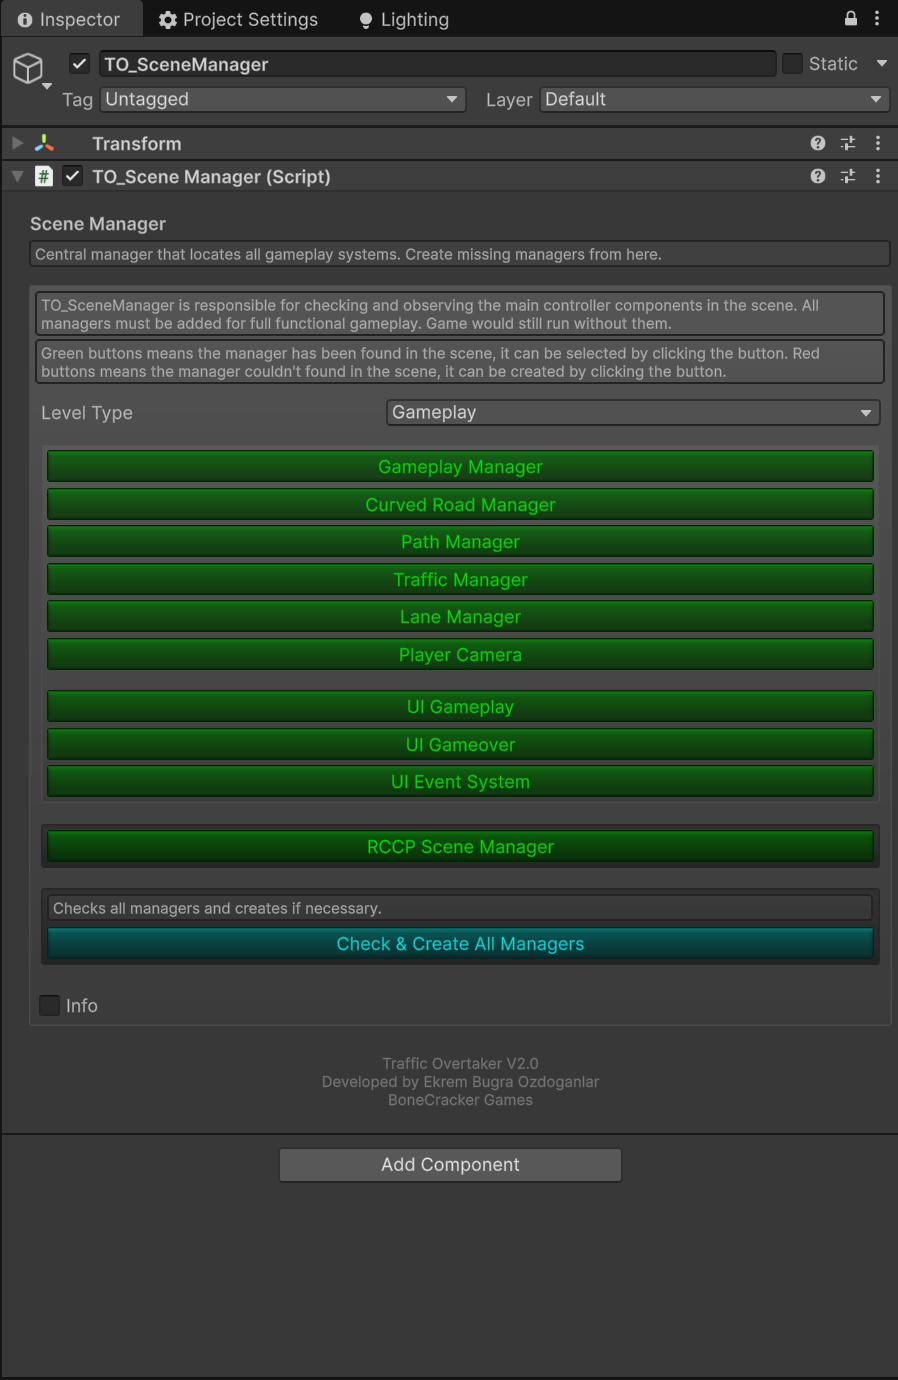
The custom inspector (TO_SceneManagerEditor) turns TO_SceneManager into a scene-assembly dashboard. When you select the GameObject, the inspector first re-runs GetAllComponents() (only while not in Play Mode), then draws a Level Type dropdown followed by a column of color-coded status buttons — one per manager the scene needs.
 The
The TO_SceneManager inspector: pick a Level Type, then use the green (found) / red (missing) status buttons, or "Check & Create All Managers" to pull the whole stack from a template.
The two help boxes at the top of the inspector state the color contract verbatim: "Green buttons means the manager has been found in the scene, it can be selected by clicking the button. Red buttons means the manager couldn't found in the scene, it can be created by clicking the button." So a green button is a navigation shortcut (it sets Selection.activeGameObject to that manager), and a red button is a build action (it instantiates the missing manager). Every create action is wrapped in Undo.RegisterCreatedObjectUndo, so a misclick is one Ctrl+Z away, and creating a manager marks the active scene dirty so you remember to save.
There is one important runtime caveat the inspector enforces: during Play Mode the create buttons are disabled and an info box appears — "Managers can't be created at runtime, this means clicking the red buttons won't do anything during gameplay." Always assemble scenes in Edit Mode.
Gameplay status buttons
When Level Type is set to Gameplay, the inspector draws these status buttons in order. The "Creates" column describes what a red (missing) button instantiates.
| Button label | Manager type located | Creates when red |
|---|---|---|
| Gameplay Manager | TO_GamePlayManager |
New empty GameObject + component |
| Curved Road Manager | TO_CurvedRoadManager |
New empty GameObject + component |
| Path Manager | TO_PathManager |
New empty GameObject + component |
| Traffic Manager | TO_TrafficManager |
New empty GameObject + component |
| Lane Manager | TO_LaneManager |
New empty GameObject + component |
| Player Camera | TO_Camera |
Instantiates the gameplayCamera prefab from TO_Settings (TO_MainCamera) |
| UI Gameplay | TO_UI_GameplayPanel |
Instantiates UI_GameplayPanel from TO_Settings (TO_UI_GameplayCanvas) |
| UI Gameover | TO_UI_GameOverPanel |
Instantiates UI_GameoverPanel from TO_Settings (TO_UI_GameoverCanvas) |
| UI Event System | EventSystem |
Instantiates UI_EventSystem from TO_Settings (TO_UI_EventSystem) |
A separate section below them always draws the RCCP Scene Manager button (RCCP_SceneManager); when red it creates the RCCP scene controller and sets registerLastVehicleAsPlayer = false. The five pure-manager buttons (Gameplay, Curved Road, Path, Traffic, Lane) build through CreateComponent(Type), which makes a bare GameObject named after the component's full type name and adds the script — these managers carry their configuration in code and need no prefab. The camera and UI buttons instead instantiate authored prefabs referenced by TO_Settings, because those objects have scene-specific visual content.
Main menu status buttons
Switching Level Type to MainMenu swaps the list to the showroom stack: MainMenu Manager (TO_MainMenuManager), UI MainMenu (TO_UI_MainmenuPanel, instantiates UI_MainmenuPanel = TO_UI_Canvas_MainMenu), UI Event System (EventSystem, instantiates TO_UI_EventSystem), and Showroom Camera (TO_Camera_Showroom, instantiates the showroomCamera prefab = TO_ShowroomCamera). The RCCP Scene Manager button is still drawn below, because the menu's rotating car preview is a real RCCP vehicle. You will rarely build a second menu scene — most reskins keep the one TO_Scene_MainMenu — but the same one-click bootstrap applies if you do.
How To: Create a New Gameplay Scene From Scratch
This is the fastest path to a fresh, fully-wired level. It uses the Check & Create All Managers button, which clones the entire authored stack from a template scene rather than creating empty managers one at a time.
- Create and save an empty scene. In Unity,
File > New Scene(use a Basic/empty template), thenFile > Save AsintoAssets/TO/Scenes/with aTO_Scene_name so it matches the set's convention (see 05_Scenes.md). - Add a
TO_SceneManager. Use the menuGameObject > BoneCracker Games > Traffic Overtaker > Create > TO Scene Manager, or the equivalent underTools > BoneCracker Games > Traffic Overtaker > Create > TO Scene Manager. Both routes drop a singleTO_SceneManagerGameObject into the scene. (See 12_EditorTools.md for the full menu map.) - Set Level Type = Gameplay. Select the new GameObject and confirm the Level Type dropdown reads
Gameplay(it is the default). At this point every status button will be red, because the scene is otherwise empty. - Click "Check & Create All Managers". This is the green primary button near the bottom of the inspector, under the help text "Checks all managers and creates if necessary." For a Gameplay level it calls
LoadSceneTemplate(TO_Settings.Instance.templateScenePath_Gameplay), which points atAssets/TO/Scenes/TO_SceneTemplates/TO_SceneTemplate_Gameplay.unity. - Let the template merge in. Internally the tool opens that template scene additively, moves every root GameObject from it into your active scene with
SceneManager.MoveGameObjectToScene, then closes the template without saving. Because the template already contains a fully-configured manager + camera + UI + road stack, your scene is now populated in one step. The tool then destroys the now-redundant standaloneTO_SceneManagerit finds (the template brings its own), via a deferredEditorApplication.delayCall, so you are left with exactly one of each manager. - Verify the buttons turned green. Re-select the scene's
TO_SceneManager(the one that came in with the template) — all status buttons should now be green, meaning every manager resolved. If any single one is still red, click that one button to create just the missing piece. - Add the road and environment art. The template provides the manager logic and a default road reference (
TO_Settingsshipsroad = TO_Highway (Prototype)), but you will typically place your ownTO_Highwayenvironment objects here. The expected gameplay root objects are listed below. - Save the scene, then register it in Build Settings so it can be loaded at runtime (
File > Build Profiles / Build Settings). The shipping build enablesTO_Scene_MainMenu,TO_Scene_Sunny,TO_Scene_Rainy, andTO_Scene_Night; add your new scene to that list.
For reference, a healthy gameplay scene (matching the shipped TO_Scene_Sunny) has these root objects after the template merge:
TO_SceneManager        RCCP_SceneManager      TO_GameplayManager
TO_CurvedRoadManager   TO_PathManager         TO_TrafficManager
TO_LaneManager         TO_MainCamera          TO_PathDirection
TO_SpawnLocation       TO_GameplayCanvas      TO_GameoverCanvas
TO_FixFloatingOrigin   EventSystem            Directional Light
TO_Highway  (+ TO_Highway (Sea), TO_Highway (Desert) environment variants)
Manual assembly (without the template)
If you prefer to build a level by hand — for example, to learn the dependencies — skip step 4 and instead click each red status button top-to-bottom: Gameplay Manager, Curved Road Manager, Path Manager, Traffic Manager, Lane Manager, Player Camera, UI Gameplay, UI Gameover, UI Event System, then RCCP Scene Manager. Each click creates one piece with Undo support and turns its button green. This produces the same manager set as the template, but without the road art and helper objects (TO_PathDirection, TO_SpawnLocation, TO_Highway), which you would then add yourself. The template route is strongly recommended for production work; manual assembly is mainly a teaching/troubleshooting aid.
How To: Visually Reskin an Existing Gameplay Scene
The opposite task — keeping the gameplay identical but changing the look — is the most common reskinning job. Because all gameplay behavior lives in the managers and the road treadmill, you can replace nearly all of the visual layer without touching a single script. The shipped scenes prove this: TO_Scene_Sunny, TO_Scene_Rainy, and TO_Scene_Night are the same game with different skies, lights, and environment dressing.
- Duplicate a known-good scene as your starting point. In the Project window, copy
Assets/TO/Scenes/TO_Scene_Sunny.unity(Ctrl+D) and rename it, e.g.TO_Scene_Desert.unity. Starting from a working scene guarantees the full manager stack, the road,TO_PathDirection,TO_SpawnLocation, andTO_FixFloatingOriginare all present and correctly wired. (Memory note: the road meshes are user-owned art — duplicating a scene keeps the existing, correct road in place.) - Swap the skybox and lighting. Open
Window > Rendering > Lighting, assign a new skybox material, and retune the Directional Light (color, intensity, rotation) and ambient/fog to match your theme. This is what most distinguishes Sunny from Night. Because URP post-processing is optional (TO_Settings.defaultPP = false), confirm your look still reads with post-processing off as well as on. - Replace environment art around the road. Swap the props, terrain, buildings, and the side-of-road environment meshes (the
TO_Highway (Sea)/TO_Highway (Desert)style environment variants). Keep these as cosmetic children/siblings of the road so they ride along with the treadmill; do not parent gameplay logic to them. - Keep the road treadmill intact. This is the rule that makes the reskin safe: leave the
TO_CurvedRoadManager,TO_PathManager, andTO_LaneManagerand their referenced road segments alone. The road is an endless pooled treadmill driven by these managers (see 07_CurvedRoads.md); changing its material and decorative geometry is fine, but removing or restructuring the path/lane data will break traffic spawning and the AI driver. If you must edit the road model itself, change the mesh/material on the existing segments rather than swapping in an unrelated object. - Restyle, do not rewire, the UI. The
TO_GameplayCanvasandTO_GameoverCanvascame from the template/prefab; you can recolor sprites, change fonts, and reposition elements, but keep the panel components (TO_UI_GameplayPanel,TO_UI_GameOverPanel) and theEventSystemso the HUD and game-over flow keep working. See 09_Customization.md for the customization and store UI. - Sanity-check with the inspector. Select
TO_SceneManagerand confirm every status button is still green. A button that has gone red after your edits means you deleted or replaced a required manager — click it to recreate, or undo the deletion. - Save and add to Build Settings. A reskinned scene is a new scene file; register it the same way as a from-scratch level so it ships.
The same duplicate-and-restyle pattern is exactly how the three shipping weather variants were produced, which is the strongest evidence that visual reskinning is low-risk as long as the manager + road layer is preserved.
Why the Template Approach Is Safer Than Hand-Wiring
It is worth understanding why TO_SceneManager exists rather than just dragging prefabs around. A Traffic Overtaker level depends on a precise set of co-located singletons that find each other by type at runtime; if even one is missing, GetAllComponents() silently returns null for it and that subsystem goes dark (the help box warns "Game would still run without them," but degraded). Hand-placing ten objects in the right configuration is error-prone, and a typo'd or duplicated manager is hard to spot. The Check & Create All Managers flow sidesteps all of that by cloning a single authored, tested template (templateScenePath_Gameplay / templateScenePath_MainMenu from TO_Settings) and merging its roots into your scene — you inherit a known-good arrangement instead of reconstructing it. For reskinning specifically, this means your creative energy goes into art and theming, while the fragile wiring is handled once, centrally, by the tool. If you ever change the canonical layout, edit the template scene assets under Assets/TO/Scenes/TO_SceneTemplates/ and every future "Create All" inherits the change.
See Also
- 05_Scenes.md — the shipped scene list, Build Settings setup, and scene-flow between menu and gameplay.
- 12_EditorTools.md — the full
Tools > BoneCracker Games > Traffic Overtakermenu, including the Create > TO Scene Manager entry used above. - 07_CurvedRoads.md — how the road treadmill, path, and lanes work, so you know what to preserve while reskinning.
- 04_SystemArchitecture.md — the manager/singleton architecture that
TO_SceneManagerlocates and bootstraps.