Creating a Single Building
This page covers 2 Build ▸ Single — making one building at a time, auditioning ideas before you commit, and painting buildings into the scene by hand. It is the pane where you work out what a building should look like; the other Build panes then apply that look at scale.
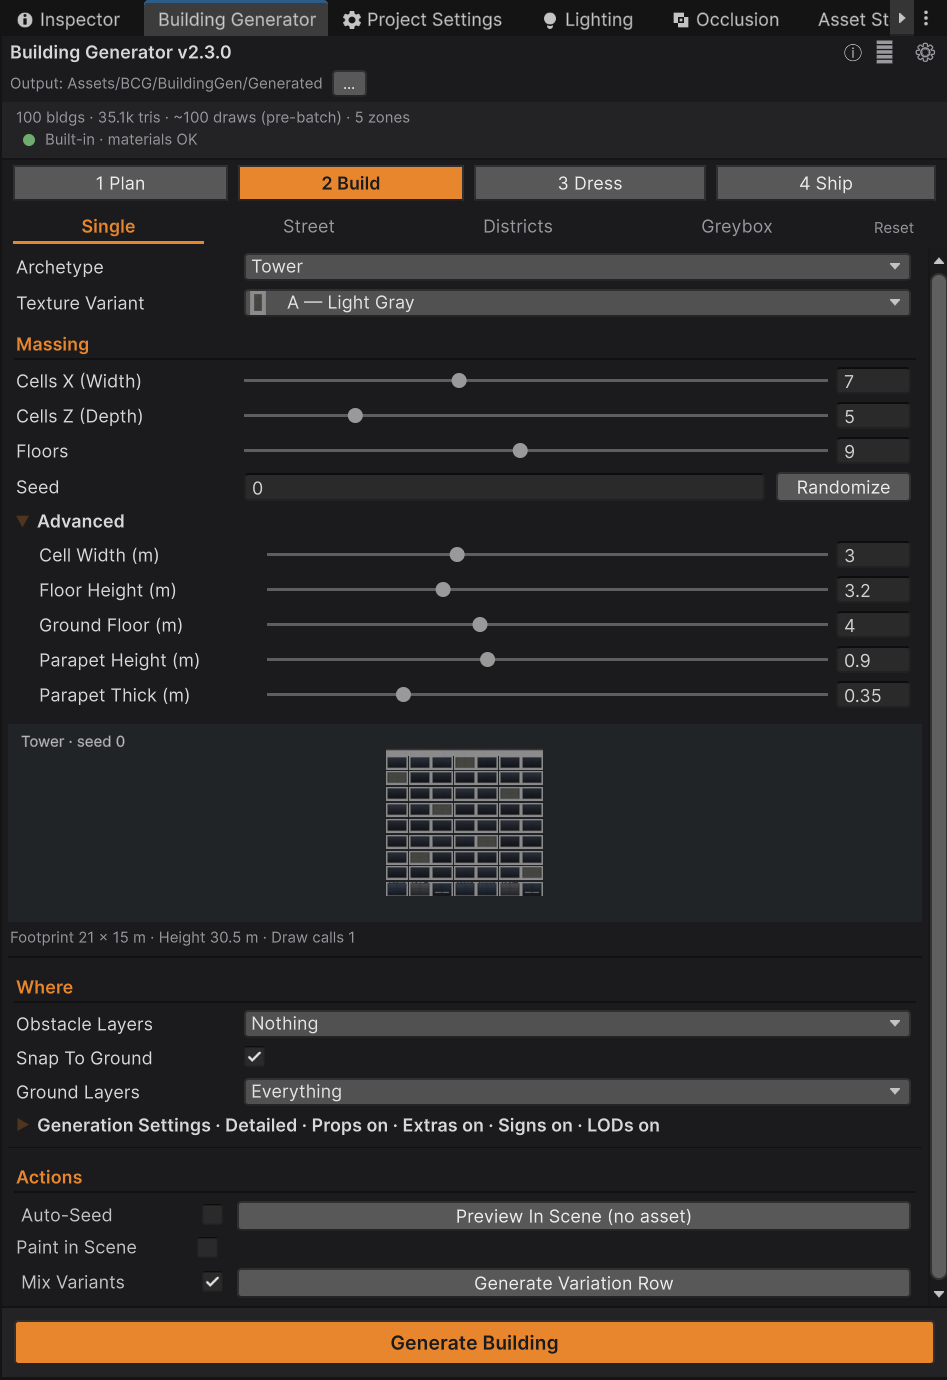
Making a building
- Pick an Archetype — Tower, Shop, Apartment or House. Switching archetype loads sensible defaults for that kind of building (a Shop gets a taller ground floor for its storefront, a House gets lower ceilings), but every field stays editable afterwards.
- Pick a Texture Variant — the palette the building wears:
| Variant | Look |
|---|---|
| A | Light Gray |
| B | Brick |
| C | Graphite Curtain |
| D | White Plaster |
- Set the massing — how big it is:
| Field | Default | What it means |
|---|---|---|
| Cells X (Width) | 7 | Window columns across the front. Width = Cells X × Cell Width |
| Cells Z (Depth) | 5 | Window columns down the side. Depth = Cells Z × Cell Width |
| Floors | 9 | Total floors, counting the ground floor |
| Seed | 0 | The integer that decides every random choice |
- Press Generate Building in the action bar.
The building appears at your scene-view pivot, dropped to ground level, and is registered with Undo so Ctrl+Z removes it.
Under the fields, a live preview redraws as you change anything, with a readout like
Footprint 21 × 15 m · Height 30.5 m · Draw calls 1. Use it — it is the real building, not an
approximation, so you never have to generate something just to see what it looks like.
Finding a seed you like
Press Randomize next to the Seed field and watch the preview. Every press is a different building of the same kind and size. When one looks right, generate it — and note the number down if you want it again, because that number is the building.
If you would rather audition at full size in the scene, use the Actions block at the bottom:
- Preview In Scene (no asset) spawns the building into your scene without writing anything to disk. It is a throwaway — it ignores the Save As Prefab setting entirely, because its whole job is to let you look at something before committing.
- Auto-Seed, next to it, rerolls the seed on every Preview click, so you can click repeatedly to flip through fresh buildings. The Seed field updates to match what you are looking at, so when one is right you just press Generate to keep it.
Fine-tuning the proportions
Expand Advanced for the dimensions behind the cells:
| Field | Range | Default | What it controls |
|---|---|---|---|
| Cell Width (m) | 2 – 5 | 3.0 | Metres per window cell — drives both width and depth |
| Floor Height (m) | 2.4 – 5 | 3.2 | Height of every floor above the ground floor |
| Ground Floor (m) | 2.8 – 6 | 4.0 | A taller ground floor reads as retail or a lobby |
| Parapet Height (m) | 0.2 – 2 | 0.9 | The wall around the roof edge. Ignored for House |
| Parapet Thick (m) | 0.15 – 1 | 0.35 | How far that wall reads inward. Ignored for House |
Cell width is the interesting one: narrowing it to 2.6 m makes a building read as older and more domestic, widening it to 3.4 m reads as modern office. Mixing cell widths across a district is what stops a skyline looking machine-made — the Variation Row and the district fills do this for you.
Five variations at once
Generate Variation Row, in the Actions block, places five buildings in a row from the current settings, each with its own seeded size jitter, with an 8 m gap between them. It is the fastest way to see the range a set of parameters produces.
- Mix Variants (on by default) gives each of the five its own palette, drawn from all four. Turn it off and all five wear the currently selected variant.
- The building sizes are identical either way. The palette choice is drawn from the random sequence whether or not you use it, precisely so that toggling Mix Variants never shifts anything else — only the materials change.
- All five share one Undo entry, so one Ctrl+Z clears the row.
Painting buildings into the scene
For hand-placed work — filling an awkward corner, thickening a skyline where the camera actually looks — turn on Paint in Scene and the Scene view becomes a brush.
- Hovering shows a ghost of where the building would land. It is blue when the spot is free, and amber when something is in the way, with a dotted line showing where the building would be pushed to instead.
- Click stamps a building using the current settings with a fresh random seed, which is written back into the Seed field so you can see what you just made.
- Shift+Click stamps the same building again — useful for a deliberate row of identical units.
- Each stamp is one Undo step.
- Stamps respect everything else the tool does: overlap avoidance, Obstacle Layers, ground snapping and its foundation skirt, and all the Generation Settings toggles.
Painting stops when you press Esc, switch to another sub-tab or stage, toggle it off, or close
the window. The toggle's label changes to Painting… (Esc to stop) while it is live, so you always
know.
Tip: turn Save As Prefab Assets off while painting. Each click then places geometry with no asset write, which makes painting feel instant instead of pausing for a fraction of a second per building. Remember to save the scene afterwards.
Shared settings on this pane
Below the archetype controls sit two blocks that appear on every pane that generates buildings:
Where — placement rules: Obstacle Layers (which physics layers count as "don't build here"), Snap To Ground and Ground Layers. See Placing buildings on terrain.
Generation Settings — a collapsed foldout whose header summarises its own state, e.g.
Standard · Props on · Extras on · Signs off · LODs off. Inside are two groups:
- Geometry — Detail level, Rooftop Props, Facade Extras, Lit Signage, Generate LODs. These change what the building is made of; see Customising Buildings.
- Saving — Save As Prefab Assets, Bake Lightmap UVs, Reuse Existing Assets. These change what gets written to disk; see Optimising.
Fake Interiors and Night Lights are deliberately not here. They are global material settings that affect every building at once rather than per-building options, so they live in 3 Dress ▸ Mood.
Editing a building you already made
Select any generated building and the identity strip appears under the status band, showing its
recipe — for example Tower 7×5 F9 · seed 12345 · 6.2k tris. Two buttons sit at its right:
- Copy puts that building's seed on the clipboard.
- Edit in Building loads the whole recipe back into this pane and switches to it.
Note what "edit" means here: you are loading the recipe, changing it, and generating again. Because the assets are GUID-stable, regenerating overwrites the same mesh and prefab files, so every instance of that building in your scenes updates. It is not an in-place edit of the one object you clicked.
Common questions
The building landed somewhere I did not click. Something was already there. The tool moved it to the nearest free spot rather than letting two buildings intersect. In open ground it always places exactly where you asked.
I want it to sit on my terrain, not at y = 0. Turn on Snap To Ground in the Where section. See uneven ground.
Can I change one wall's material? No — a building is one mesh with one material, which is what makes it cost one draw call. See One mesh, one material.
Where to go next
- Creating Many Buildings — the same recipe applied to a street or a district.
- Customising Buildings — what each archetype and detail level changes.
- Reference ▸ Settings — every field on this pane with its default and range.