Creating Items (Catalogs)
Everything the garage sells comes from catalog assets you author in the Project window - no code, no scene work. This chapter explains the catalog structure, then gives a step-by-step recipe for every content type.
How Content Is Organized
One Catalog Set asset aggregates up to eight per-category catalogs, and is what you assign to the scene (Scene Setup):
RCCPT_CatalogSet  (the one asset your controller references)
 |- Paint Catalog      colors + custom color unlock + finishes
 |- Wheel Catalog      wheel models (indices into RCCP's global wheel list)
 |- Spoiler Catalog    spoilers (indices into the vehicle's spoiler array)
 |- Siren Catalog      sirens (indices into the vehicle's siren array)
 |- Decal Catalog      decal materials (URP/HDRP)
 |- Neon Catalog       neon materials (URP/HDRP)
 |- Upgrade Catalog    price ladders for Engine / Brakes / Handling / Speed
 |- Tuning Catalog     which tuning sliders and color knobs to expose
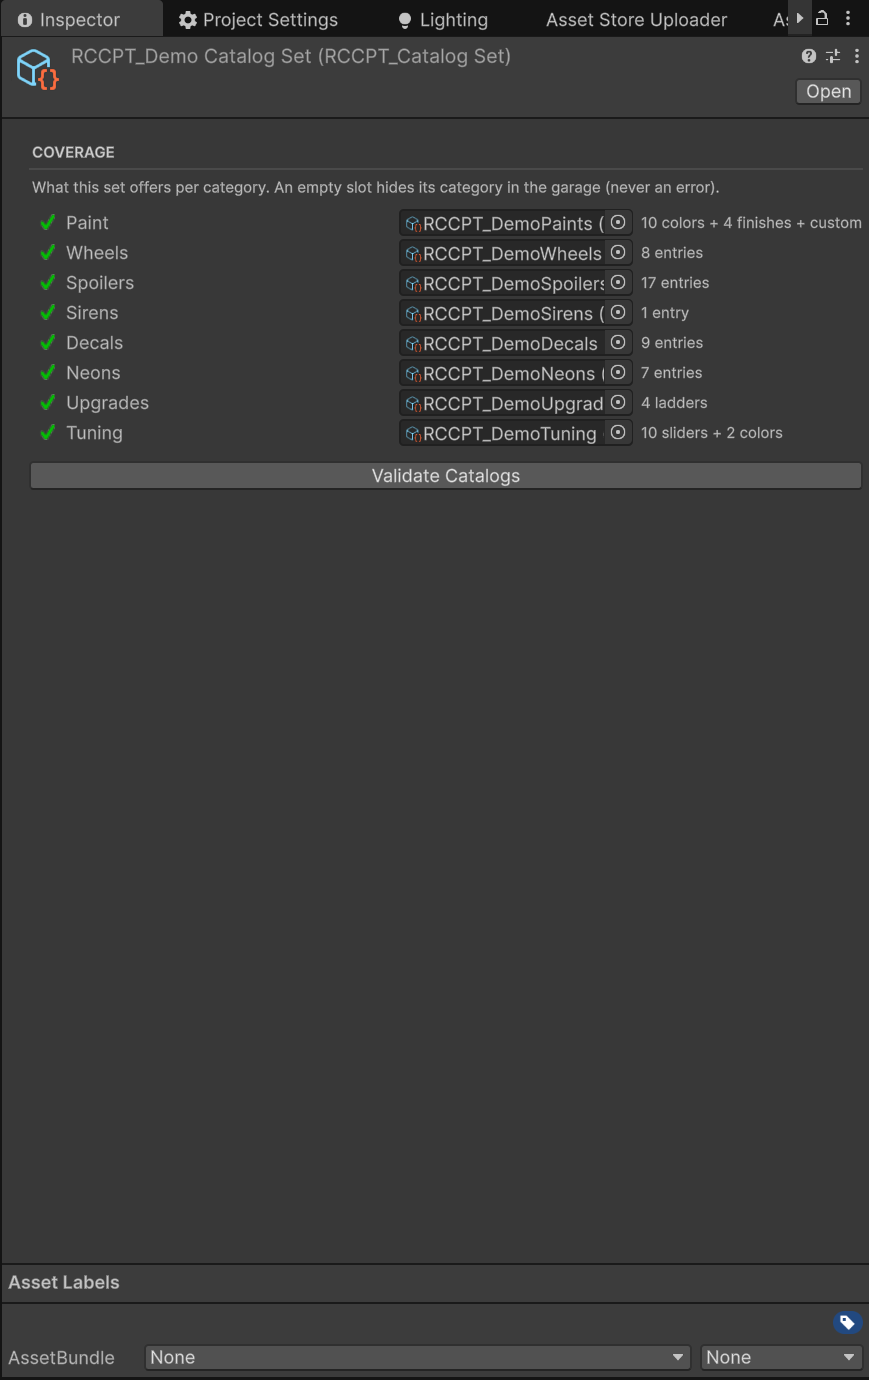
Leaving a slot empty simply hides that category in the garage. You can share one set across every scene (assign it as the project default on RCCPT_Settings) or use different sets per scene (controller override).
The Catalog Set inspector's Coverage block is the fastest way to confirm your content is wired up: each slot shows a status icon and a summary such as 10 colors + 4 finishes + custom, 8 entries, 4 ladders, or empty — nothing to offer. It states the rule on screen too - an empty slot hides its category and is never an error. Full details: Editor Tools Reference.
All catalog assets are created from the same menu: Assets > Create > BoneCracker Games > RCCP Tuner > ... (Catalog Set, Paint Catalog, Wheel Catalog, Spoiler Catalog, Siren Catalog, Decal Catalog, Neon Catalog, Upgrade Catalog, Tuning Catalog).
Study the demo first.
Assets/RCCP Tuner/Demo/Catalogs/contains a complete, working example of every catalog type. But author your own content in your own assets, not by editing the demo catalogs - the Setup > Build Demo Scene menu regenerates them. It does ask first and lists exactly what it will overwrite (the scene, the demo catalogs, the demo sky/floor materials), but asset writes cannot be undone, so anything you added to those files is gone.
Fields Every Entry Shares
Whatever the category, each entry row has the same base fields:
| Field | What it does |
|---|---|
| Id | The stable ownership key. Auto-filled when left empty. Never change it after release - players' ownership is stored under it, and renaming orphans their purchases. |
| Display Name | The name shown on the item card. |
| Icon | Optional sprite for the card. Paint and finish entries draw a colour/material swatch instead and never need one. Every other kind (wheels, spoilers, sirens, decals, neons) shows no icon at all when the slot is empty - so fill it, or let the Tuner render one for you (Generating Item Icons From Your Models). |
| Price | The base price. The economy config's global multiplier applies on top (Prices & Economy). |
| Is Free | Free entries are owned from the start - use this for stock/default content. |
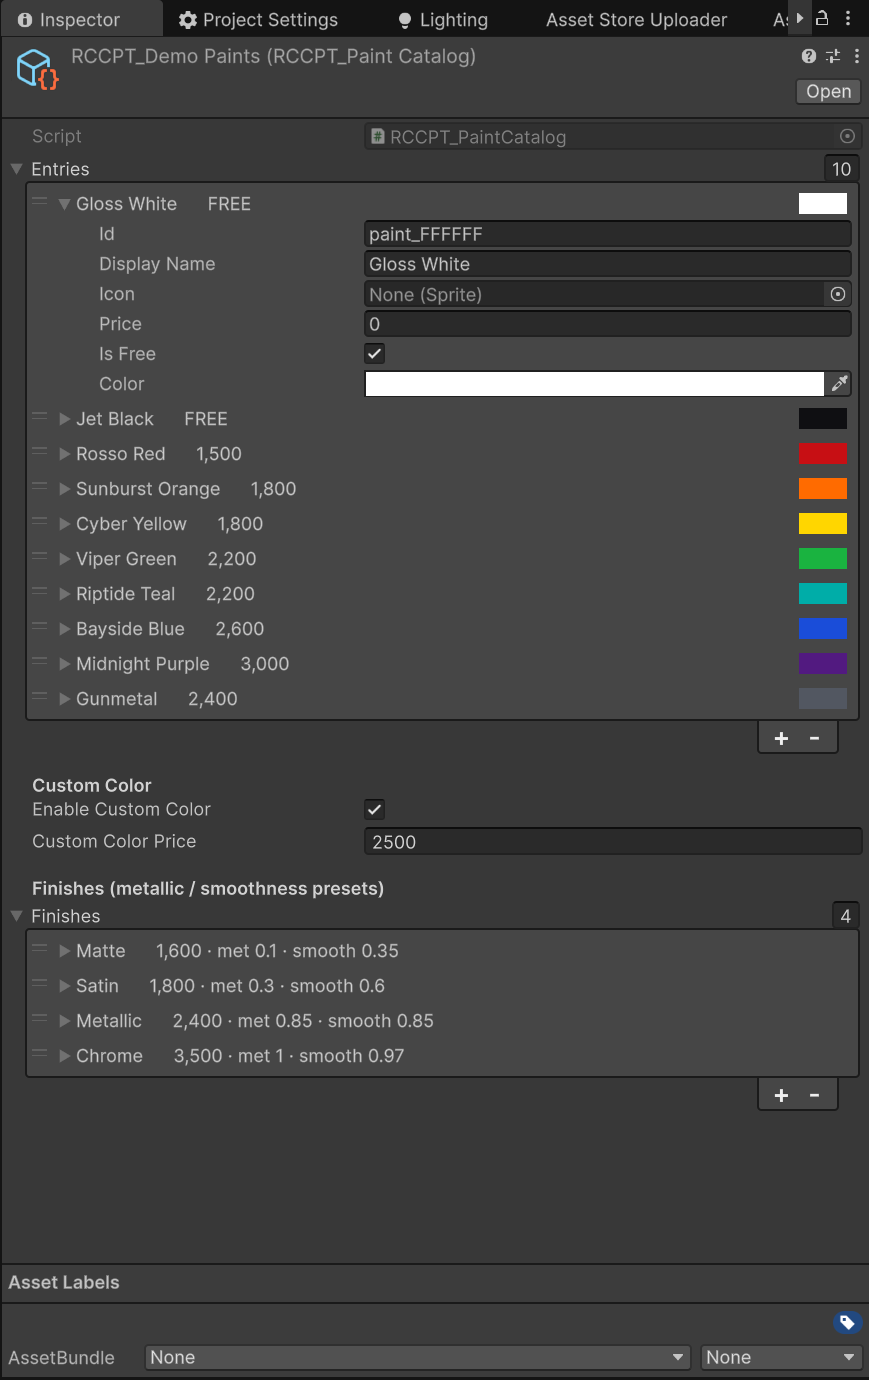
You will not see Element 0, Element 1, … in these lists. Each row's collapsed header shows its own content - Bayside Blue 2,600 with a colour chip at the end of the row, Stock FREE · stock, Decal 0 500 · Decal_0 - so you can audit a long catalog without expanding anything. Watch for NO MATERIAL: it means that row points at nothing and will silently never apply.
Always tick Is Free for free content - do not just leave the price at 0. The catalog validator treats a price of 0 on a non-free entry as an authoring error and flags it (see The Validator). At runtime, however, nothing blocks it: a zero-priced entry is handed to the player as owned and free, and the card renders as OWNED. So an unpriced item is not "safely disabled" - it is silently given away. Say what you mean with Is Free. (Upgrade ladders behave differently and really are blocked - a rung with no price makes that level unbuyable.)
Recipe: Add a New Paint Color
- Open your Paint Catalog asset (or create one and assign it to your Catalog Set's Paint slot).
- Expand Entries and click +.
- Set Display Name (for example
Sunset Pink), pick the Color, and set a Price (or tick Is Free). - Leave Id empty - it auto-fills from the color (for example
paint_FF69B4). - Save the project. Done - the new swatch appears in the garage's Paint category.
Notes:
- The color's alpha is ignored - paints are always applied opaque.
- Custom Color (same asset, below the entries):
Enable Custom Colorturns the free-pick HSV picker tab on or off, andCustom Color Price(default 2500) is its one-time, account-wide unlock price. Set the price to 0 to make the picker free from the start.
Recipe: Add a Paint Finish
In the same Paint Catalog, the Finishes list defines metallic/smoothness presets (see Using the Garage for what finishes are):
| Field | Range | Default | Meaning |
|---|---|---|---|
| Metallic | 0-1 | 0.22 | Metallic level written to the body material |
| Smoothness | 0-1 | 0.95 | Smoothness / glossiness level |
| Clearcoat | 0-2 | 1 | Multiplier on the material's authored clearcoat strength |
- A free Factory card that restores the original finish is generated automatically - do not author one.
- For a matte finish, set Clearcoat near 0 - otherwise the clearcoat layer keeps the body glossy no matter how low the smoothness goes. (The demo's Matte uses metallic 0.1, smoothness 0.35, clearcoat 0.05.)
- Finishes write the same runtime material instances RCCP's painters color - your shared
.matassets on disk are never modified.
Recipe: Add a Wheel
Wheel offerings point into RCCP's project-global wheel list, not into the vehicle:
- First make sure the wheel model exists in RCCP's changeable-wheels list: Tools > BoneCracker Games > Realistic Car Controller Pro > Configuration > Wheels. Note the index of your wheel in that list (the first entry is index 0).
- In your Wheel Catalog, add an entry and set Wheel Index to that number.
- Name it, price it, save.
Wheel Index -1 means "stock wheels" - the demo ships a free Stock entry at -1 so players can always return to factory wheels. Include one in your catalog too.
Once the entries exist, generate their card icons instead of drawing them: Generating Item Icons From Your Models.
Recipe: Add a Spoiler or Siren
Spoilers and sirens are per-vehicle content - the index points into the arrays on that vehicle's Spoiler Manager / Siren Manager:
- On your vehicle prefab, make sure the spoiler (or siren) object exists in the manager's array. Note its index.
- Add a catalog entry with that Index.
- Index -1 means "none" - ship a free "No Spoiler" entry so players can remove one they bought.
Because indices are per-vehicle, a spoiler catalog written for one car only fits cars whose spoiler arrays are laid out the same way. Different cars with different bodykits usually get different catalog sets. The same is true of their card icons - see the caveat in Generating Item Icons From Your Models.
Where are these managers? They are child objects of
RCCP_Customizeron the vehicle - Spoiler Manager, Siren Manager, Decal Manager, Neon Manager - and the arrays you are indexing into are theirspoilers/sirens/decals/neonsfields. Select the vehicle, expand itsRCCP_Customizerchild in the Hierarchy, and pick the manager you need.
Recipe: Add a Decal or Neon
Decals and neons are material entries with one strict rule: the material you reference in the catalog must be the exact same material asset that sits in the vehicle Decal Manager's / Neon Manager's array. RCCP identifies decals by asset reference - a copy, a variant, or any other material would silently fail to persist (it saves as "none" and vanishes on reload).
- Open the vehicle's Decal Manager (or Neon Manager) and note which material assets its array holds.
- In the catalog, add entries referencing those same assets.
- Price, name, save. The validator cross-checks this for you and errors on foreign materials.
Decal/Neon categories only appear under URP or HDRP - on the Built-in pipeline RCCP's decal and neon components do not render, so the Tuner hides the categories entirely.
Recipe: Set Up the Upgrade Catalog
The Upgrade Catalog is not a list of items - it is four price ladders, one per upgrade kind, each exactly five rungs (element 0 = the price of level 1):
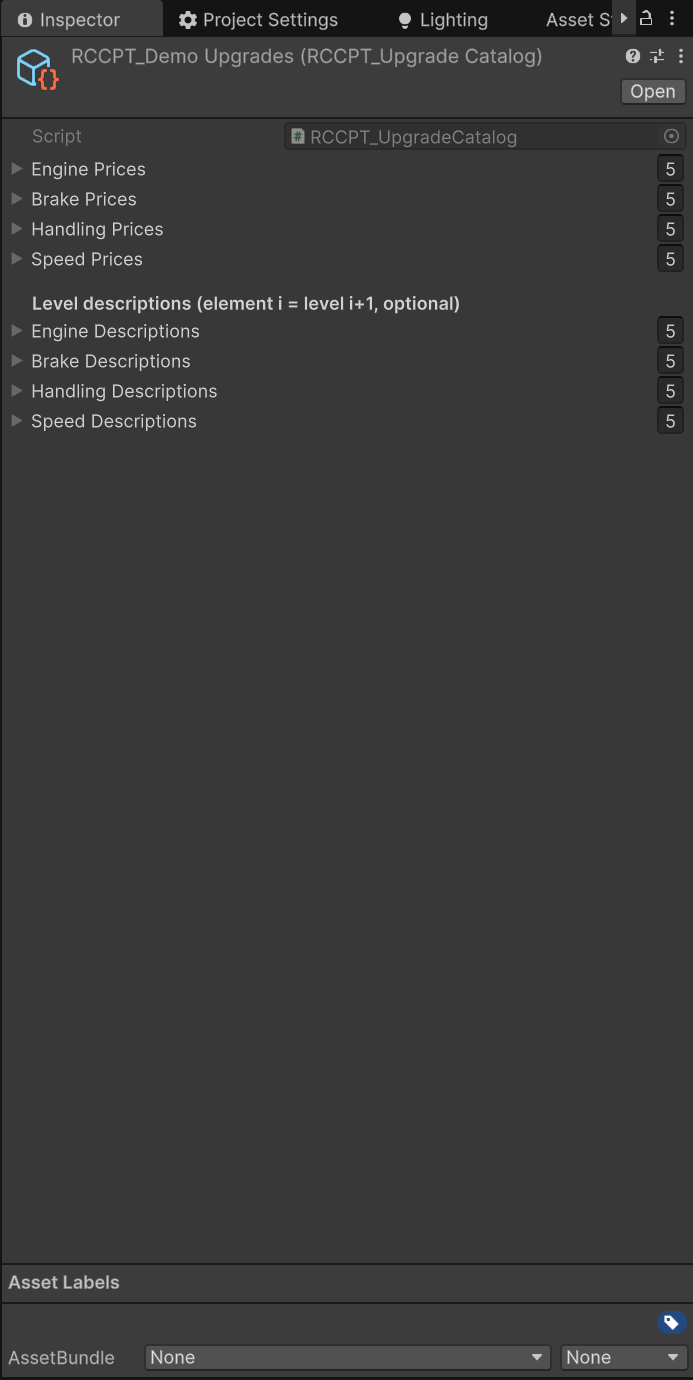
| Ladder | Default rung prices (levels 1-5) |
|---|---|
| Engine Prices | 3000, 6000, 10000, 15000, 22000 |
| Brake Prices | 1800, 3600, 6000, 9000, 13000 |
| Handling Prices | 1800, 3600, 6000, 9000, 13000 |
| Speed Prices | 2400, 4800, 8000, 12000, 17500 |
Buying level N pays every rung between the owned level and N - jumping from stock straight to level 3 costs rungs 1+2+3. This is the single most misread rule in the asset, so it is worth a picture:
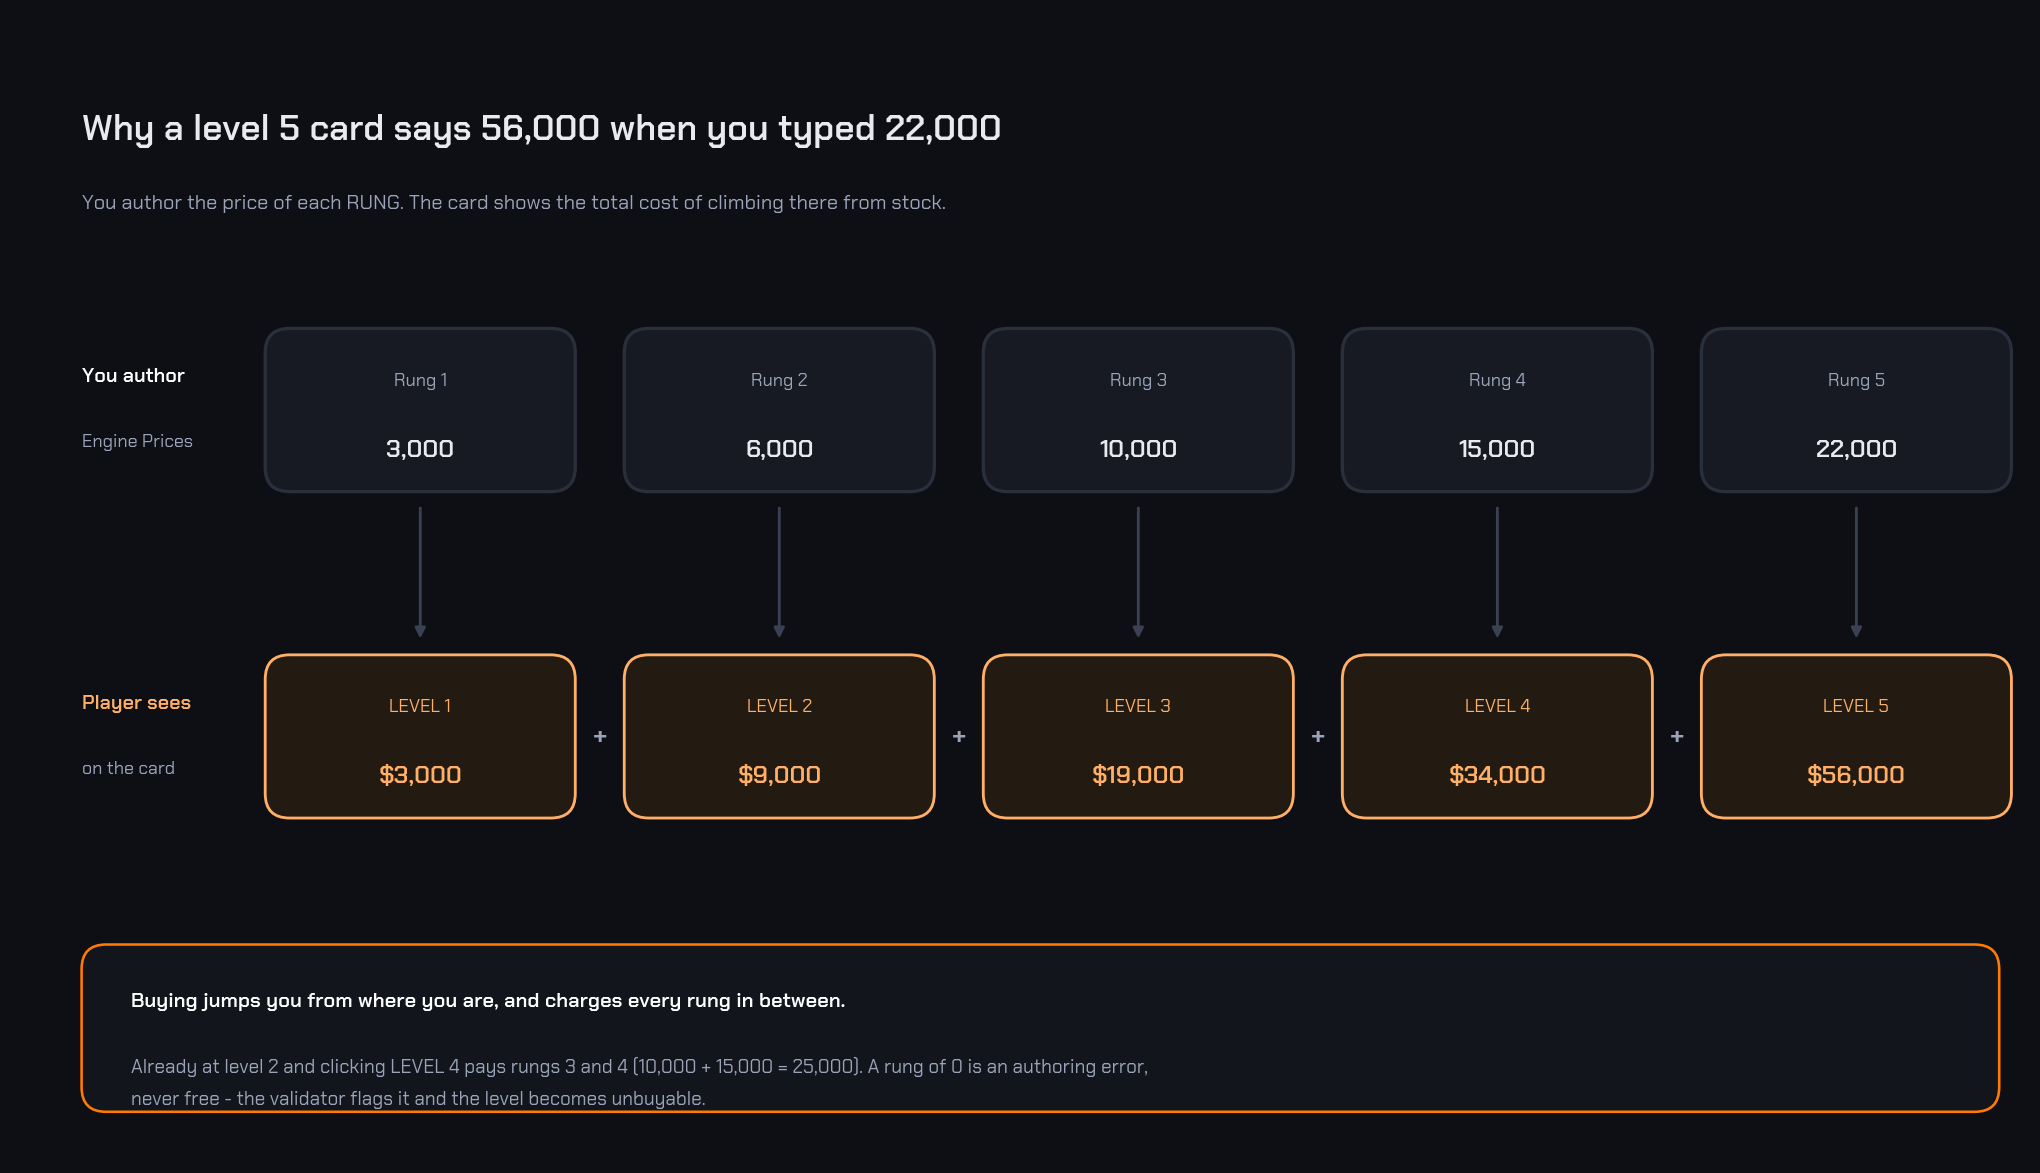
Every rung must have a price greater than 0; a zero or missing rung is an authoring error and makes those levels unpurchasable (the validator flags it, and the Catalog Set inspector reports the ladder as 3/4 ladders intact).
The four description arrays below the ladders are optional flavor text per level ("Stage 2 turbo kit..."), shown in the info panel when the player hovers a level card. Empty descriptions simply keep the panel hidden.
What each level actually does to the car (how much torque, how much brake force) is RCCP's business - it comes from the efficiency settings on the vehicle's own Upgrade Manager components, not from the Tuner.
Recipe: Configure the Tuning Category
The Tuning Catalog decides which sliders the tuning workshop exposes and their ranges:
| Slider row field | Meaning |
|---|---|
| Kind | Which RCCP tuning knob this drives (front/rear camber, ride height, suspension travel, spring force, damper) |
| Display Name | The label next to the slider |
| Enabled | Untick to hide a row without deleting its authoring. A disabled row is labelled · HIDDEN in the list. |
| Min / Max | The slider range |
The default asset ships all ten rows (a front and a rear of each):
| Kind pair | Shipped range | The player sees |
|---|---|---|
| Front / Rear Camber | -10 to 5 | degrees, one decimal - -2.5° |
| Front / Rear Ride Height | 0 to 1 | a percentage, 0% to 100% |
| Front / Rear Suspension Travel | 0.05 to 0.5 | metres - 0.25 m. RCCP enforces the 0.05 floor no matter what you author. |
| Front / Rear Spring Force | 20000 to 100000 | a plain number |
| Front / Rear Damper | 1000 to 10000 | a plain number |
Note the ride-height row especially: you author 0 to 1, but the garage displays it as a percentage, so the numbers you type and the numbers your players read are not the same scale.
Below the sliders: Expose Smoke Color and Expose Headlight Color toggle the two color rows, and Color Presets is the shared swatch palette for both.
The tuning category's unlock price is deliberately not here - it lives on the Economy Config, the single home of economy numbers (Prices & Economy).
Entry IDs and the Ownership Keyspace
Cosmetic purchases - paint, finishes, wheels, spoilers, sirens, decals, neons, plus the custom-colour and tuning unlocks - are recorded globally under a key built as <category>:<entry id>, for example paint:paint_FF69B4 or wheels:wheel_3. Buy once, use on every car.
Performance upgrades are not. Engine / Brake / Handling / Speed levels are stored per vehicle, keyed by that car's RCCPT_VehicleId GUID, so upgrading one car never upgrades another. See the picture in Using the Garage.
Three practical consequences of the cosmetic keyspace:
- IDs auto-fill and de-duplicate. Leave them empty while authoring; selecting the asset fills them in (duplicates get
_2,_3... suffixes). - IDs are forever. After release, changing an entry's id (or letting it regenerate) orphans every player's ownership of that entry. Rename the Display Name freely - never the Id.
- IDs must be saved to disk before you build. The auto-fill runs in the editor; a player build cannot fill missing ids, and an entry whose id shipped empty cannot be purchased. The validator has a dedicated check for this ("id(s) EMPTY ON DISK") - if it fires, make any trivial edit to the asset and save the project so the filled ids persist.
Generating Item Icons From Your Models
An entry with no icon shows a blank card. You do not have to open Photoshop - the Tuner can render the icons from your actual 3D models:
Tools > BoneCracker Games > RCCP Tuner > Tools > Generate Catalog Thumbnails From Selected Vehicle
- Select a vehicle in the Hierarchy that has an
RCCP_Customizer(the demo showroom car works). - Run the menu item.
- Choose Keep Them (fill empty only) to fill blanks without touching icons you assigned by hand, or Overwrite All to re-render everything.
Each icon is rendered in Edit Mode through your project's own render pipeline, so the card matches what the equipped part actually looks like, and lands as a 256 x 256 transparent PNG in Demo/Thumbnails/ inside the install folder.
What it does and does not cover:
| Category | Model comes from | Universal? |
|---|---|---|
| Wheels | RCCP's project-global changeable-wheels list | Yes - same for every car |
| Spoilers | The selected vehicle's spoiler objects | No - car-specific |
| Sirens | The selected vehicle's siren objects | No - car-specific |
| Paint, finishes | not processed | They draw colour swatches instead |
| Decals, neons | not processed | Assign their own artwork |
Two things to know before you run it:
- ⚠ It writes into whichever catalog set resolves - your scene controller's, or failing that the project default on
RCCPT_Settings. On a fresh project that default is the demo catalog set, which Build Demo Scene regenerates. Assign your own catalog set on the scene'sRCCPT_TunerControllerfirst, or your icons can be wiped later. - Entries with index -1 (your "Stock" wheel, "No Spoiler") are skipped deliberately - they are meant to have no icon.
Full reference: Editor Tools.
The Validator
Tools > BoneCracker Games > RCCP Tuner > Tools > Validate Catalogs checks the resolved catalog set (scene override or project default) against the open scene's vehicle and prints a full report to the Console. It is also a button on the Catalog Set and Tuner Controller inspectors.
⚠ Open a scene with your vehicle in it first. With no RCCP vehicle loaded, every vehicle-dependent check is skipped - indices, decal/neon materials, category support - and the validator still reports Errors: 0. The dialog tells you it skipped them, but a clean result from an empty scene proves nothing.
| Severity | Checks |
|---|---|
| Error | Missing/zero prices on non-free entries · an upgrade ladder with fewer than 5 rungs · an upgrade rung with no price · empty entry ids (in memory or on disk) · wheel/spoiler/siren indices out of range · decal/neon materials not in the vehicle's arrays |
| Warning | Content authored for a category the vehicle/pipeline does not support (the panel auto-hides) · vehicle supports a category but no content is authored · finishes authored but the body shader has no metallic/smoothness · missing upgrade level descriptions · no upgrade catalog at all |
Errors are things that will visibly break purchases; fix them before shipping. Warnings are honesty notices about content that will not appear.
Next Steps
- Set what everything costs: Prices & Economy.
- Give the new content a look of its own: Theming & Editing the UI.
- Every tool used above, in one reference: Editor Tools.