Using the Garage
This chapter is the full tour of the garage as the player experiences it - and of the rules underneath, which you will want to understand when wiring the Tuner into your game. No setup here; if you have not run the demo yet, do Quick Start first.
Getting in and out. In the demo, press T (the RCCPT_OpenCloseHotkey component - it needs Unity's Input System package) or call OpenGarage() from your own code. You leave through the exit button - the X at the far right of the top bar. Only that button asks before discarding a staged cart; the hotkey and the scripting call discard immediately and silently.
The Top Bar
The strip across the top is always visible and never scrolls away:
| Element | What it shows |
|---|---|
| Vehicle name | The car you are shopping for. It reads Display Name from the vehicle's RCCPT_VehicleId if you filled it in; otherwise the Tuner tidies up the GameObject name (RCCP_PrototypeVehicle_Skyline becomes PROTOTYPE VEHICLE SKYLINE). Set Display Name so your players see a real car name - Scene Setup. |
| Wallet | Your current balance, formatted by the economy config (symbol, thousands separator). It rolls up when you earn. |
| + button | A test-only button that grants free credits. It ships enabled - turn it off before you build your game (Prices & Economy). |
| Cart badge | How many items are staged. Click to open the cart drawer. |
| X (far right) | Leaves the garage, asking first if the cart is not empty. |
The Golden Rule: What the Car Shows
At every moment while the garage is open, the vehicle renders exactly:
   OWNED baseline        what is already yours (RCCP's saved loadout)
 + CART items            everything staged for purchase
 + PENDING tuning        slider changes not yet checked out
 -----------------------------------------------------------------
 = what you would drive away with, if you paid right now
Hovering an item layers one temporary try-on on top of that; un-hovering re-projects the state above. This invariant is why the garage always feels honest: the car never keeps something you have not paid for, and never hides something you have.
The Shopping Flow
                 hover a card
                 ------------>  temporary TRY-ON on the car
                                (reverts the moment the pointer leaves)

                 click a card
                 ------------>  is it OWNED or FREE?
                                   |
                     YES ---------+---------- NO
                      |                        |
              equips instantly          joins the CART
              (no charge, saved)        (car previews it)
                                               |
                                          CHECKOUT
                                               |
                              funds validated for the WHOLE cart
                                   |                    |
                                  OK               not enough
                                   |                    |
                        debited once, every        NOTHING changes
                        item committed + saved
Reading a Card
Every item in the strip is a card, and its price line is the fastest way to know where you stand with it:
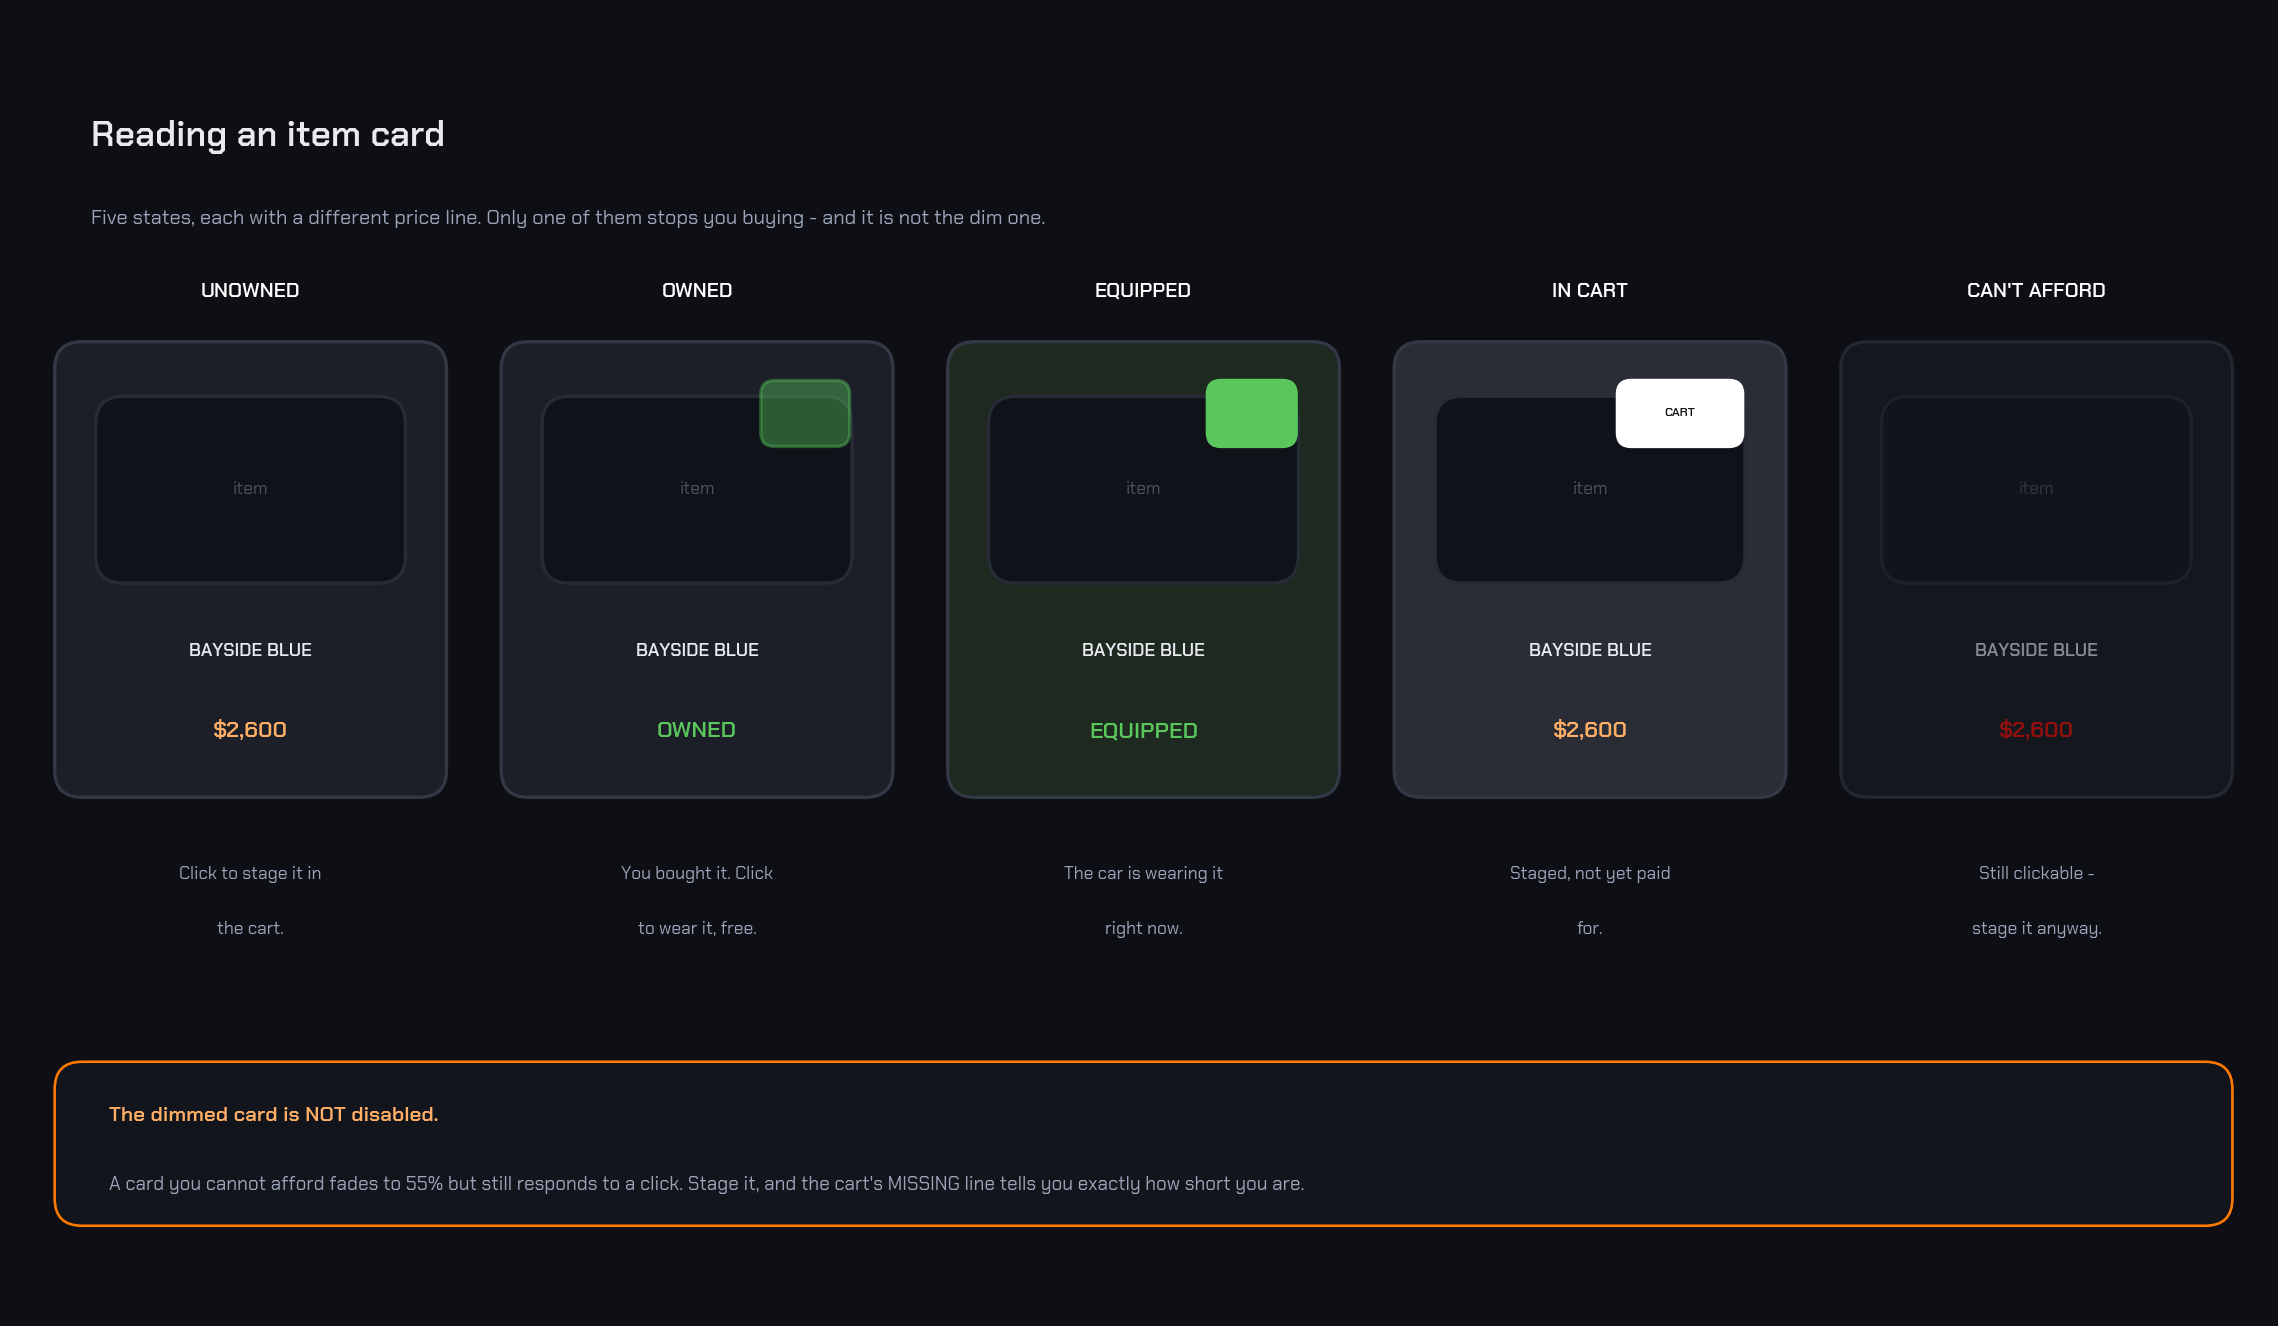
| State | Price line says | The card looks like | Clicking it |
|---|---|---|---|
| Unowned | the price | normal | Stages it in the cart |
| Owned | OWNED in green |
green badge, faded | Equips it - free, instantly |
| Equipped | EQUIPPED in green |
green badge, vivid, green-tinted card | Nothing to do; you are wearing it |
| In cart | the price | a small cart icon in the card's corner, plus a subtle accent tint | Removes it from the cart |
| Can't afford | the price in red | whole card dimmed to 55% | Still stages it - see below |
Two of these trip people up:
- Owned and Equipped are different things. Owning a wheel set means you paid for it; equipping means the car is wearing it right now. You can own five wheel sets and wear one. That is why the merely-owned badge is faded and the equipped one is not.
- A dimmed card is not a disabled card. You are allowed to stage something you cannot afford - the card stays clickable on purpose, and the cart tells you exactly how short you are. Nothing is charged until checkout.
Free entries print FREE instead of a price and behave like owned items: one click equips them.
While You Hover
A hover try-on announces itself so the player never mistakes a preview for a purchase:
- The hovered card gets a preview outline and an accent-tinted background.
- A small PREVIEW chip appears above the strip for as long as the try-on is applied.
Both clear the instant the pointer leaves.
Key behaviors, each deliberate:
- Hover try-ons are delayed 120 ms so sweeping the pointer across the strip does not flicker the car through every item.
- One item per slot. The cart holds at most one entry per exclusive slot - paint, paint finish, wheels, spoiler, siren, neon, each decal position, each upgrade type, and the tuning unlock. Adding a second wheel set replaces the first; so does a second finish.
- Owned items never enter the cart. Clicking anything you own (or anything free) equips it instantly and moves the owned baseline.
- Checkout is atomic. Validate everything, debit once, commit everything, save once. Insufficient funds = zero changes.
- Leaving through the X button asks first. Pressing the top bar's X with staged items opens a confirmation; confirming discards the cart and reverts the car to the owned baseline. The cart's Clear button asks too. ⚠ The T hotkey and a scripted
CloseGarage()do not ask - they discard the cart immediately. If you drive the garage from your own UI, call the confirmation yourself or wire your button to the same exit path. - The cart is modal. While the cart drawer is open, the item strip, the category rail and the tuning panel all dim to 45% and stop accepting input, with an on-screen hint ("Close the cart to keep browsing."). The tuning panel is included on purpose: a slider dragged while the cart is open would move but silently discard its value.
The Cart Drawer
The drawer lists what you have staged, the running TOTAL, and one line that saves a lot of mental arithmetic:
| Line | When it shows | What it means |
|---|---|---|
| REMAINING (green) | the cart fits your wallet | What your balance will be after checking out |
| MISSING (red) | the cart costs more than you have | Exactly how much more you need |
MISSING is also the explanation for a greyed-out CHECKOUT button - the button only enables when the whole cart is affordable.
Categories
The left rail lists a category only when both conditions hold: the vehicle supports it (its RCCP_Customizer has the matching manager child) and the catalog set has content for it. Either one missing hides the tab - an empty catalog slot is a normal, deliberate way to hide a category, not an error.
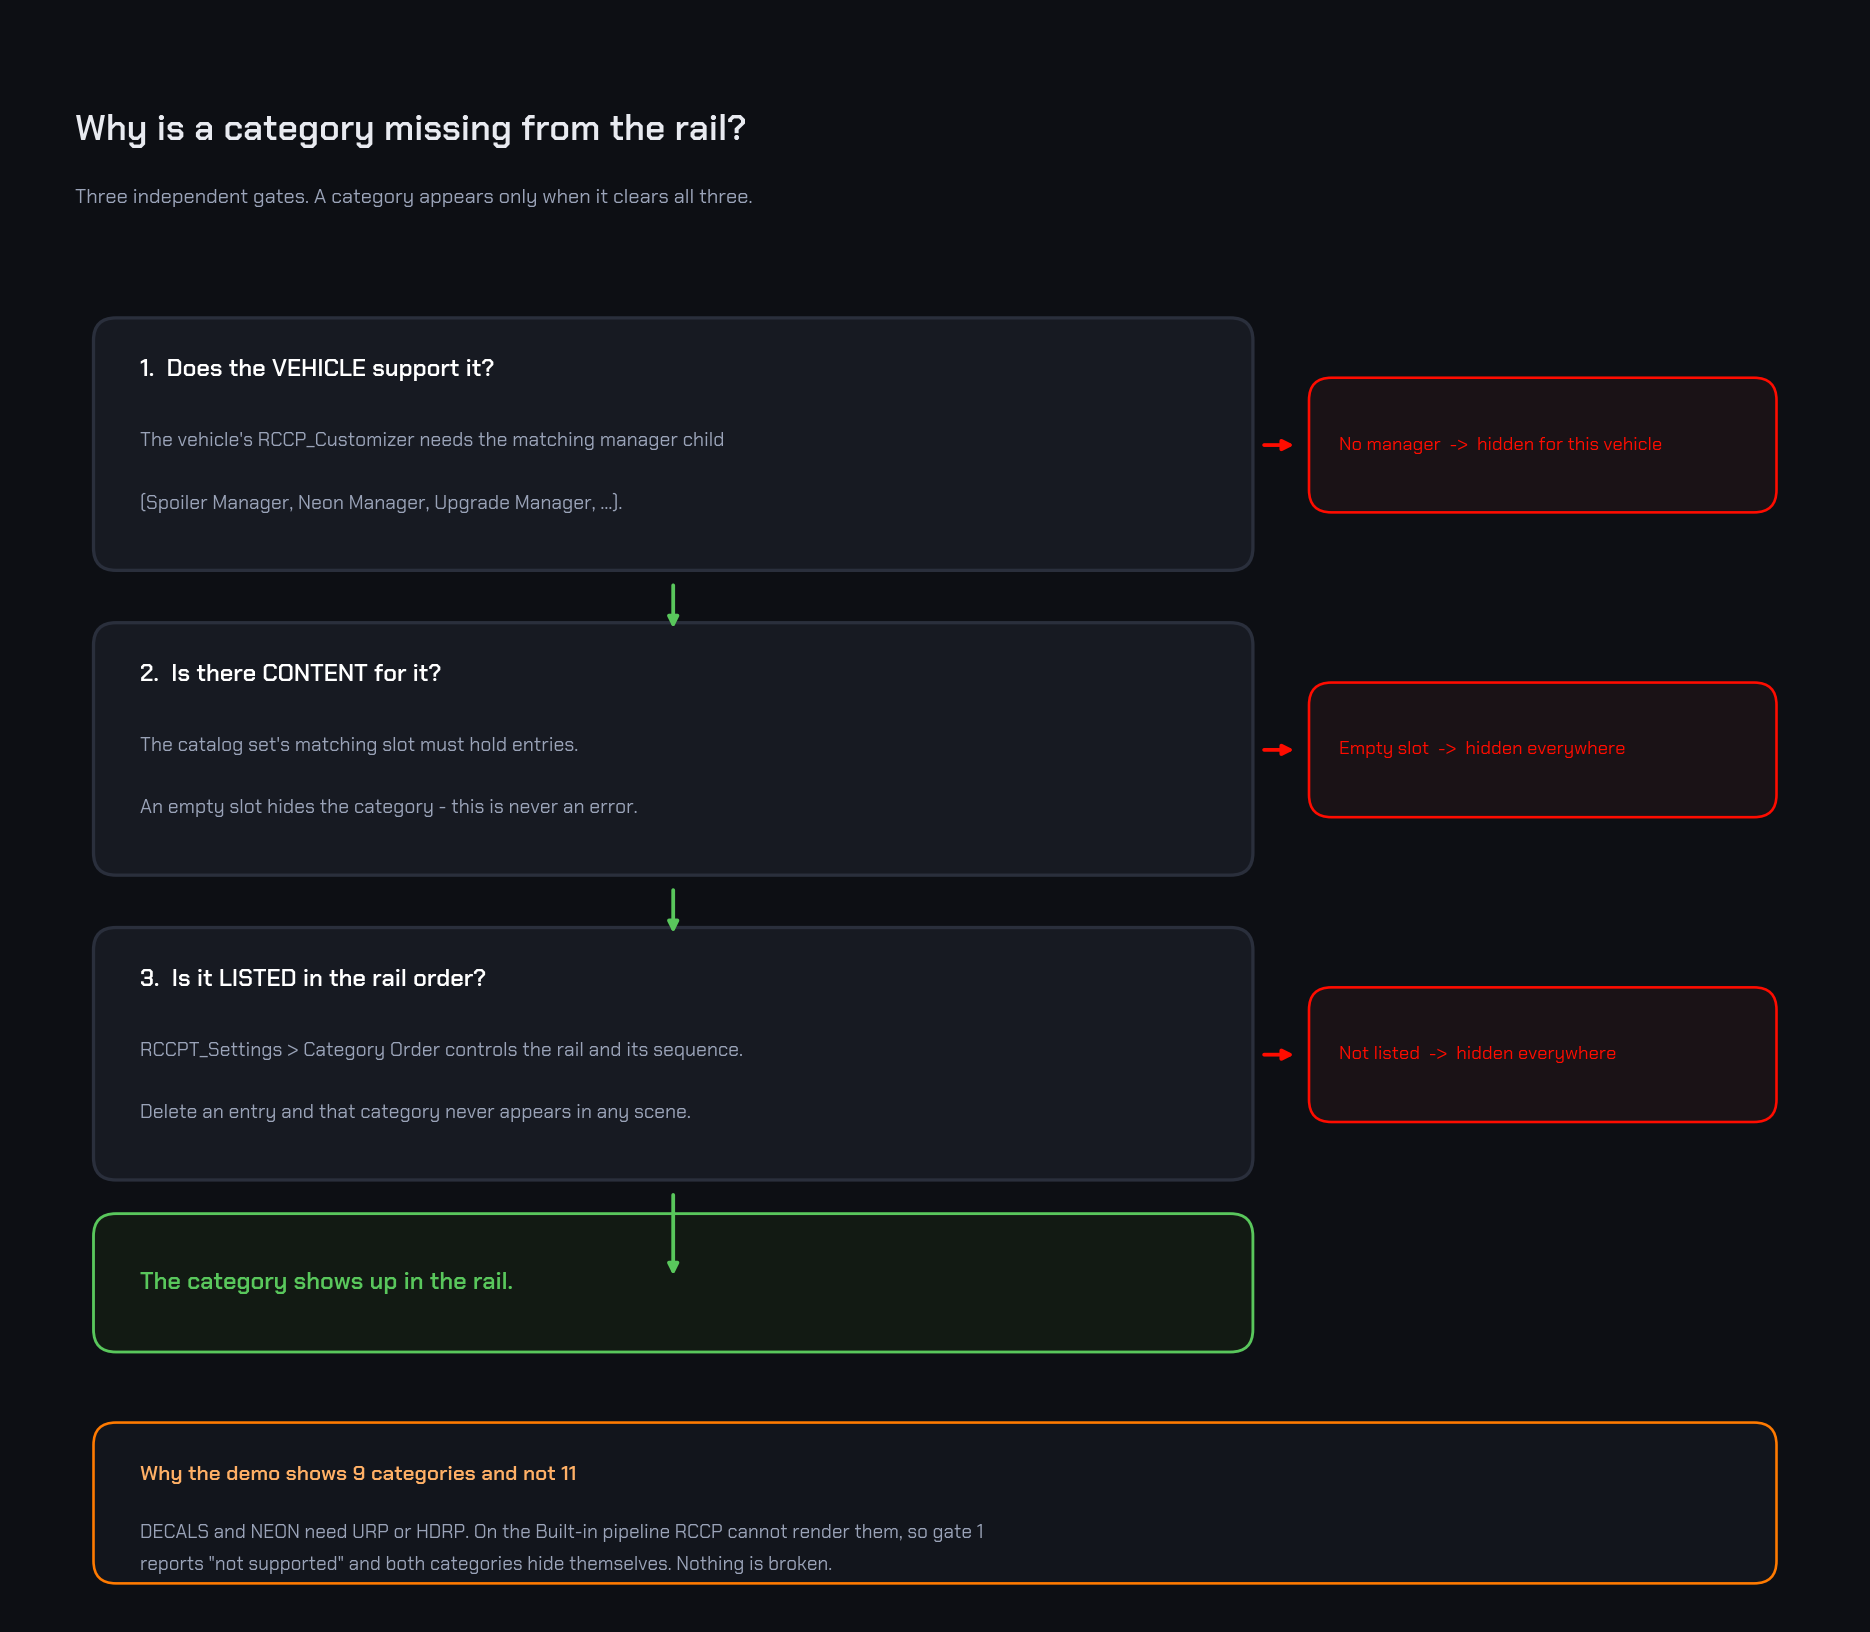
The full possible set: Paint, Wheels, Engine, Brakes, Handling, Speed, Spoiler, Siren, Decals, Neon, Tuning. If one is missing and you did not expect it to be, work down the three gates above, or see Troubleshooting.
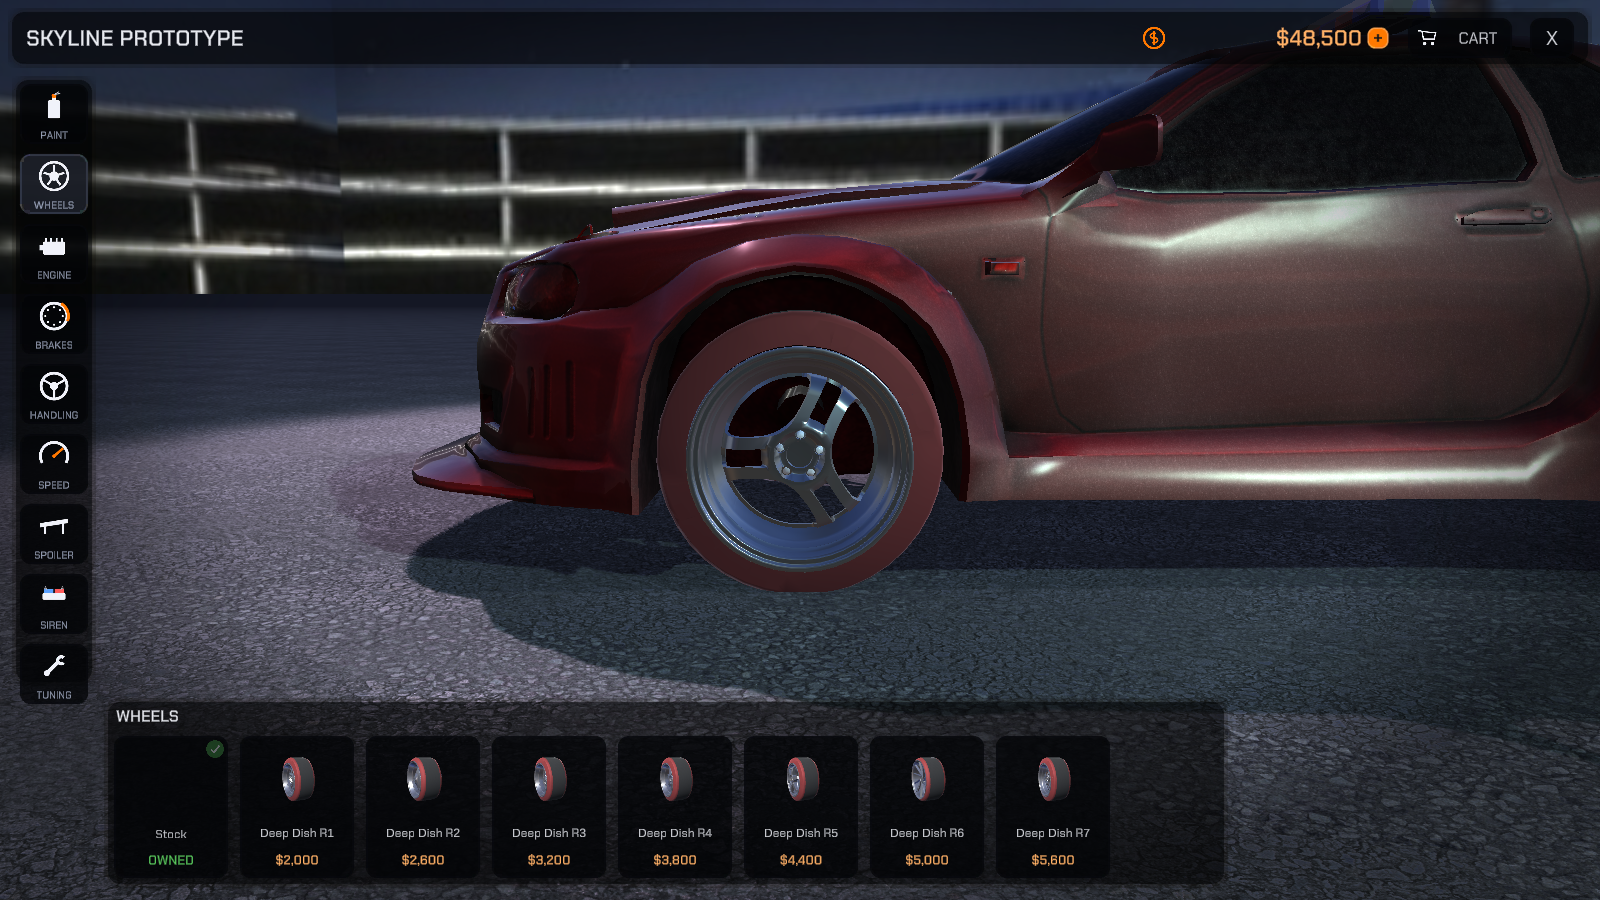
Each category also drives the cinematic camera to a fitting shot - wheels get a low wheel-level view:
Decals
The Decal category adds a four-way location selector (FRONT / BACK / LEFT / RIGHT) above the strip - each side of the car is its own slot, so you can cart four different decals at once. The highlighted button is the side you are currently shopping for; the strip below always refers to that one location. Decals and Neon render only under URP/HDRP and auto-hide on Built-in, matching RCCP itself.
The Paint Studio
The Paint category has up to three sub-tabs (the tab row hides itself when only preset colors are authored). The active tab is highlighted - it takes the theme's accent colour while the other two stay dark, so there is never any doubt about which mode you are in. Paint always reopens on COLORS, even if you left it on CUSTOM or FINISH.
COLORS
The authored preset swatches. Entries without a custom icon render as color swatches automatically.
CUSTOM
A free HSV color picker - hue, saturation, brightness sliders with a live preview swatch. Dragging paints the car live.
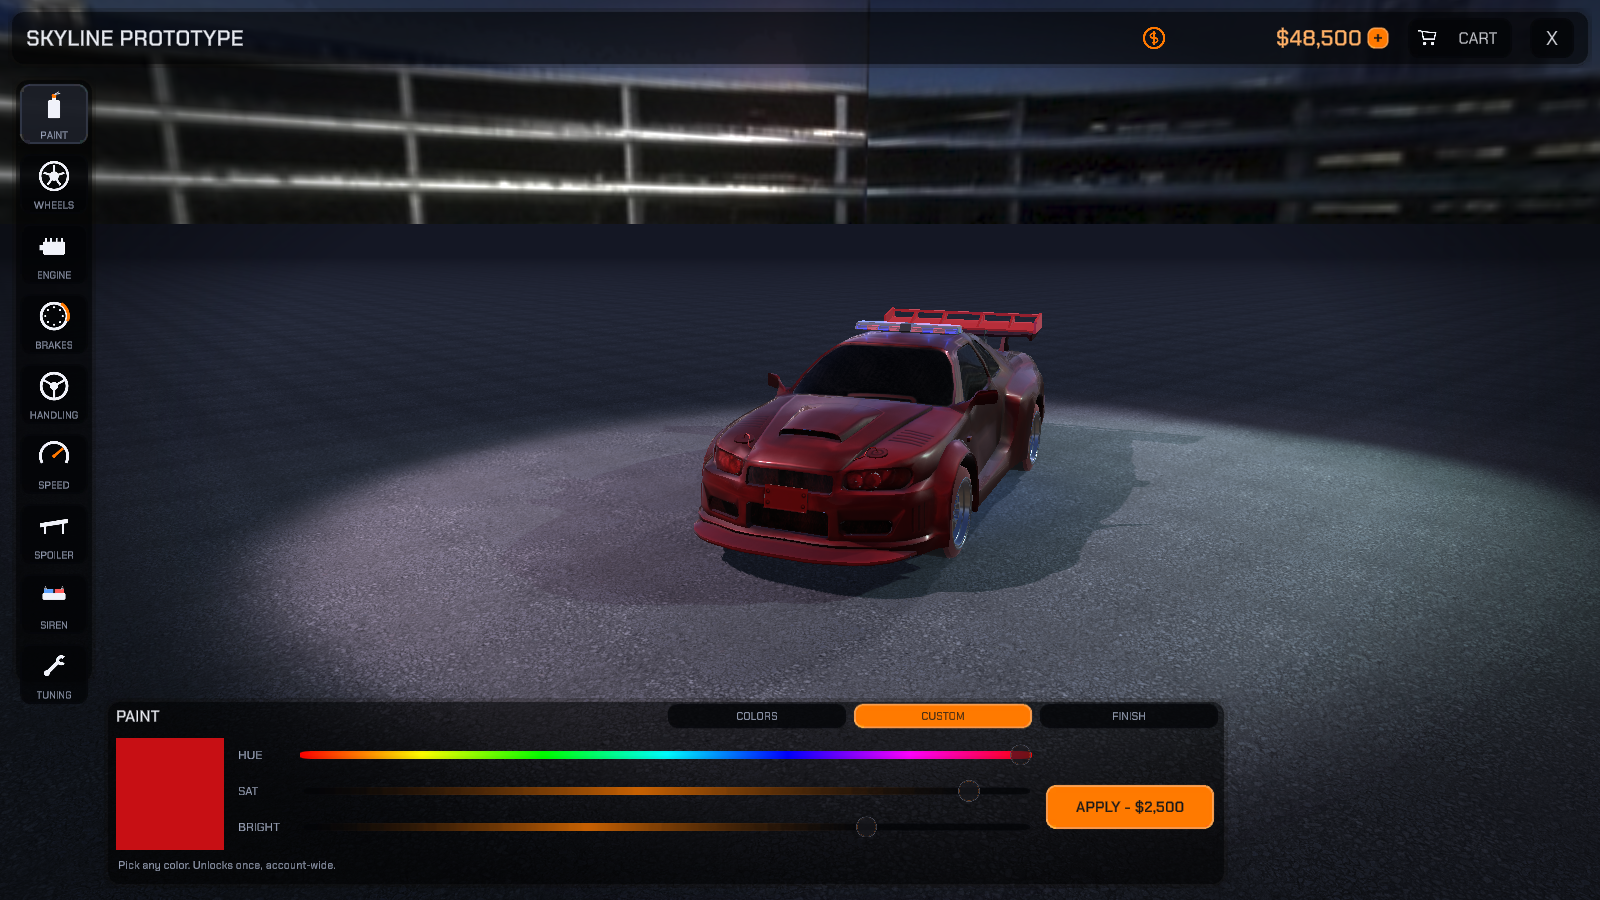
The picker itself is a one-time, account-wide unlock: the APPLY button shows the unlock price until it is bought (staged through the cart like anything else), after which any picked color applies instantly and free, forever, on every car.
FINISH
Metallic / smoothness presets - the demo ships Matte, Satin, Metallic, and Chrome - applied on top of whatever color the car wears:
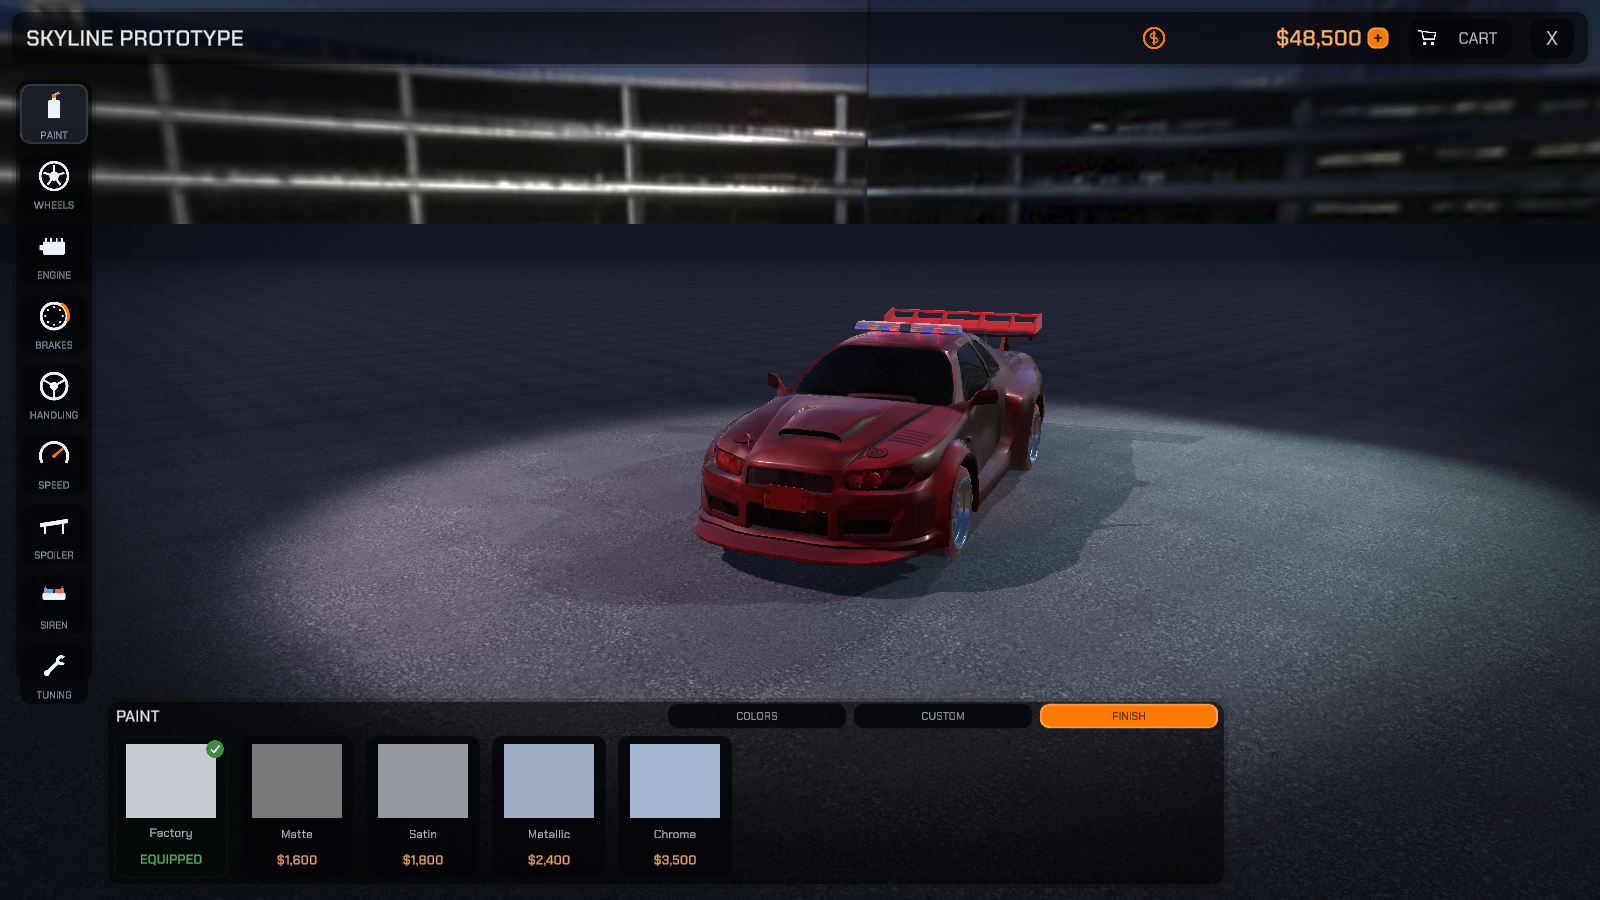
- A free Factory card that restores the original finish is generated automatically - it is never part of your catalog.
- Finishes are global cosmetics: buy once, use on every car.
- The tab hides itself on vehicles whose body materials expose no metallic/smoothness properties.
- Because RCCP's own save has no concept of a finish, the applied finish persists in the Tuner's save. In garage scenes it re-applies automatically; for gameplay scenes add
RCCPT_PaintFinishApplierto the vehicle prefab (Scene Setup).
Performance Upgrades and the Stat Panel
The four performance categories (Engine, Brakes, Handling, Speed) sell five-level upgrade ladders. While one of them is open, the stat panel shows four live bars reading the vehicle's real RCCP values:
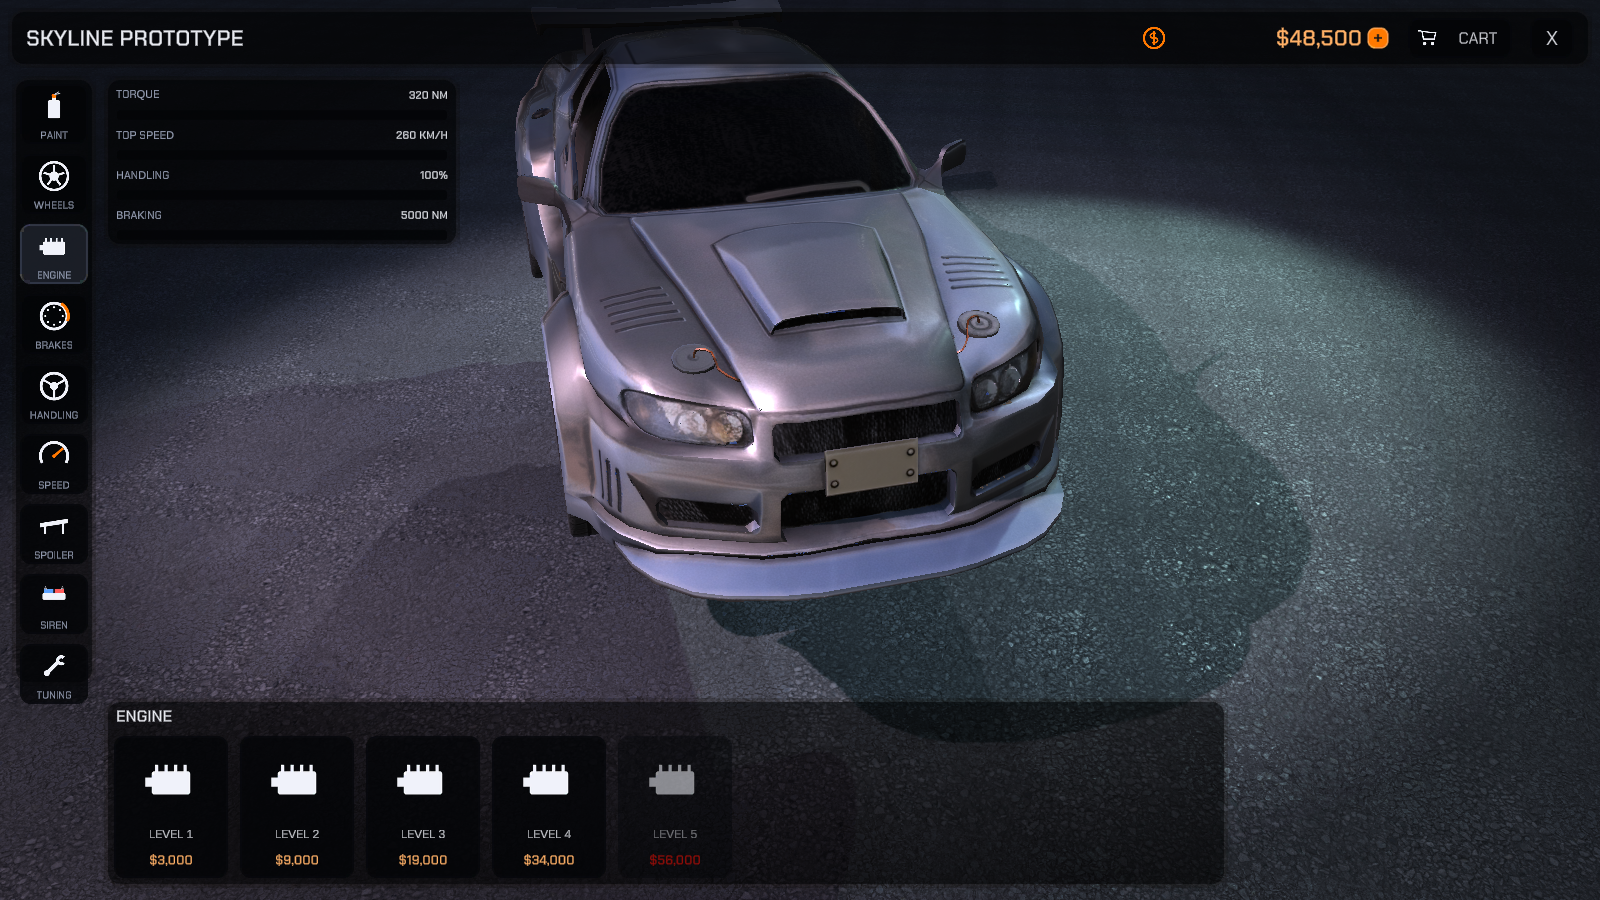
| Row | Unit on screen | What it reads |
|---|---|---|
| TORQUE | NM |
Engine torque |
| TOP SPEED | KM/H |
Maximum speed |
| HANDLING | % |
Traction assist, as a percent of this car's stock value |
| BRAKING | NM |
Brake torque |
Two notes on those readouts:
- The engine row is labelled TORQUE, not "acceleration" - torque is the number RCCP actually exposes and the number the upgrade moves.
- HANDLING is a percentage on purpose. It rides on RCCP's traction-helper strength, which is a 0-1 factor and means nothing to a player on screen. Showing it as a percent of stock ("112%") makes the improvement legible. All four rows are read-only readouts - they are not editable.
How the panel behaves:
- The solid fill is the car as projected - owned baseline plus anything staged in the cart. It measures upgrade progress, not the raw number, so on a completely stock car every bar sits empty (as in the screenshot above) and fills as you buy levels. The number beside it always shows the real value.
- Hovering a higher level card lays a translucent green ghost over the bar showing where that level would land, and the numeric readout becomes a delta - for example
358 > 371 NM. The unit is printed once, at the end. Hovering a lower level inverts the picture: the solid fill drops to the hovered level and a red ghost marks the current level you would be falling from. - Level prices are cumulative ladders - buying level N pays every rung between your owned level and N (Prices & Economy).
- Hovering a level card also shows its authored description (if any) in the info panel above the strip.
- A stat whose upgrade component is missing from the vehicle hides its row entirely.
Tuning
The Tuning category is a workshop, not a shop: camber, ride height, suspension travel, spring and damper forces, plus tire-smoke and headlight colors. It sits behind a single one-time, account-wide unlock:
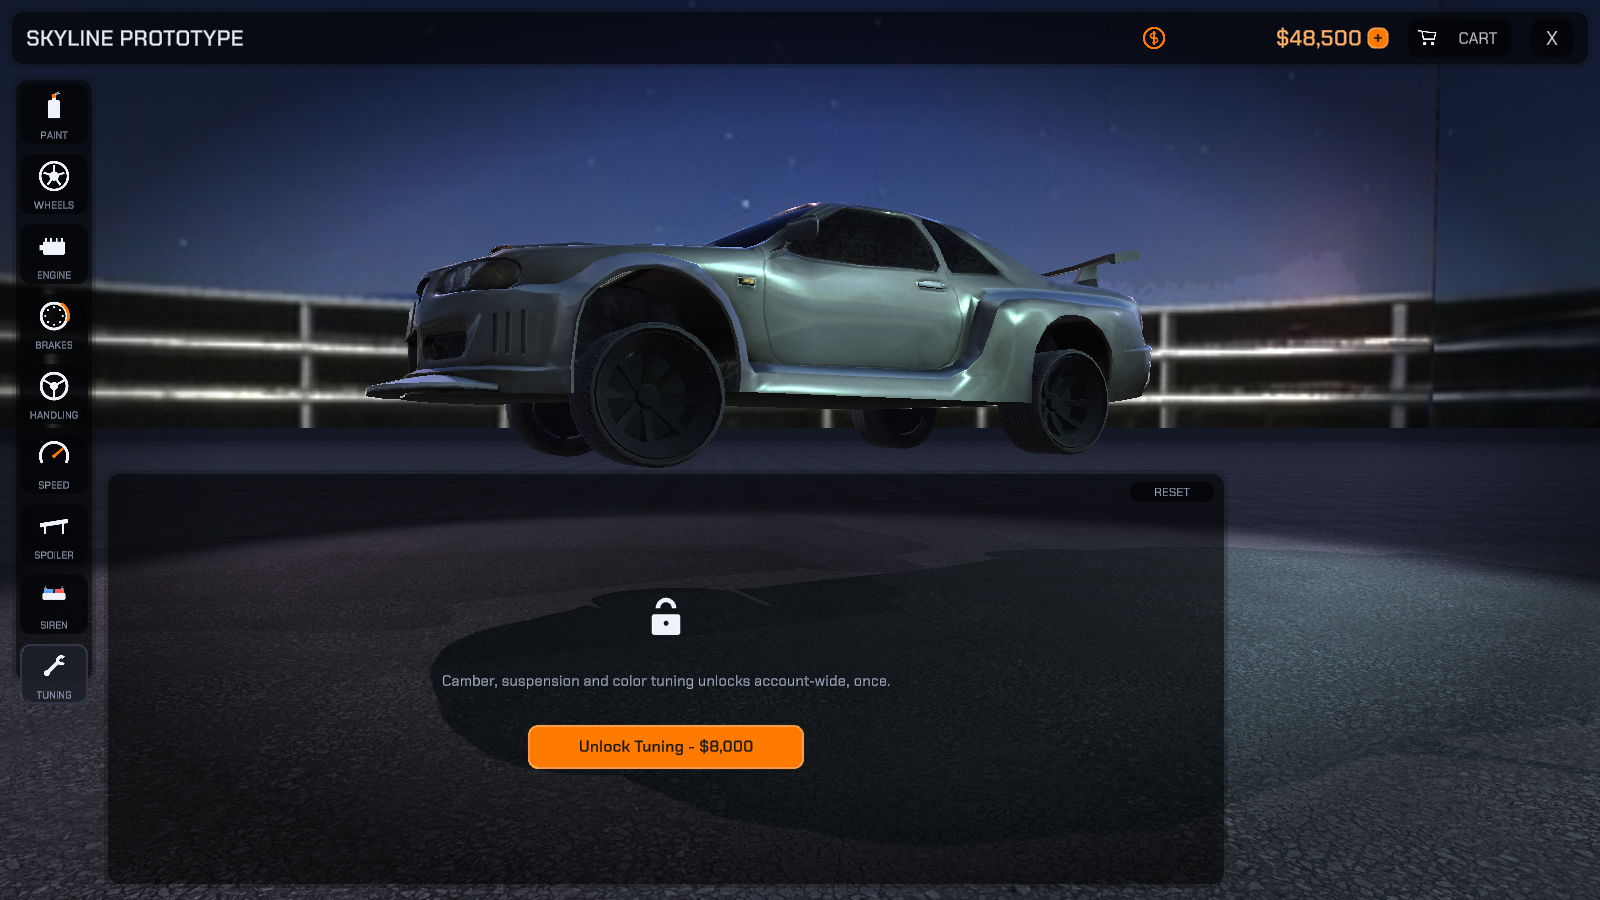
The unlock button prints its own price - Unlock Tuning - $8,000 in the demo - and clicking it stages the unlock into the cart. The sliders become editable immediately (so you can try before you buy) - but the unlock, like everything else, only becomes yours at checkout:
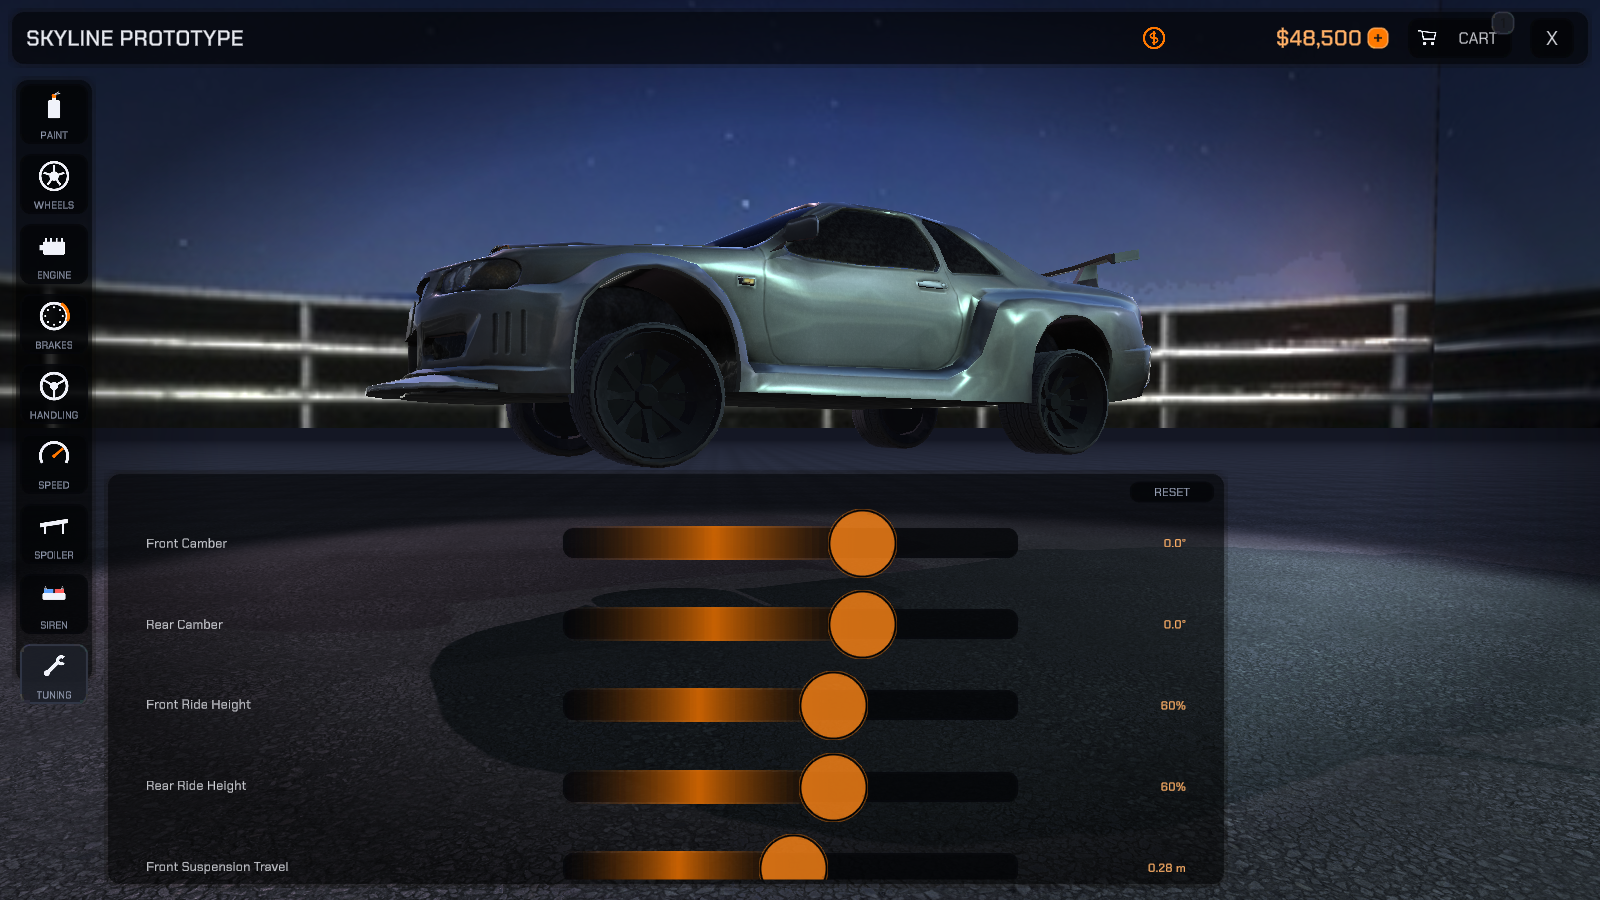
Each slider shows its live value with a unit beside the track, so you are never guessing:
| Slider | Reads as |
|---|---|
| Front / Rear Camber | degrees, one decimal - -2.5° |
| Front / Rear Ride Height | a percentage - the catalog's 0-1 range shown as 0% to 100% |
| Front / Rear Suspension Travel | metres, two decimals - 0.25 m |
| Front / Rear Spring Force, Damper | a plain number (newtons), no unit suffix |
The RESET button snaps every slider back to that vehicle's stock values - the suspension figures RCCP captured before any customization. It is safe: RESET stages the change like any drag, so nothing is committed until checkout, and you can still leave without paying. (On a vehicle whose stock values were never captured, RESET falls back to the current value and appears to do nothing.)
Slider changes preview on the car live and are committed at checkout with the rest of the cart. Removing the unlock from the cart also drops any pending slider changes (they no longer have a justification).
The Cinematic Camera, as the Player Feels It
Every category change blends the camera to a purpose-built shot - rear three-quarter for spoilers, low and wide for neon, wheel-level for wheels and brakes:
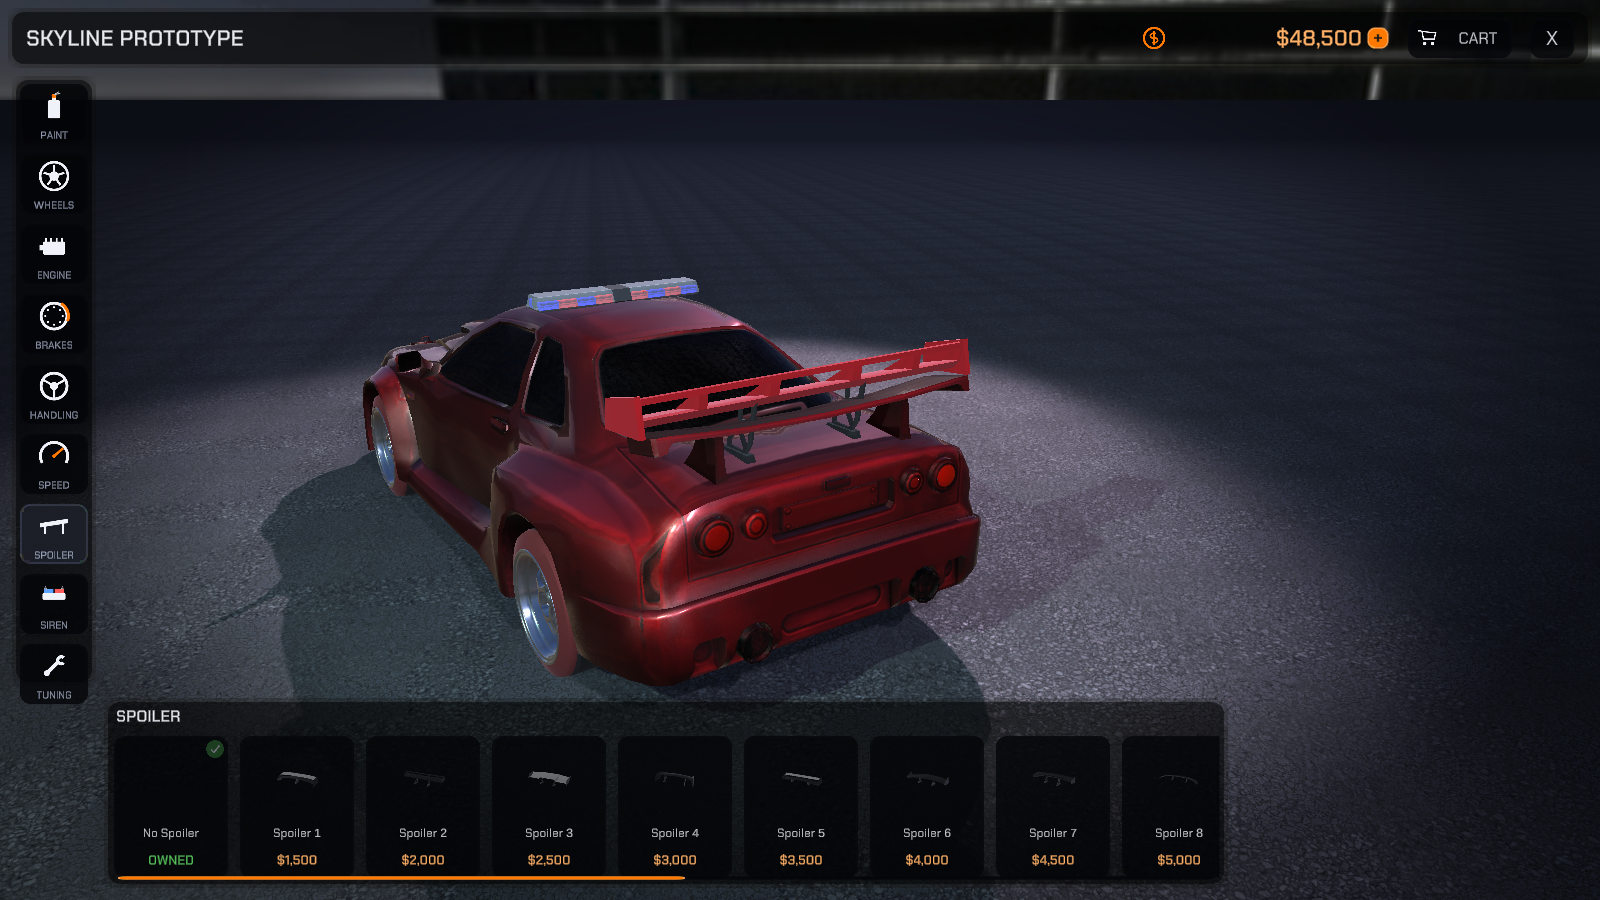
Drag empty screen space to orbit, scroll - or pinch with two fingers on touch - to zoom (each shot clamps how far). Sit still for about six seconds on a shot that allows it and a slow automatic orbit starts; in the shipped library two shots enable it, which means Paint, Handling and Speed auto-orbit and the rest hold still. Everything runs on unscaled time, so the garage feels identical even if your game slows or pauses Time.timeScale. Authoring your own shots: The Cinematic Camera.
While the Garage Is Open
The controller locks the scene down and restores it precisely on close:
| While open | On close |
|---|---|
| Driving inputs disabled, engine off | Restored to their exact pre-open states |
| Vehicle damage components disabled | Re-enabled (if they were enabled before) |
| RCCP dashboard + mobile controls hidden | Restored to their exact prior states (plus anything in Additional Hud Roots To Hide) |
| RCCP gameplay camera + canvas disabled | Always enabled on close - deliberately, so the player never leaves the garage without a working camera (plus optional handoff overrides - Scene Setup) |
Note the asymmetry in the last two rows: HUD roots are restored to exactly what they were, but the gameplay camera and canvas are switched on regardless of how they started.
⚠ The whole HUD-hiding pass - including your own extra roots - is gated by one project-wide switch: RCCPT_Settings > Hide RCCP Hud While Open (ships on). Turn it off and Additional Hud Roots To Hide silently stops working too.
What Persists Where
Understanding the two saves prevents most confusion later:
| Data | Lives in |
|---|---|
| Wallet balance, ownership, unlocks | The Tuner save - PlayerPrefs key RCCPT_Save_v1 (or an opt-in JSON file - Prices & Economy) |
| The applied configuration (equipped paint, wheel, levels...) | RCCP's own save, keyed by the vehicle's RCCPT_VehicleId GUID |
| The applied paint finish | The Tuner save (the one exception - RCCP has no finish field) |
In short: the Tuner remembers what you own; RCCP remembers what the car wears.
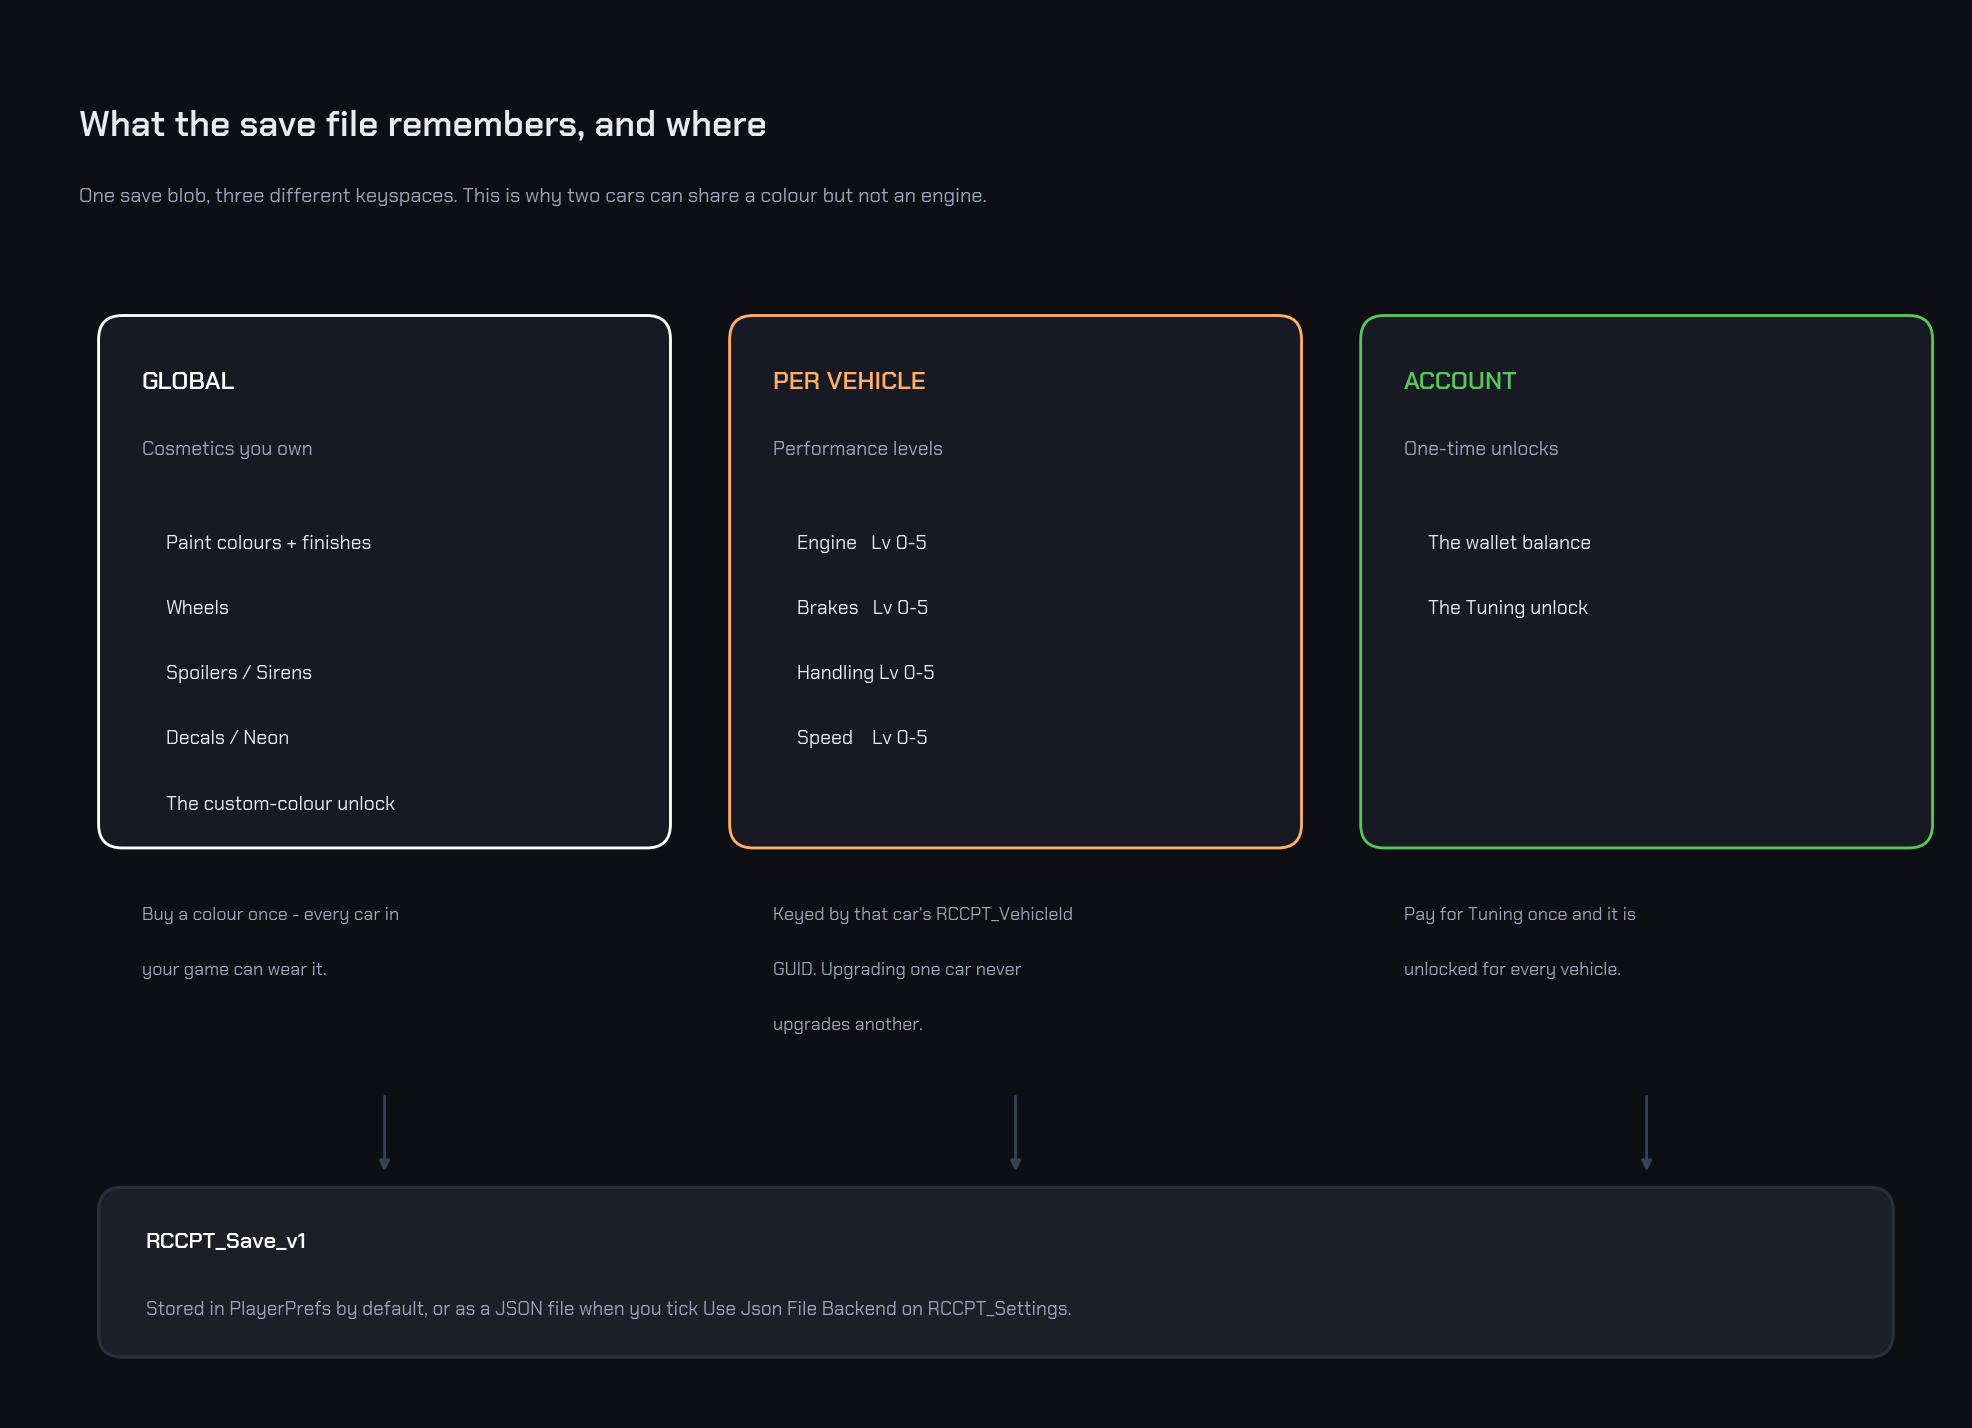
Within the Tuner's own save, three different things are remembered in three different ways - which is why two cars can share a colour but never share an engine level:
Mobile
The canvas respects the device safe area, and below an aspect ratio of about 1.15 (portrait-ish screens) it switches to a compact layout: the category rail becomes a bottom tab bar and the cart opens as a full-screen sheet. Camera orbit works with touch drag. No setup required - see Theming & Editing the UI for how the responsive presets are authored.
Next Steps
- Author what the garage sells: Creating Items.
- Adjust prices and the wallet: Prices & Economy.