Scene Setup - Adding the Tuner to Your Own Scene
This chapter takes you from "the demo works" to "the garage runs in my scene, on my vehicle". Every step is menu-driven; no code is required.
What a Garage Scene Contains
A working Tuner scene has three required pieces and two optional ones. The shipped showroom is the reference layout:
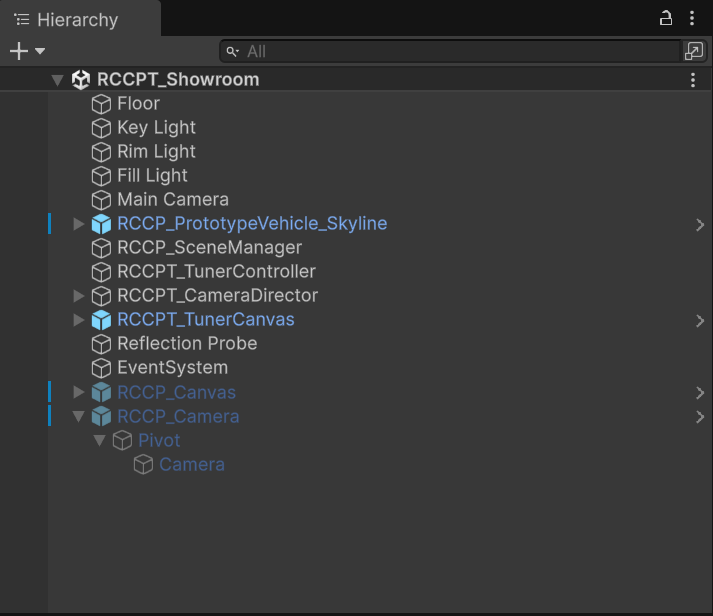
| Piece | Required? | What it does |
|---|---|---|
An RCCP vehicle with RCCP_Customizer |
Required | The car being customized |
RCCPT_TunerCanvas (prefab instance) |
Required | The garage UI overlay |
RCCPT_TunerController |
Required | Owns the whole system: economy, session, camera takeover |
RCCPT_CameraDirector |
Optional | Author the garage camera in the scene; without one, a camera is spawned at runtime |
RCCPT_OpenCloseHotkey |
Optional | The T key toggle (created for you by the setup menu; needs Unity's Input System - see Step 5) |
Step 1: Prepare the Vehicle
The Tuner sells whatever RCCP's customization system can do on that vehicle. A category tab only appears in the garage when two independent conditions are both met:
- The vehicle can do it. Each category maps to a manager object under the vehicle's
RCCP_Customizer- RCCP's own customization component, which sits as a child object on the vehicle. - The catalog set has content for it. The Catalog Set you assign in Step 3 has one slot per category. An empty slot hides that category even on a perfectly configured vehicle.
| Garage category | Vehicle needs (under RCCP_Customizer) | Catalog Set slot |
|---|---|---|
| Paint | Paint Manager | Paint |
| Wheels | Wheel Manager, plus at least one wheel in the project-global RCCP_ChangableWheels list |
Wheels |
| Engine / Brakes / Handling / Speed | Upgrade Manager | Upgrades (one slot feeds all four) |
| Spoiler | Spoiler Manager with at least one spoiler object assigned | Spoilers |
| Siren | Siren Manager with at least one siren object assigned | Sirens |
| Decals | Decal Manager, and a URP or HDRP project | Decals |
| Neon | Neon Manager, and a URP or HDRP project | Neons |
| Tuning | Customization Manager | Tuning |
The four performance categories need only the Upgrade Manager itself. The individual Engine / Brake / Handling / Speed components underneath it are not required for the tab to appear - they only decide whether that category can show a live stat readout.
Adding the customizer and its managers. Select the vehicle and press the Customizer button in its RCCP_CarController inspector - that creates an empty RCCP_Customizer child. Now select that child: its inspector lists every manager the vehicle does not have yet (for example "Spoiler Manager not found!") with a Create button beside each one. Press Create for the categories you want to offer.
Neither hide condition is a bug and neither writes anything to the Console - this capability detection is deliberate, automatic, and per-vehicle. If a tab is missing, check the vehicle first and the catalog second: Troubleshooting walks the full decision tree, and the Catalog Set inspector reports which slots actually hold content - see Editor Tools.
Tip: RCCP's prototype vehicles (like the demo's Skyline) already carry a fully-populated customizer - they are great first test subjects.
Step 2: Create the Tuner Canvas
With your scene open, run Tools > BoneCracker Games > RCCP Tuner > Setup > Create Tuner Canvas.
This drops an instance of Prefabs/RCCPT_TunerCanvas.prefab into the scene and - if the scene has no RCCPT_TunerController yet - creates one for you, with the RCCPT_OpenCloseHotkey component (T key) already attached.
Expected: the garage overlay is visible in the Game view straight away, covering your scene. That is normal - the canvas hides itself on startup, so it disappears the moment you press Play. Nothing is broken.
Exactly one RCCPT_TunerController belongs in a scene. If you copy a garage setup between scenes and end up with two, the runtime binds to an arbitrary one and their settings compete silently; the controller inspector flags that with a one-click Select All fix (Editor Tools).
The canvas is a real, hand-editable uGUI hierarchy - see Theming & Editing the UI when you want to restyle it.
Step 3: Give the Garage Content
The garage needs a Catalog Set - the asset that says which paints, wheels, upgrades (and their prices) are on offer. Select the RCCPT_TunerController object and look at its inspector:
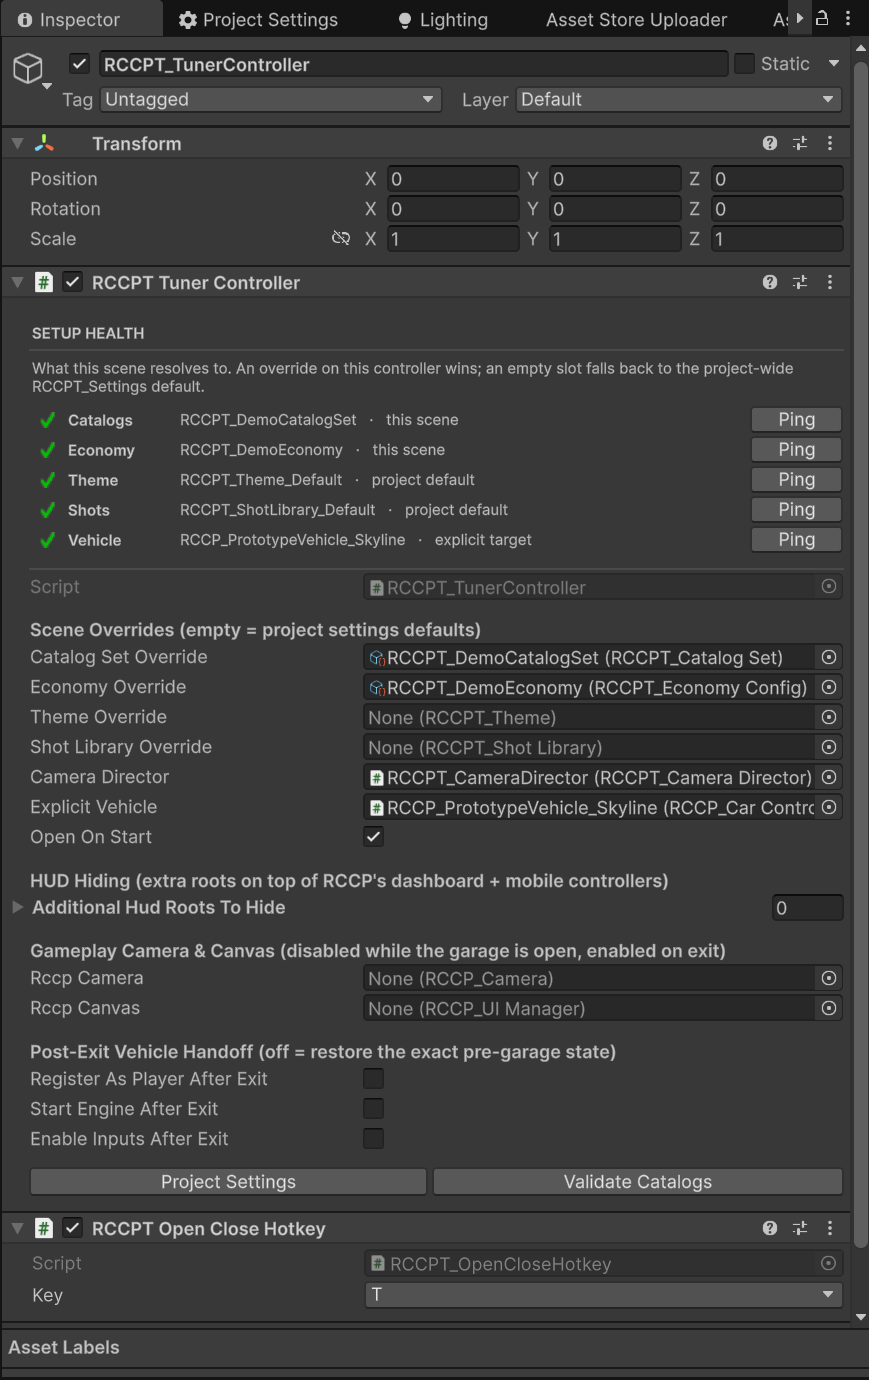
Assign a catalog set in either of two places. The same override -> project default -> built-in fallback chain governs all four content slots:
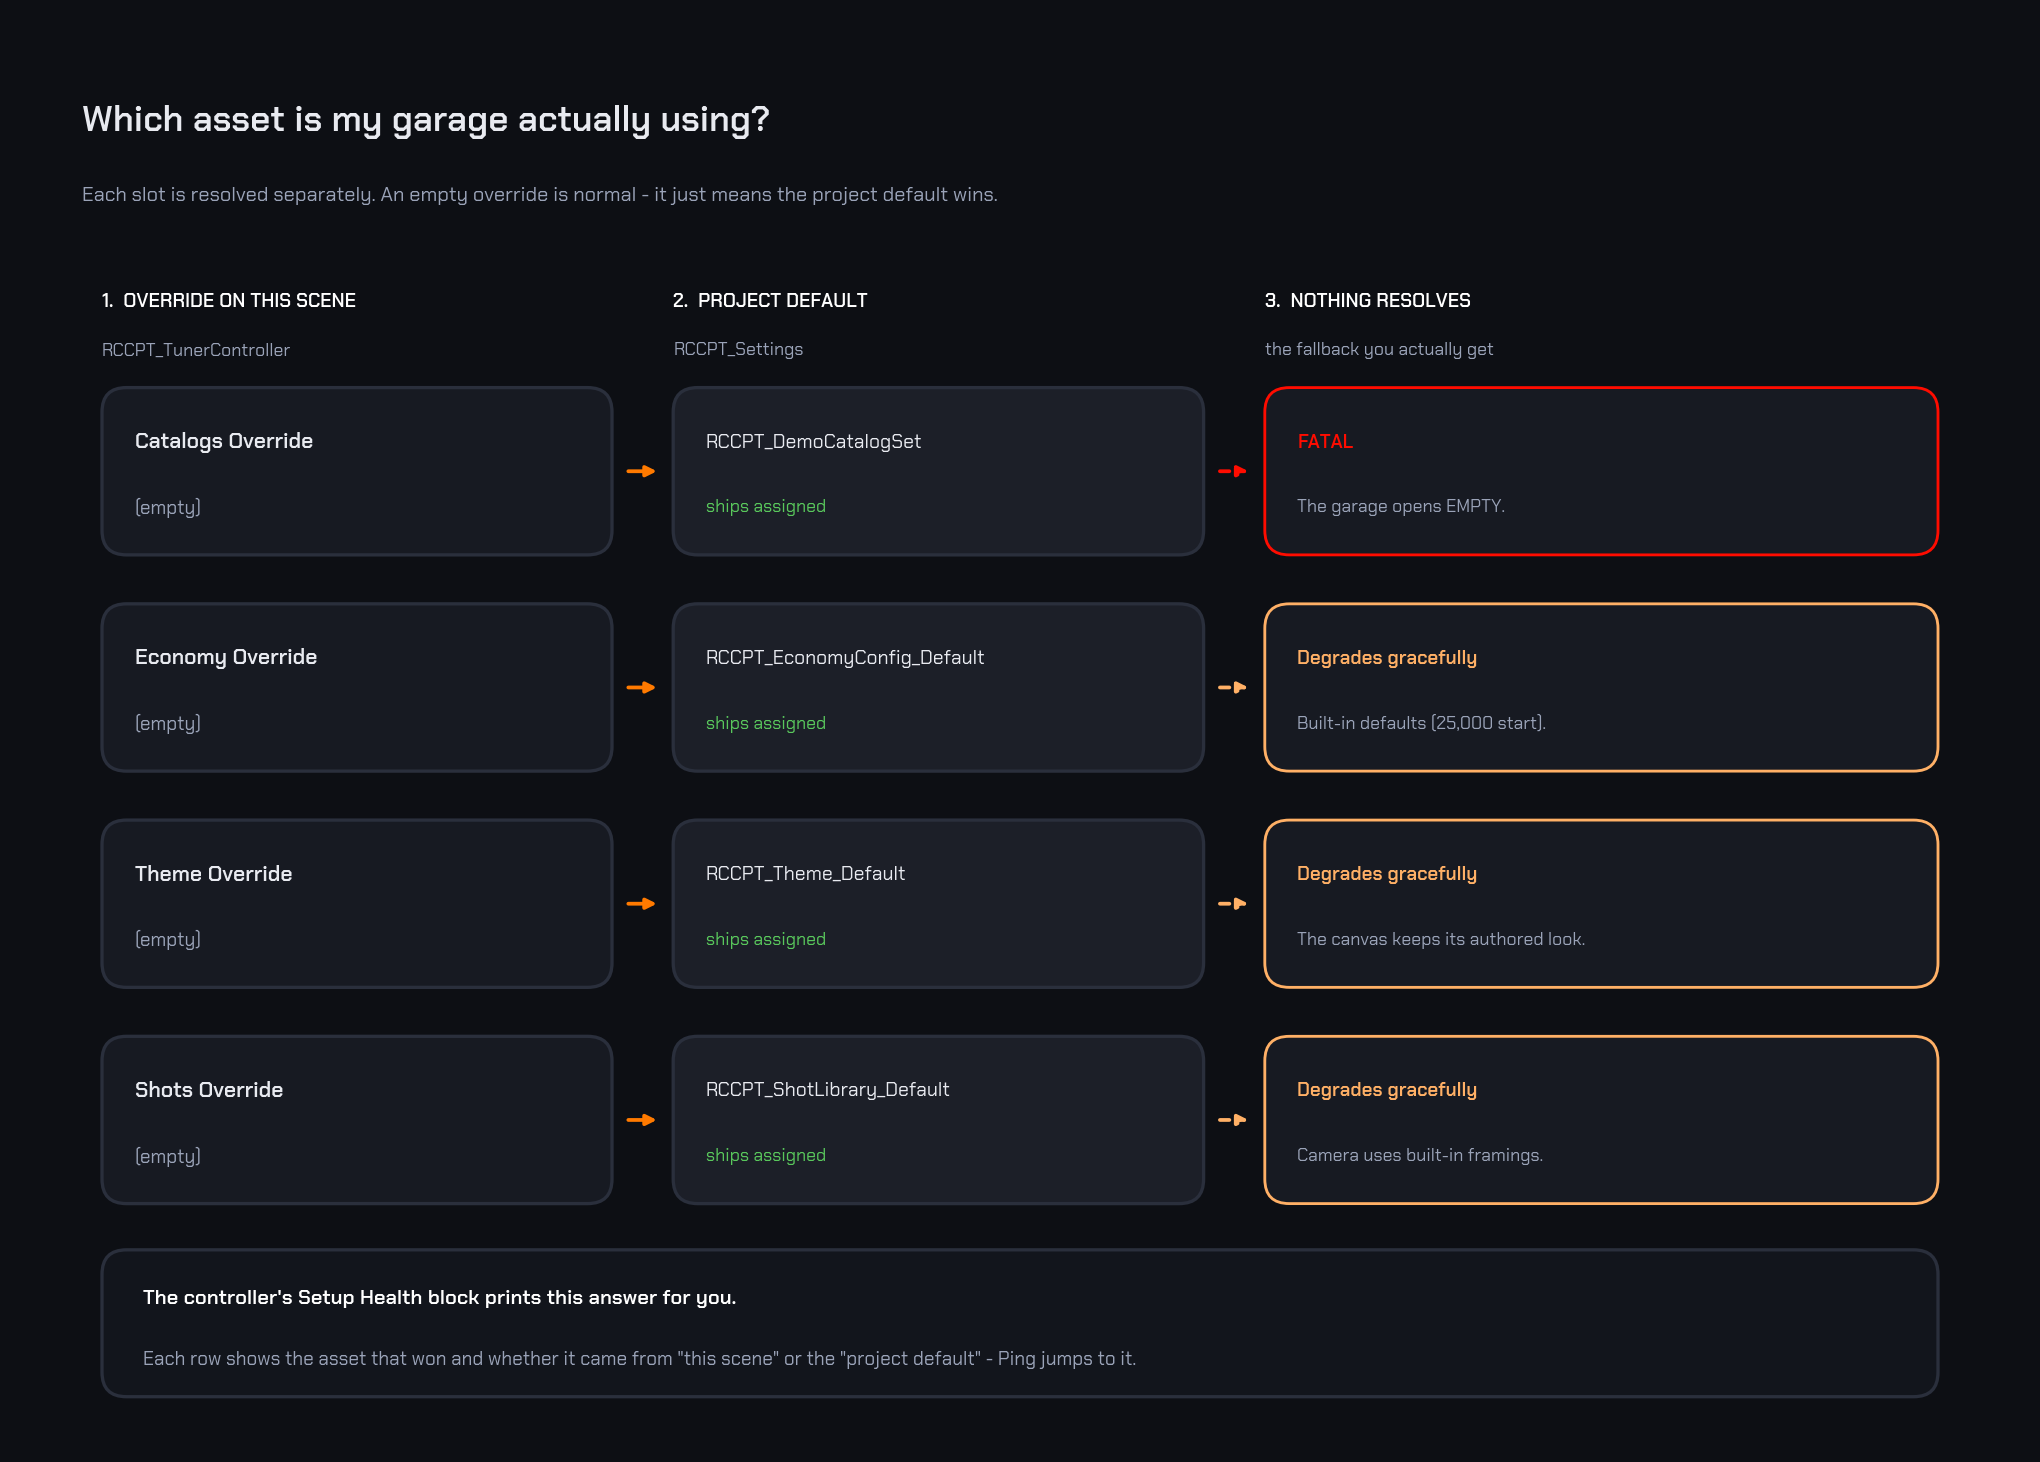
In the inspector the four slots are labelled Catalog Set Override, Economy Override, Theme Override and Shot Library Override, and they fall back to defaultCatalogSet, economyConfig, theme and shotLibrary on RCCPT_Settings.
An empty override slot is the normal, healthy state. It means "use the project default", not "unassigned". Only the catalog set is fatal when nothing resolves at all - the other three degrade to sensible built-in behaviour.
Confirming What the Scene Actually Resolved To
You do not have to trace that chain by hand. Select the controller in Edit Mode and the top of its inspector shows a Setup Health block: one row per slot (Catalogs / Economy / Theme / Shots) naming the asset that actually resolved and whether it came from this scene or the project default, each with a Ping button that highlights the asset in the Project window. A fifth row tells you which vehicle the garage will open on. An unresolved catalog set raises an error notice with a one-click Locate Catalog Set fix. Full reference: Editor Tools.
For your first run you probably do not need to assign anything. The shipped RCCPT_Settings already points Default Catalog Set at RCCPT_DemoCatalogSet, so a fresh import resolves to the demo content and the Catalogs row reads RCCPT_DemoCatalogSet · project default before you touch a single field. Assign an override only when this scene should sell something different. Author your own set later with Creating Items.
If no catalog set resolves anywhere, the garage opens empty and the Console says exactly that on open, naming both slots and the demo set at Assets/RCCP Tuner/Demo/Catalogs/RCCPT_DemoCatalogSet.asset.
Step 4: Give the Vehicle a Stable Save Identity
Select your vehicle in the scene, then run Tools > BoneCracker Games > RCCP Tuner > Setup > Add Vehicle Id To Selected Vehicle.
This adds an RCCPT_VehicleId component holding a unique, serialized ID (a GUID). Why it matters:
- RCCP saves each vehicle's applied configuration under a key that defaults to the object's name - so two cars both named "Skyline" would overwrite each other's saves. The Vehicle Id replaces that key with its GUID.
- The Tuner also keys per-vehicle upgrade ownership on this GUID.
- If the vehicle already had a name-keyed RCCP save, it is migrated to the GUID automatically, once.
Two rules to remember:
- Run this on the scene instance (or in Prefab Mode), not on a prefab asset in the Project window. If you selected the car in the Hierarchy you are already on the scene instance and this rule does not affect you - it only bites when you select the prefab in the Project window, which the menu refuses with a dialog. The GUID must be unique per vehicle, not shared by every instance of a prefab. (Duplicated vehicles in a scene detect the collision and regenerate automatically.)
- Never regenerate the GUID after your game has shipped. Ownership and saves are keyed on it - regenerating orphans the player's progress. The inspector's Regenerate (forks save identity) button confirms with a dialog warning you about exactly this.
If you skip this step, the controller adds a Vehicle Id automatically the first time the garage opens on that vehicle. Doing it deliberately in the editor is still better: the GUID then serializes into your scene/prefab instead of being minted at runtime.
Naming the Car on Screen
RCCPT_VehicleId carries one more field worth setting while you are here: Display Name. It is what the garage's top bar shows, and it is the largest text on the screen.
| Display Name | What the top bar shows |
|---|---|
| Left empty (default) | A tidied-up version of the GameObject's name: (Clone) stripped, a leading RCCP_ / RCC_ / BCG_ stripped, underscores and hyphens turned into spaces, camel-case split into words, the whole thing uppercased. RCCP_PrototypeVehicle_Skyline becomes PROTOTYPE VEHICLE SKYLINE. |
| Filled in | Your text, uppercased. Skyline GT-R becomes SKYLINE GT-R. |
The cleanup exists so a raw prefab name never reaches a player's screen, but it can only tidy the name you gave the object - it cannot invent a good one. Set Display Name on every vehicle you ship. The demo showroom does exactly that: its car is authored with Skyline Prototype, which is why the demo's top bar does not read PROTOTYPE VEHICLE SKYLINE.
Step 5: Open the Garage
Press Play, then open the garage any of four ways:
| Method | How |
|---|---|
| Hotkey | Press T (the RCCPT_OpenCloseHotkey component; change its Key field to rebind). Requires the Input System - see the note below |
| Automatic | Tick Open On Start on the controller (how the demo scene does it) |
| From the inspector | Select the controller while in Play Mode and press Open Garage in its Live Session panel - no game UI, no hotkey, no code (Editor Tools) |
| From code | RCCPT_TunerController.Instance.OpenGarage(); - see Scripting API |
⚠ The T hotkey needs Unity's Input System. The whole body of
RCCPT_OpenCloseHotkey- the Key field, itsTdefault, and the key check itself - is compiled only when the Input System package is active. In a project set to Input Manager (Old) under Edit > Project Settings > Player > Active Input Handling, the component has no Key field to rebind, T does nothing, and nothing is written to the Console. Switch Active Input Handling to Input System Package (New) or Both, or use one of the other three methods above. (RCCP itself drives its input through the Input System, so most RCCP projects already have this set.)The hotkey also deliberately ignores T while the player is typing in a text field, so a chat or name-entry box cannot toggle the garage.
Which vehicle opens? The controller resolves it in this order:
explicitVehicle field (assigned on the controller)
   -> else: RCCP Scene Manager's active player vehicle
      -> else: the first RCCP vehicle found in the scene
For a single-car showroom you can leave explicitVehicle empty. Assign it when the scene contains several vehicles and you want the garage bound to a specific one. The Vehicle row of the Setup Health block reports which case your scene is in before you press Play.
Step 6 (Optional): Author the Garage Camera
Without any camera setup, the garage spawns its own camera at runtime, copying your gameplay camera's settings - the zero-setup path. For full control (post processing, culling, FOV), place an RCCPT_CameraDirector in the scene and assign a child camera to its Scene Camera slot, exactly like the demo does. You can leave that child camera enabled while you frame the shot in the editor - the director switches it off itself on startup so it never fights your gameplay camera, and wakes it when the garage opens. Details in The Cinematic Camera.
Step 7 (Optional): Play Nicely with Your Gameplay HUD and Camera
While the garage is open, the Tuner gets your gameplay UI and camera out of the way. The two halves behave differently on close, on purpose:
| What is parked while the garage is open | What happens on close |
|---|---|
| RCCP's dashboard + mobile controls, plus any roots you list in Additional Hud Roots To Hide | Restored to their exact prior state. A root that was already hidden before the garage opened stays hidden |
| The RCCP gameplay camera + gameplay canvas | Always switched on, even if they started the scene disabled - deliberate, so the player can never leave the garage without a working follow camera and HUD |
That asymmetry is the answer to "why did my HUD come back hidden but my camera come back on?" - your own roots are restored, RCCP's camera and canvas are guaranteed.
Three controller sections tune this behavior:
| Inspector section | Field | Purpose |
|---|---|---|
| HUD Hiding | Additional Hud Roots To Hide |
Add your own UI roots here; they hide with the garage and restore on close |
| Gameplay Camera & Canvas | Rccp Camera / Rccp Canvas |
Which RCCP camera / UI canvas to re-enable on exit. Empty = found automatically (inactive objects included) |
| Post-Exit Vehicle Handoff | Register As Player After Exit, Start Engine After Exit, Enable Inputs After Exit |
All off by default, which restores the exact pre-garage state. Turn them on to hand the player a drivable car when leaving the garage |
A typical "garage inside my game" setup ticks all three handoff boxes so closing the garage means: engine on, inputs live, camera following.
⚠ HUD hiding has a fourth switch, and it is not on the controller. The whole HUD half is gated by Hide RCCP Hud While Open on the project-wide
RCCPT_Settingsasset (on by default). Turn it off and RCCP's dashboard and mobile controls stay visible over the garage - and yourAdditional Hud Roots To Hidelist stops working too, because the same switch gates it. The camera and canvas half is not gated by it and keeps working either way. If your extra HUD roots are being ignored, check that setting before you check the list. Reach it with the Project Settings button at the bottom of the controller inspector, or openAssets/RCCP Tuner/Resources/RCCPT_Settings.assetdirectly - full field reference in Editor Tools.
Step 8: Validate
Run Tools > BoneCracker Games > RCCP Tuner > Tools > Validate Catalogs with your scene open - or press the Validate Catalogs button at the bottom of the controller inspector, which runs the identical check without hunting through the menu. It cross-checks your catalog content against the scene's vehicle and reports errors (missing prices, out-of-range indices, foreign materials) and warnings in the Console, then shows a summary dialog. Make this a habit before builds.
⚠ Validate with a vehicle in the open scene. With no RCCP vehicle loaded, every vehicle-dependent check - index ranges, decal and neon materials, category support - is skipped, and the summary still reports Errors: 0. The dialog admits it ("No vehicle in scene - vehicle-dependent checks skipped."), but a green result from an empty scene is not proof your catalogs are shippable.
The full rule set and what each message means live in Editor Tools; the authoring side is in Creating Items.
Gameplay Scenes (No Garage)
Vehicles spawned in ordinary gameplay scenes re-apply their saved RCCP configuration by themselves - no Tuner objects needed. One exception: the paint finish (matte/chrome etc.) lives in the Tuner's own save, not RCCP's. Add the small RCCPT_PaintFinishApplier component next to RCCPT_VehicleId on the vehicle prefab and the saved finish re-applies on spawn in any scene. See Using the Garage for what the finish system is.
Setup Checklist
- [ ] Vehicle has
RCCP_Customizer+ managers for the categories you want - [ ] The catalog set has content in the slots for those same categories (both gates, Step 1)
- [ ] Setup > Create Tuner Canvas run in the scene, and exactly one
RCCPT_TunerControllerin it - [ ] Setup Health shows a resolved asset on the Catalogs row (override or project default)
- [ ] Setup > Add Vehicle Id To Selected Vehicle run on the vehicle, with Display Name filled in
- [ ] A way to open the garage chosen (T hotkey / Open On Start / inspector button / code)
- [ ] Tools > Validate Catalogs reports 0 errors with your vehicle in the open scene
Next Steps
- Learn everything the garage can do: Using the Garage.
- Replace the demo content with your own: Creating Items.
- Every menu item, inspector and one-click fix in one place: Editor Tools.