Installing Realistic Truck Simulator
This guide walks you through installing Realistic Truck Simulator (RTS) V1.5 into a Unity project — from checking requirements, through the import itself, to verifying that everything landed correctly. It is written for beginners: every step is spelled out, and every dialog you will see is described before it appears. If you have already imported the asset and just want to explore, jump ahead to Demo Scenes.
Before You Start
Unity Version
Realistic Truck Simulator supports Unity 2022.3.51 or newer, up through Unity 6.x. This release (V1.5) was authored and tested on Unity 6000.3.6f1. If you are starting a new project, any recent Unity 6 version is a safe choice.
Render Pipeline
Out of the box, RTS targets the Built-in Render Pipeline. If your project uses URP or HDRP, the bundled Realistic Car Controller Pro (RCCP) package includes render pipeline converters you can run after import — refer to the RCCP documentation (included under Assets/RTS/Realistic Car Controller Pro/) for the conversion steps. This guide assumes the Built-in pipeline.
What Comes With the Asset
You do not need to buy or install anything else. Two things ship inside the package:
- Realistic Car Controller Pro (RCCP) — the vehicle physics system RTS is built on. It is bundled at
Assets/RTS/Realistic Car Controller Pro/and imports together with everything else. If you already own RCCP as a separate asset, read Duplicate RCCP scripts below before importing. - All RTS content: scripts, editor tools, prefabs, three demo scenes, and this documentation.
Required Unity Packages
RTS relies on a few official Unity packages. These are the exact versions the RTS project itself was authored against (from its Packages/manifest.json):
| Package | Version | Used for |
|---|---|---|
com.unity.ai.navigation |
2.0.12 | NavMesh — the guide system calculates its route line on a navigation mesh |
com.unity.inputsystem |
1.18.0 | The new Input System — all keyboard, gamepad, and wheel controls |
com.unity.ugui |
2.0.0 | Unity UI (uGUI) — HUD, job list, notifications, minimap |
A package is a module Unity installs through its Package Manager rather than through your Assets folder. On Unity 6, TextMeshPro (the text rendering system RTS uses for all labels) is included inside the com.unity.ugui package, so you will not see a separate TextMeshPro entry. On Unity 2022.3, TextMeshPro is installed as its own package instead.
If any of these packages are missing from your project, install them via Window → Package Manager (select Unity Registry in the packages dropdown, search for the package, click Install).
Importing the Asset
The asset is delivered through the Unity Asset Store and imported with Unity's Package Manager:
- Open your project in a supported Unity version (see above). Ideally start from a fresh project for your first look at the asset.
- Open Window → Package Manager.
- In the packages dropdown at the top-left, select My Assets. This lists everything linked to the Unity account that purchased the asset — make sure you are signed in with that account.
- Find Realistic Truck Simulator in the list (use the search field if needed).
- Click Download, and once the download finishes, click Import.
- Unity opens the Import Unity Package dialog: a tree view of every file in the package with a checkbox next to each. Leave everything ticked — RTS expects its full folder structure, including the bundled RCCP — and click Import.
- Wait for Unity to import the assets and compile the scripts. This can take a few minutes on the first import.
What Happens on First Import
RTS runs a small first-time setup automatically after the import finishes. Nothing here modifies your scenes — it only prepares project settings.
The welcome dialog and the BCG_RTS symbol
The first thing you will see is a dialog titled Realistic Truck Simulator | Regards from BoneCracker Games:
"Thank you for purchasing and using Realistic Truck Simulator. Please read the documentation before use. Also check out the online documentation for updated info. Have fun :)"
Click Let's get started! to continue. Behind the scenes, RTS adds a scripting define symbol named BCG_RTS to your project — a project-wide flag compiled into your scripts. RTS uses it to detect that this first-run setup has already happened, so you will only see this sequence once per project (adding the symbol may trigger a brief script recompile). The Welcome Window then opens automatically — more on it in the next section.
The missing layer dialog
Right after that, RTS checks your project's layers. A layer is a named slot (0–31) that Unity attaches to GameObjects so cameras and physics can include or exclude whole groups of objects. The RTS minimap renders its icons on a dedicated layer called RTS_MinimapIcons, which the minimap camera renders and the RCCP gameplay camera excludes.
Fresh projects do not have this layer, so RTS shows a dialog titled Realistic Truck Simulator | Found Missing Layers For Realistic Truck Simulator:
"These layers will be added to the Tags and Layers
RTS_MinimapIcons"
Click Add. RTS writes the layer name into the first empty user layer slot (slot 8 or higher) in your project's Tags and Layers settings and logs Layer: RTS_MinimapIcons has been added. to the Console. In the shipped demo project this layer sits at slot 12, but in your project it simply takes the first free slot — the slot number does not matter, only the name does.
If you dismiss this dialog, nothing breaks immediately, but the minimap will warn at runtime — see Troubleshooting.
The Welcome Window
The Welcome Window is your home base inside the editor. It opens automatically on first import, and you can reopen it any time via Tools → BoneCracker Games → Realistic Truck Simulator → Welcome Window. It is a floating window titled Realistic Truck Simulator (720×600) with a sidebar of four tabs.
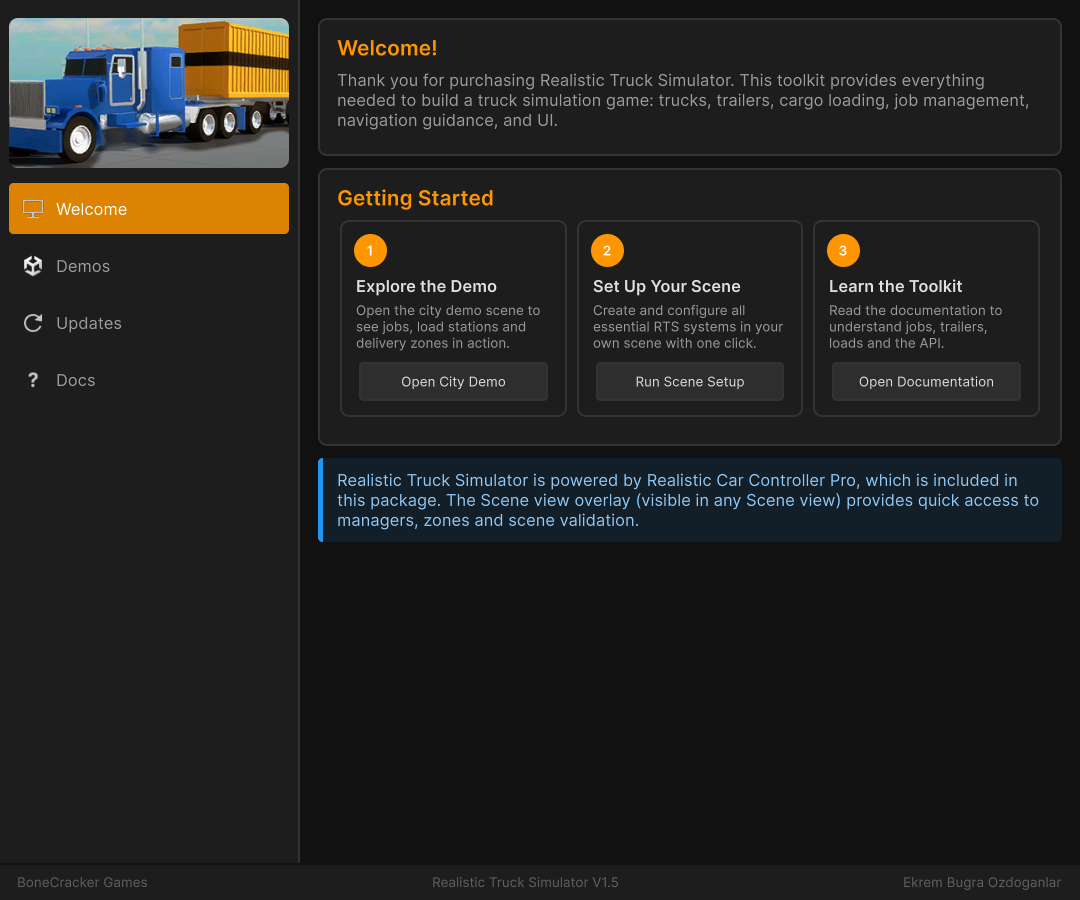
- Welcome — greets you and offers a three-step getting-started path as clickable cards: Open City Demo (opens the full city demo scene), Run Scene Setup (creates and configures all essential RTS systems in your currently open scene with one click — run this inside the scene you want to build, and see Scene Setup first), and Open Documentation (downloads the documentation archive). An info box reminds you that RTS is powered by the included Realistic Car Controller Pro and that a Scene view overlay provides quick access to managers, zones, and scene validation.
- Demos — cards for the three included scenes: City Demo (full city environment with jobs, load stations and delivery zones), Template Demo (minimal template scene with all RTS systems configured and ready), and Setup Template (barebones setup scene to use as the starting point for your own map). Opening a scene from here prompts you to save unsaved changes first, so you cannot lose work.
- Updates — shows your installed version (V1.5) and the safe update procedure: back up your project, move any of your own files out of the RTS folder, then delete the folder and reimport the latest version. A button takes you to the Asset Store page.
- Docs — buttons for the online documentation, the offline documentation folder (
Assets/RTS/Documentation), and the YouTube tutorial playlist, plus support links. When contacting support, include your invoice number — responses usually arrive within a business day.
A Note About the Input System
RTS drives its vehicles through Unity's new Input System package (version listed above). If your project was created with only the legacy Input Manager active, Unity may show its own dialog when the package is installed, asking whether to enable the new input backend — accepting it restarts the Unity Editor. This is normal, one-time Unity behavior; let it restart and continue where you left off.
If you were never prompted and input does not work in Play Mode, check Edit → Project Settings → Player: the Active Input Handling option must be set to a mode that includes the new Input System (either Input System Package or Both).
Folder Structure After Import
After a full import, everything lives under a single Assets/RTS/ folder. The Project window should look like this:
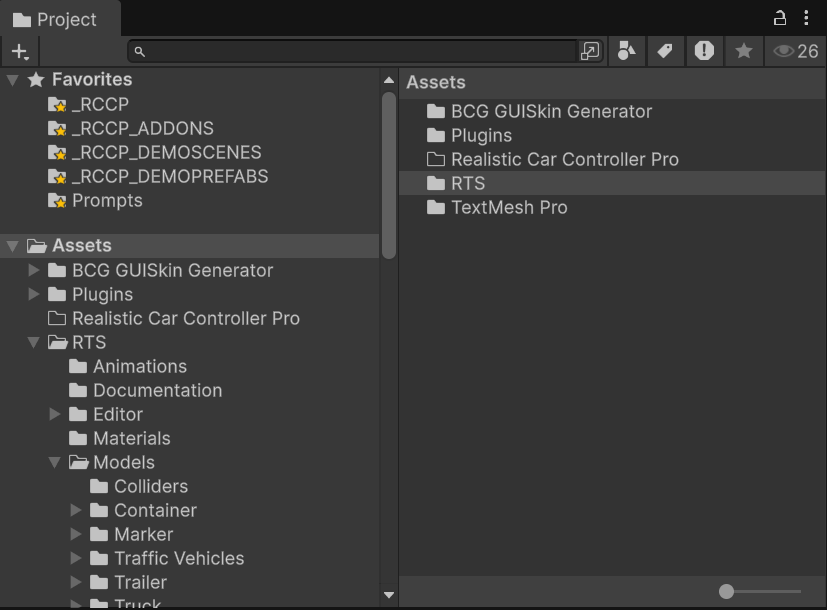
Assets/RTS/
  Animations/                     <- Animation assets
  Documentation/                  <- Offline documentation (this doc set + scripting reference)
  Editor/                         <- Editor-only tools: inspectors, Welcome Window, browsers
  Materials/                      <- Materials for the demo content
  Models/                         <- Truck, trailer, and environment models
  Prefabs/                        <- Ready-made prefabs (a "prefab" is a reusable, pre-configured GameObject)
    DeliveryStations/             <- Five delivery zone prefabs
    LoadStations/                 <- Five load station prefabs
    MinimapIcons/                 <- Minimap icon prefabs
    TrailerSpawners/              <- Trailer spawn point prefabs
    Trucks/                       <- The drivable RTS_Truck prefab
    UI/                           <- UI canvas and widget prefabs
  Realistic Car Controller Pro/   <- The bundled RCCP vehicle physics package
  Resources/                      <- Assets RTS loads at runtime by name
    EditorIcons/                  <- Icons used by the editor UI
    Generated/                    <- Generated GUI skin textures
    Jobs/                         <- Job assets (ScriptableObjects: data files saved as assets)
    Loads/                        <- Cargo load prefabs
    Trailers/                     <- Trailer prefabs
    RTS_GUI.guiskin               <- Shared GUI skin for the editor tools
    RTS_Settings.asset            <- Central settings file (see Settings Reference)
  Scenes/                         <- RTS_DemoScene_City, RTS_DemoScene_Template, RTS_SceneSetup
  Scripts/                        <- All runtime C# scripts
  Skybox/                         <- Skybox assets
  Textures/                       <- Textures for the demo content
The Resources folders matter more than they look: RTS discovers jobs, loads, and trailers by loading these folders at runtime, so keep their paths intact (Assets/RTS/Resources/Jobs, .../Loads, .../Trailers). The Settings Reference covers RTS_Settings.asset in detail.
Verify Your Installation
Run through this checklist before moving on:
- No compile errors. Open the Console (Window → General → Console) and confirm there are no red error entries. Yellow warnings from third-party content are not blockers.
- The menu exists. Check that Tools → BoneCracker Games → Realistic Truck Simulator appears in the menu bar, with entries such as Settings, Welcome Window, and Create.
- The Welcome Window opens. Select Tools → BoneCracker Games → Realistic Truck Simulator → Welcome Window.
- Settings resolve. Select Tools → BoneCracker Games → Realistic Truck Simulator → Settings — the
RTS_Settingsasset should appear in the Inspector. - The layer is present. Open Edit → Project Settings → Tags and Layers and confirm one of the user layer slots (8–31) reads
RTS_MinimapIcons. - The demo runs. Open
Assets/RTS/Scenes/RTS_DemoScene_City.unityand press Play. You should be able to drive the truck with W / A / S / D or the arrow keys. See Demo Scenes for a full tour.
Troubleshooting the Install
The minimap warns about a missing layer
If you dismissed the layer dialog on first import, entering Play Mode in a scene with the minimap logs this warning:
Layer "RTS_MinimapIcons" not found. Make sure the layer name is correct.
Fix it manually: open Edit → Project Settings → Tags and Layers and type RTS_MinimapIcons (exact spelling) into any empty User Layer slot from 8 upward. If the automatic dialog instead logged All allowed layers have been filled., every user layer slot is already occupied — free one up, then add the layer.
Text is invisible or shows as squares
RTS UI text uses TextMeshPro. If Unity shows its TMP Importer dialog offering to import TMP Essentials, accept it — those are the default font resources TextMeshPro needs. On Unity 6, TextMeshPro itself is already part of the com.unity.ugui package; on Unity 2022.3 make sure the TextMeshPro package is installed via the Package Manager.
Duplicate RCCP scripts (compile errors)
RTS bundles its own copy of Realistic Car Controller Pro at Assets/RTS/Realistic Car Controller Pro/. If your project already contains RCCP from a separate purchase, importing RTS gives you two copies of every RCCP_ script, and the Console fills with compile errors about names that are already defined. The fix is to keep exactly one copy:
- If your standalone RCCP is older than the copy bundled with RTS, delete your standalone RCCP folder and use the bundled one — RTS V1.5 is built and tested against its bundled RCCP version.
- If your standalone RCCP is newer, delete the bundled copy at
Assets/RTS/Realistic Car Controller Pro/instead, and verify the project still compiles cleanly afterward.
Back up your project before deleting either folder.
"Scene Not Found" when opening demos
If a Welcome Window button shows the dialog Realistic Truck Simulator | Scene Not Found, the scene file has been moved or deleted, or its path is no longer set in RTS_Settings. Similarly, the Demos tab shows "RTS_Settings could not be loaded from Resources. Reimport Realistic Truck Simulator to restore it." if the settings asset itself is missing. In both cases the cure is the same: reimport Realistic Truck Simulator from the Package Manager with all files ticked.
For anything not covered here, see Troubleshooting.
Next Steps
With the asset installed and verified:
- Drive the demo. Open the city scene and complete a delivery — Demo Scenes walks you through it.
- Learn the building blocks. Essentials explains trucks, trailers, loads, jobs, and zones — the vocabulary the rest of this documentation uses.
- Build your own scene. When you are ready, Scene Setup shows how the one-click Run Scene Setup works and what it creates.