The Setup Wizard
The Setup Wizard is the fastest way to turn a bare helicopter model into a fully configured, validator-clean, flyable aircraft with zero manual component wiring. This document walks through every step in order, explains what each one asks for and what it actually does to your scene, and covers the supporting utilities (automatic collider generation, the pivot-fix tool, and the scripted "headless" path). Read 02_QuickStart.md first if you just want a one-page path to flight; come here when you want to understand each decision the wizard makes.
Overview
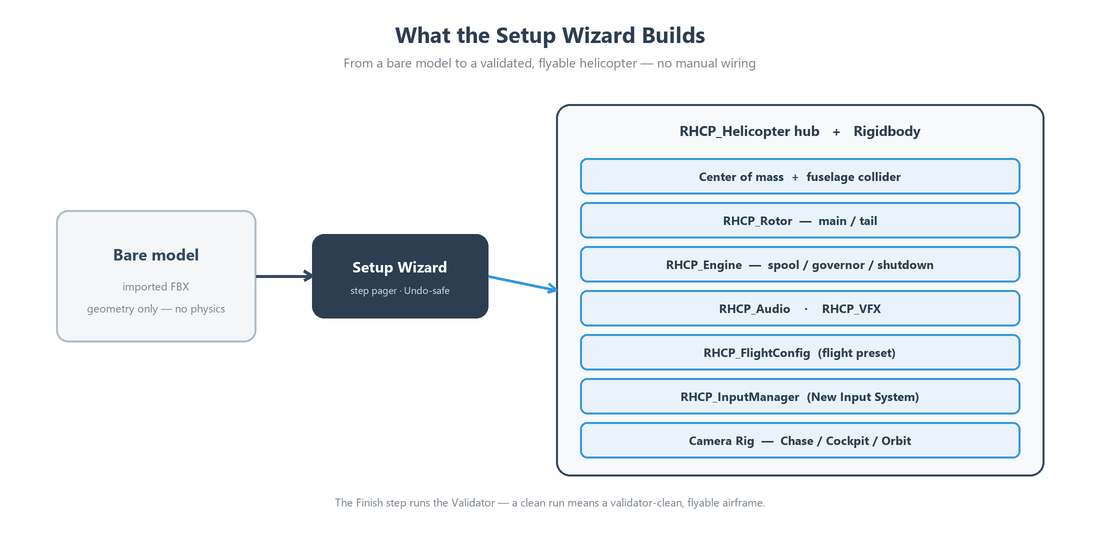
The wizard exists to solve one problem: a freshly imported FBX is just geometry. To fly it you need a physics body, a center of mass, rotor modules, a flight configuration, input, and (usually) a camera. Wiring all of that by hand is error-prone and easy to get subtly wrong — a collider accidentally placed on the spinning rotor mesh, a mass left at Unity's default of 1, an unassigned flightConfig. The wizard performs each of these steps for you, validates as it goes, and hands off to the Validator at the end so you can confirm the result is clean.
The wizard works in place on the GameObject you point it at. It does not clone your model under a managed root or move your geometry — it adds components, sets serialized fields, and (optionally) creates a separate camera rig object. Every change goes through Unity's SerializedObject/Undo pipeline, and each step runs inside its own collapsed undo group, so a single Ctrl+Z reverts a whole step rather than leaving you in a half-configured state. Re-running the wizard on an already-configured helicopter never duplicates components: each step calls EnsureComponent, which reuses an existing component if one is present.
Because the wizard is built on a small set of pure step objects (RHCP_WizardStep subclasses operating on a serialized RHCP_WizardState), the exact same logic is available without the window — see Headless ApplyAll for scripting a full setup in editor automation.
Opening the Wizard
There are several entry points, all leading to the same window:
| Entry point | Menu / location | Behavior |
|---|---|---|
| Tools menu | Tools ▸ BoneCracker Games ▸ RHCP ▸ Setup Wizard… | Opens the wizard with an empty model slot (or pre-filled if a helicopter is selected). |
| GameObject menu | GameObject ▸ BoneCracker Games ▸ RHCP ▸ Helicopter (Setup Wizard)… | Pre-fills step 1 from the currently selected GameObject. |
| Welcome window | Setup Wizard action | Opens the wizard from the first-import onboarding screen. |
The RHCP_Helicopter hub inspector deliberately does not host a wizard button — it offers Tune Flight and Validate instead. The wizard is a create-time tool (re-applying its starting values over a tuned airframe would overwrite your work), so it lives in the menus and the Welcome window. Opening it on a helicopter that is already configured first asks for confirmation, with Cancel as the default button.
When you open the wizard with a GameObject selected, it pre-fills the Model root slot. If that object (or one of its parents) already has an RHCP_Helicopter hub, the wizard treats it as a re-entry: it caches the existing hub and jumps straight to the first incomplete step rather than starting at step 1. "Incomplete" here means the first step whose inline validation reports a blocking (Error-severity) issue, so re-opening a partly-built helicopter drops you exactly where attention is needed.
The window is a step pager: a breadcrumb header lists all ten steps (the current one bold), a HelpBox area shows inline validation, the body holds the current step's fields, and a footer carries ◀ Back, Skip, and Next ▶ buttons. Next is disabled while the current step has a blocking issue, Skip appears only on steps marked skippable, and on the last step Next becomes Finish ✓. The whole wizard state is serialized on the window, so it survives a domain reload (for example, a script recompile) without losing your progress.
The Steps
The wizard runs exactly ten steps, in this fixed order (from RHCP_SetupWizard.CreateSteps()). Each step's Apply runs when you advance past it (via Next, Skip, or Finish); skippable steps still run their Apply with sensible defaults when skipped.
Step 1 — Model
This is the entry point and cannot be skipped. You assign the Model root: the scene GameObject you want to turn into a helicopter (an FBX instance or any existing object). When you advance, the wizard adds an RHCP_Helicopter hub component to that object; because the hub declares the Rigidbody as a required component, Unity adds the Rigidbody automatically at the same time. The hub is the central registry that all the modules (rotor, engine, audio, VFX, damage) attach to and tick through.
Inline validation guards the most common mistakes before you proceed:
- Error if no model is assigned — you must point the wizard at a scene object.
- Error if the model has no
MeshRendererorSkinnedMeshRenderer— there is nothing to fly. - Error if the model is nested under another
RHCP_Helicopter— pick a standalone object so you don't create a hub inside a hub. - Warning if the root
localScaleis not(1, 1, 1)— the physics presets assume unit scale, and a scaled root skews mass, inertia, and the center of mass. Bake the scale into the mesh on import rather than scaling the transform.
Step 2 — Physics body
Skippable. This step configures the Rigidbody for the airframe and optionally generates a collider. You pick an Airframe class and toggle Generate fuselage collider.
The airframe class sets the Rigidbody mass from a preset:
| Airframe class | Mass | Typical use |
|---|---|---|
Light |
900 kg |
Light utility / scout |
Medium (default) |
1800 kg |
Medium transport |
Heavy |
5000 kg |
Heavy lift |
Beyond mass, the step sets linearDamping = 0, angularDamping = 0 (the flight model applies its own aerodynamic damping, so the Rigidbody's built-in drag must stay out of the way), interpolation = Interpolate (so the camera follows a smooth body rather than a stepped physics body), and collisionDetectionMode = ContinuousDynamic (so a fast-moving helicopter doesn't tunnel through thin geometry). If Generate fuselage collider is enabled, it calls the collider generator described in Automatic Collider Generation. The collider toggle defaults to on.
Step 3 — Center of mass
Skippable. The center of mass (COM) is the single highest-leverage parameter for flight feel — a helicopter hangs from its rotor like a pendulum, so a COM that sits below the rotor hub is self-righting and stable, while a high COM is twitchy. By default this step leaves Set custom COM offset off and computes a sensible default: it calls Rigidbody.ResetCenterOfMass() to get the collider/bounds-derived center, then lowers it by 0.4 meters toward the skids. That lowered point is written back so you can see and refine it.
If you enable Set custom COM offset, the COM offset field becomes editable and the step writes your exact local-space offset to Rigidbody.centerOfMass instead. Either way, you can drag the orange COM handle in the Scene view while this step (or the hub) is selected to tune it interactively — that handle writes the same field through the serialized pipeline, so it is Undo-correct.
Snap COM under main rotor hub. The main rotor applies its vertical lift at the rotor hub, so for trim-free hover the COM must sit directly under that point — otherwise the lift vector has a horizontal lever arm to the COM and the airframe carries a constant pitch/roll trim moment that it cannot hold hands-off (it will tilt and drift away). The ⌖ Snap COM under main rotor hub button does this alignment for you: it finds the main rotor's thrust point and sets the COM's horizontal (X/Z) position under it, keeping the height (Y) you chose so the COM stays low for pendulum stability. It enables Set custom COM offset, updates the field, and applies the result live (so the orange gizmo moves immediately) with full Undo. If no main rotor exists yet — for example you are on this step before assigning one — it tells you to assign or create the main rotor first. The Validator's RHCP-VAL-003 fix performs the same snap, so a flagged airframe can be corrected with one click there too.
Step 4 — Rotors
Not skippable. Here you tell the wizard which transforms are the rotors so it can attach RHCP_Rotor modules with the correct roles. You assign:
- Main rotor node (required) — the only source of lift. The wizard adds an
RHCP_Rotorto it, sets itsrotorRoletoMain, and writes the Main rotor radius (m) you supply (default5, clamped to a minimum of0.5). The radius drives disc area and therefore thrust. - Tail rotor node (optional) — if assigned, the wizard adds an
RHCP_RotorwithrotorRoleset toTail. The tail rotor provides anti-torque (yaw control to counter the main rotor's reaction torque). Leaving it empty is legal for arcade-leaning or coaxial/no-tail airframes.
Inline validation reports an Error if no main rotor node is assigned, because without it there is no thrust at all. The wizard derives each rotor's spin axis from its role-aware control frame at runtime; if a blade mesh visually spins around the wrong axis, the Validator's VAL-012 rule and the Pivot Fix Utility correct it after setup.
Step 5 — Flight preset
Not skippable, but it auto-resolves a default so you can simply click through. You pick a Flight config (an RHCP_FlightConfig ScriptableObject) and set the Arcade ↔ Realistic slider (profileBlend, default 0.25).
RHCP_FlightConfig is the data asset that holds the full tunable surface — thrust-to-weight, control rates, drag, anti-torque, ground effect, translational lift, engine behavior, and the assist profile. profileBlend is the arcade-to-realistic axis: lower values are more forgiving (more auto-leveling, scaled-down cyclic), higher values are closer to a realistic, hands-on model. If you leave the Flight config slot empty, the wizard auto-assigns the bundled default config and writes it onto the hub's flightConfig field.
Two important behaviors to know:
- Inline validation shows a Warning if no config is assigned and no bundled default exists — create one (via Assets ▸ Create ▸ BoneCracker Games ▸ RHCP ▸ Flight Config) before flying.
- The slider value is intentionally not written into the config asset by this step. The bundled presets are shared assets, and writing the slider would stomp the value for every helicopter that references them. The slider is captured in wizard state; per-project preset cloning (writing the slider onto a private clone) is planned but not yet active, so for now set the feel on a config asset you own. See 05_FlightTuning.md for how to tune
profileBlendand the rest of the config.
Step 6 — Audio
Skippable, and safe to skip — the audio module is silent with no clips assigned. Toggle Add audio module (default on) to attach an RHCP_Audio component to the hub, then optionally assign an Engine loop and a Rotor loop AudioClip. The module layers and modulates these by engine RPM and load at runtime. Any unassigned clip is null-guarded, so a partly-filled or empty module never errors.
Step 7 — VFX
Skippable. Toggle Add VFX module (default on) to attach an RHCP_VFX component to the hub. This module owns the particle channels (exhaust, rotor downwash dust, crash effects), which are wired to bundled particle prefabs and driven by hub state. Like audio, it is safe to skip and safe to leave partly configured; the channels are gated independently rather than all-or-nothing.
Step 8 — Camera rig
Skippable — skip it if you already have your own camera stack. Toggle Create camera rig (default on), optionally Add cockpit camera, and optionally assign a Cockpit pivot transform (the mount point the cockpit camera sits at).
When applied, this step first checks whether an RHCP_CameraManager already targets this hub; if one does, it does nothing rather than create a duplicate rig. Otherwise it creates a new RHCP_CameraRig GameObject and adds:
- a
Camera, - an
AudioListener(only if the scene doesn't already have one), - an
RHCP_CameraManager(bound to the hub and the camera), - an
RHCP_ChaseCamera(the follow camera), - an
RHCP_CockpitCamera(only if you enabled the cockpit toggle), and - an
RHCP_OrbitCameraMode(the launch orbit mode).
It wires all of these into the manager's serialized references and assigns the bundled default camera config so the collision, orbit, shake, feel, and blend layers (including orbit zoom) are authorable out of the box. At runtime the camera-switch cycle is Chase → Cockpit → Orbit (it wraps and skips any mode that isn't wired). If you supplied a Cockpit pivot, it is written to the hub's cockpitCameraPivot field. See 06_Cameras.md for the full camera system.
Step 9 — Input
Not skippable, but it has an override. This step ensures input is set up and checks that your project's input settings are compatible. RHCP uses the New Input System exclusively; the legacy Input Manager is not supported. The step displays the Project Doctor's worst input status: if the Doctor reports a blocking input issue, you'll see a warning pointing you at Tools ▸ RHCP ▸ Project Doctor.
There is an I know what I'm doing (override) toggle. With the override off, a blocking project-input problem is reported as an Error that prevents advancing — fix it in the Project Doctor (or enable the override) first. When applied, the step ensures an RHCP_InputManager exists on the helicopter (adding one if absent) and, if its actions asset is unassigned, assigns the bundled RHCP_InputActions asset. See 04_Controls_and_Input.md for the binding map and 08_EditorTools.md for the Project Doctor.
Step 10 — Finish
The final step (technically skippable in the pager, but it is where you land). It runs the full Validator against the helicopter you just configured and shows the result inline: either a green "no errors" line with the warning/info counts, or a red summary telling you how many errors and warnings remain. When you click Finish ✓, the wizard selects the hub and frames it in the Scene view, then shows a "Helicopter configured ✓" notification. If errors remain, open the Validator to resolve them with one-click fixes.
Automatic Collider Generation
When step 2 has Generate fuselage collider enabled, the wizard calls RHCP_ColliderGenerator.GenerateFuselageBox. A solid collider on the helicopter is not optional plumbing — crash detection, ground-effect sensing, and the rotor-downwash dust raycast all need it. The generator's job is to produce a sensible fuselage box without ever enclosing the spinning rotor blades, because a collider on a fast-rotating mesh destabilizes the PhysX solver (this is exactly the failure the Validator's VAL-008 rule guards against).
The generator is conservative and idempotent:
- It first scans every collider under the hub. If any non-trigger collider already exists, it does nothing and returns — it will not pile a second body collider on top of one you already authored.
- It then computes the combined renderer bounds of the model excluding rotor geometry and excluding particle-system renderers, converts those world-space bounds into the hub's local space, and adds a single
BoxCollidersized and centered to fit.
Rotor geometry is identified three ways, so it works whether or not you've assigned rotors yet: a transform is treated as rotor geometry if it (or any ancestor) has an RHCP_Rotor component, if it is one of the rotor nodes passed in from step 4, or if its name (or an ancestor's name) contains one of the keywords rotor, propeller, blade, or prop (case-insensitive). If no usable non-rotor renderer bounds are found, the generator does nothing rather than create a degenerate box. The whole operation is registered with Undo.
The Pivot Fix Utility
At runtime each RHCP_Rotor spins its blade mesh around a serialized spinAxis vector, in the mesh's local space. The disc plane itself — the plane the rotor produces thrust through — is fixed by the rotor's role-aware control frame (the main rotor's disc normal follows the rotor transform's up axis; the tail rotor's follows its right axis). If the imported blade mesh was authored with an axis that doesn't line up, the blades will appear to spin in the wrong plane even though the flight model is correct. The Validator flags this as VAL-012 ("rotor visual spin axis off-plane").
RHCP_PivotFixUtility is the one-click fix for VAL-012, exposed as the Validator's one-click fix for that rule (and SafeForFixAll, so it also runs in Fix All (safe)). It does not insert or rotate any GameObject in the rotor hierarchy — doing so would be prefab-fragile and would disturb the disc plane the flight model depends on. Instead it re-derives the correct spinAxis:
- It takes the expected disc normal (in world space) from the rotor's role-aware geometry.
- It expresses that normal in the spinning mesh's local space.
- It snaps the result to a clean cardinal axis (right/left/up/down/forward/back) when the local axis is within about 3 degrees of one — this keeps the serialized value tidy. If snapping to a cardinal would no longer sweep the disc plane (which can happen under non-uniform scale, where
TransformDirectionandInverseTransformDirectionaren't exact inverses), it keeps the exact computed vector instead. - It writes the result to the
spinAxisfield throughSerializedObject.
Because the entire correction is a single serialized-field edit with no geometry changes, it is fully Undo-able and qualifies for the Validator's Fix All (safe) batch. The fix is idempotent: if the axis is already aligned it reports no change and does nothing.
Headless ApplyAll (scripted full setup)
Every wizard step is a pure operation over an RHCP_WizardState, so you can run the entire setup from code without opening the window. The static method RHCP_SetupWizard.ApplyAll(RHCP_WizardState) executes each step's Apply in the same table order as the windowed flow, each wrapped in its own collapsed undo group — producing the same configured helicopter as clicking through the UI. This is the path the asset's EditMode tests drive, and it's the right approach if you generate or batch-configure helicopters in your own editor tooling.
Populate the state object's fields (the same ones the UI binds to) and call ApplyAll. The state mirrors the step fields exactly, including their defaults:
using BoneCrackerGames.RHCP.Editor;
using UnityEngine;

// Build the state the wizard would otherwise collect through its UI.
var state = new RHCP_WizardState
{
    modelRoot       = mySceneModel,            // step 1 — required
    airframeClass   = RHCP_AirframeClass.Medium, // step 2 — Light/Medium/Heavy
    generateCollider = true,                   // step 2
    // comOffsetSet stays false -> step 3 computes the lowered default COM
    mainRotorNode   = mainRotorTransform,      // step 4 — required
    mainRotorRadius = 5f,                       // step 4
    tailRotorNode   = tailRotorTransform,      // step 4 — optional
    // flightConfig left null -> step 5 assigns the bundled default
    profileBlend    = 0.25f,                    // step 5 (slider only; not written to a shared asset)
    addAudio        = true,                     // step 6
    addVfx          = true,                     // step 7
    addCameraRig    = true,                     // step 8
    addCockpitCamera = false                    // step 8
};

RHCP_SetupWizard.ApplyAll(state);
// state.hub now holds the configured RHCP_Helicopter.
The state object is [Serializable] and exposes a ResolveHub() helper that returns the working hub (the cached one, or any RHCP_Helicopter on modelRoot). Because ApplyAll reuses the step objects' EnsureComponent logic, calling it twice on the same model is safe — it reconfigures in place rather than duplicating components. For deeper scripting against the configured helicopter, consult the XML documentation comments on the runtime types rather than driving the wizard internals directly.
After the Wizard
Once the wizard finishes, do two things before you consider the helicopter done.
First, validate. The Finish step already ran the Validator and reported a count, but open Tools ▸ BoneCracker Games ▸ RHCP ▸ Validator… to see the full result list, ping each flagged object, and apply one-click fixes. The wizard is designed so that a clean run produces a validator-clean helicopter, so any errors here usually point to something the wizard couldn't decide for you (a missing flight config, an unwired camera target, a rotor axis needing the pivot fix). The Validator and the Project Doctor are covered in detail in 08_EditorTools.md.
Second, fly it. Enter Play Mode and confirm the helicopter spools up and hovers. The hub's inspector exposes a live telemetry foldout in Play Mode (engine state, RPM, and so on) so you can watch the model respond. From there, move on to 05_FlightTuning.md to dial in the feel — the center of mass (step 3), profileBlend (step 5), and the rest of the RHCP_FlightConfig surface are where flight character actually lives. The wizard's job is to get you a correct, complete starting point; tuning is the next phase.
Troubleshooting
| Symptom | Likely cause | Resolution |
|---|---|---|
| Next is greyed out | The current step has a blocking (Error) validation issue. | Read the red HelpBox above the step body and fix what it asks for. On step 1 this is usually a missing model or no renderer; on step 4 a missing main rotor; on step 9 a project-input problem. |
| The wizard opened on a middle step | You selected an object that already has an RHCP_Helicopter, so the wizard jumped to the first incomplete step. |
This is intended re-entry behavior. Use ◀ Back to review earlier steps. |
| No collider was generated in step 2 | A non-trigger collider already exists under the root, or no non-rotor renderer bounds were found. | The generator respects an existing body collider by design. If you want it to regenerate, remove your existing collider first; if your geometry is all rotor-named, rename the fuselage meshes so they don't match rotor/propeller/blade/prop. |
| The blades spin in the wrong plane | The blade mesh's authored axis disagrees with the rotor's disc plane (VAL-012). | Open the Validator and apply VAL-012's one-click fix (or Fix All (safe)) — it rewrites spinAxis only, no geometry moves. See The Pivot Fix Utility. |
| Step 9 reports a blocking input error | The project's Active Input Handling isn't set to the New Input System, or the Input System package is missing. | Open Tools ▸ RHCP ▸ Project Doctor and apply its one-click fixes (changing the input handler requires an editor restart). Use the override only if you understand the consequence. See 10_Troubleshooting.md. |
| Step 5 warns "no flight config" | No config was assigned and no bundled default was found in the project. | Create one via Assets ▸ Create ▸ BoneCracker Games ▸ RHCP ▸ Flight Config, then assign it in the step. |
| The slider value didn't "stick" to my preset | By design, step 5 does not write profileBlend into a shared config asset. |
Set the feel directly on a config asset you own, or via the RHCP_FlightConfig inspector. See 05_FlightTuning.md. |
| A second camera rig appeared | Unlikely — the camera step skips creation if a manager already targets the hub. | If you see duplicates, check whether another rig targets a different hub; the duplicate guard is per-hub. |
If a problem isn't covered here, see 10_Troubleshooting.md and the FAQ.