Quick Start
This guide gets you from a freshly imported package to a helicopter in the air as fast as possible. It has two paths: a two-minute path that opens the bundled demo so you can fly immediately with the default controls, and a ten-minute path that turns one of your own models into a flying, validated helicopter using the Setup Wizard. Read the two-minute path first to get a feel for the asset, then come back for the ten-minute path when you want your own airframe in the cockpit.
Prerequisites
Before you start, confirm your project meets the asset's baseline. Realistic Helicopter Controller Pro (RHCP) targets Unity 6000.3.6f1 or newer and works on both the Built-in Render Pipeline and Universal Render Pipeline (URP); the High Definition Render Pipeline (HDRP) is not supported. The asset uses the New Input System exclusively, so the legacy Input Manager will not drive the helicopter at all.
If you have not yet imported the package, see Installation for the package import, the New Input System switch (Unity prompts for a restart when you enable it), and the Project Doctor one-click environment check. Everything below assumes the asset is imported, the project has compiled cleanly, and you are running in Input System only mode. If the helicopter does not respond to any input later on, the active input handler is the first thing to verify.
The Two-Minute Path: Open the Demo and Fly
The fastest way to see RHCP working is the bundled demo scene, which is pre-wired with a hero helicopter, a camera rig, the HUD, and all input. There is nothing to configure — you only need to open the scene and press Play.
Open and play the demo scene
- In the Project window, open
Assets/Realistic Helicopter Controller Pro/Scenes/RHCP_Demo.unity. - Press Play in the Unity toolbar.
- The helicopter spawns on the landing pad with the engine running. Pull up on the collective and it lifts off.
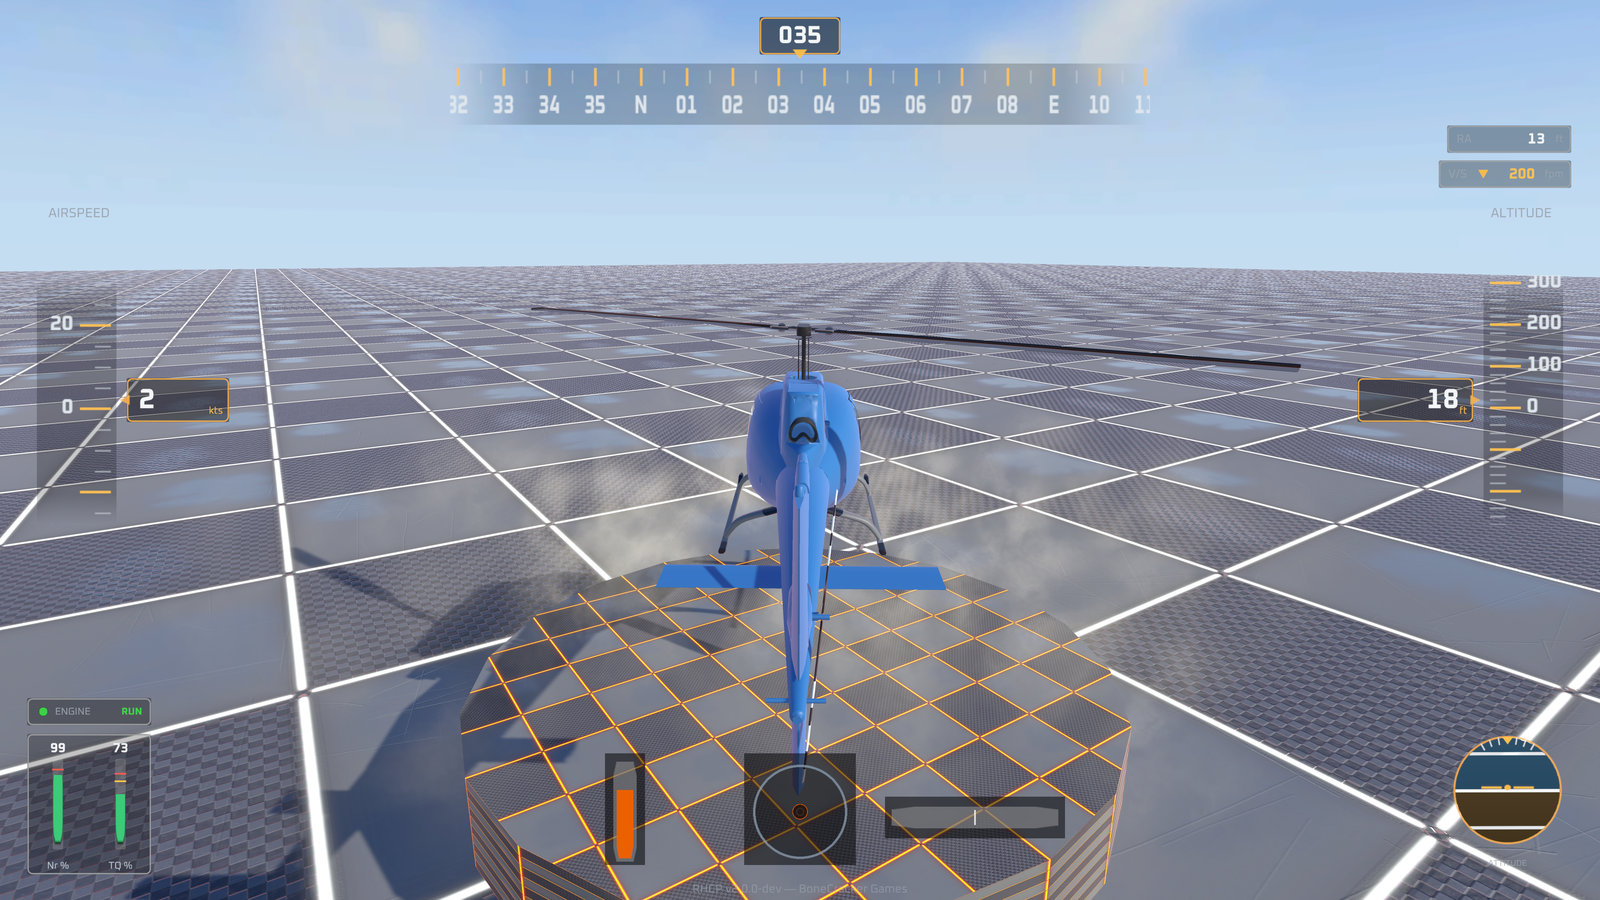
A few things to know before your first lift-off. Collective is your vertical control: it sets how much lift the main rotor produces, so more collective climbs and less collective descends — it is your primary altitude lever. Cyclic tilts the rotor disc to move you horizontally: nose-down pitches you forward, and banking left or right rolls you in that direction. The pedals rotate the helicopter on the spot (yaw) by countering the rotor's natural twisting force, which is why they are also called anti-torque controls. Start with small, gentle inputs — a real rotorcraft reacts quickly, and the default flight feel leans toward realism.

While you fly, the demo also responds to the convenience keys covered below: press R to respawn at the start, H to toggle the HUD, C to switch camera views, E to start or stop the engine, and Esc to open the in-demo settings panel.
The in-demo Settings panel
Press Esc (or Start on a gamepad) to open the demo's Settings panel. This is a convenience panel, not a shipped options framework — it demonstrates the runtime API by writing live component state and PlayerPrefs, and it deliberately never edits the underlying configuration assets. From it you can invert cyclic pitch, change cyclic sensitivity, switch between the cockpit and chase camera, set the quality level, scale the on-screen mobile controls, and toggle the HUD readout between Metric and Aviation units.
Opening the panel freezes the helicopter and frees the mouse cursor so you can click the controls; the helicopter holds position with neutral inputs until you close the panel again. Your choices for invert, sensitivity, quality, and units are saved and re-applied the next time you enter Play mode. For the full breakdown of each row, see HUD and Mobile.
Default Controls Cheat-Sheet
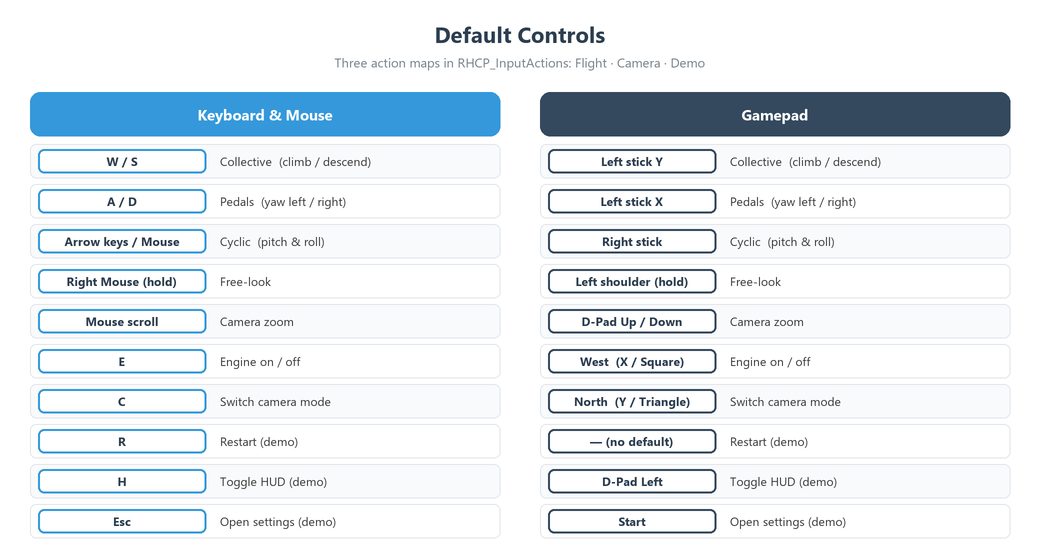
The bindings below are the defaults shipped in RHCP_InputActions.inputactions. Both keyboard-and-mouse and gamepad are bound out of the box; you do not need to choose a control scheme. The flight controls live in the Flight action map, the view controls in the Camera map, and the demo convenience keys in the Demo map.
This is a helicopter, not a car.
W/Sraise and lower it (collective), andA/Dspin it on the spot (pedals / yaw) — they do not drive it forward. To move forward you tilt the rotor with the arrow keys or the mouse (cyclic). If your reflex is "W= go forward," that is the one habit to unlearn. (In the demo you can re-open this cheat-sheet any time with the on-screen ? button.)
| Control | Aviation term | Keyboard / Mouse | Gamepad |
|---|---|---|---|
| Climb / descend | Collective (lift) | W / S |
Left stick Y |
| Move forward/back, bank left/right | Cyclic (pitch & roll) | Arrow keys, or move the mouse (cursor is captured during flight) | Right stick |
| Turn left / right on the spot | Pedals (yaw / anti-torque) | A / D |
Left stick X |
| Start / stop engine | — | E |
West button (X / □) |
| Switch camera view | — | C |
North button (Y / △) |
| Free-look around | — | Hold right mouse button | Left shoulder (hold) |
| Zoom camera | — | Mouse scroll wheel | D-Pad Up / Down |
| Restart / respawn | — | R |
— (keyboard only) |
| Toggle HUD | — | H |
D-Pad Left |
| Open settings (demo) | — | Esc |
Start |
A few notes on how the bindings behave:
- Mouse cyclic is the primary fine control for pitch and roll. Mouse motion is read as a delta, so the rotor follows where you push the mouse rather than snapping to an absolute position. While flight input is live, the cursor is captured so the mouse drives the cyclic instead of wandering off-screen; it is released automatically when the settings panel opens, when the window loses focus, or when you press Esc in the editor.
- Collective on keyboard uses
W/Sas a one-dimensional axis, so holding a key ramps the input rather than snapping it. On gamepad, the same axis lives on the left stick's vertical axis. - Camera look requires holding the right mouse button (or the left shoulder on gamepad) as a modifier, which keeps mouse-look from fighting the mouse cyclic.
The demo convenience keys (R, H, Esc/Start, D-Pad Left) are part of the Demo action map and are driven by the demo scripts, not the core flight system. In your own scenes you wire up only the Flight and Camera maps; you do not need the Demo map unless you want those same convenience behaviors. See Controls and Input for the complete reference, including how to rebind actions and read input from your own code.
The Ten-Minute Path: Set Up Your Own Helicopter
When you want your own model flying instead of the demo hero, use the Setup Wizard. It takes a bare model and produces a flying, validator-clean helicopter with no manual component wiring — the same end result you would get by hand, in a fraction of the time and with the common mistakes already prevented.
Launch the wizard
Select your helicopter model in the scene or Hierarchy, then open the wizard from the menu (under Tools > BoneCracker Games > RHCP, or from the right-click GameObject menu — see Setup Wizard for the exact menu path). If you had a model selected, the wizard pre-fills the first step with it; if you re-open the wizard on a helicopter that already has the RHCP hub component, it jumps straight to the first step that still needs attention.
Work through the steps
The wizard is a ten-step pager. Each step shows inline help boxes — informational, warning, or error — and the Next button stays disabled until any blocking issue on the current step is resolved, so you cannot proceed with a misconfigured airframe. The steps run in this order:
| # | Step | What it does |
|---|---|---|
| 1 | Model | Identifies the model root that becomes the helicopter and attaches the RHCP_Helicopter hub. |
| 2 | Physics | Configures the Rigidbody (mass and related physics settings). |
| 3 | COM | Sets the center of mass so the airframe hovers stably instead of tumbling. |
| 4 | Rotors | Adds the main and tail RHCP_Rotor modules and aligns their spin axes. |
| 5 | Preset | Applies a flight-configuration preset as the starting point for tuning. |
| 6 | Audio | Adds the RHCP_Audio module for engine and rotor sound layers. |
| 7 | VFX | Adds the RHCP_VFX module for downwash, exhaust, and damage effects. |
| 8 | Camera | Builds the camera rig with a default orbit/chase configuration. |
| 9 | Input | Wires the New Input System input layer to the helicopter. |
| 10 | Finish | Finalizes the setup, selects the hub, and frames it in the Scene view. |
Each step's changes are applied in their own collapsed Undo group, so you can step Back or use Unity's Undo at any point without leaving half-applied state. You can Skip optional steps; required steps cannot be skipped. When you click Finish on the last step, the wizard selects the finished hub and frames it in the Scene view, and you are ready to drop the helicopter into a scene and press Play.
For the full walkthrough of every step, including how the collider is generated around the rotor and what each preset means, see Setup Wizard. Once the helicopter exists, Flight Tuning covers how to dial in its feel.
Quick Tips
These tips smooth out your first sessions with the asset:
- Fly with small inputs. The default flight feel is realistic, so brief taps and gentle stick pressure go a long way. If you want a more forgiving response, lower the profileBlend value (the arcade-to-realistic slider) in the flight configuration — see Flight Tuning.
- Use the mouse for cyclic, not the keyboard, once you are comfortable. Holding the cyclic on the mouse gives you far finer control of pitch and roll than the arrow keys, which is closer to how the asset is meant to be flown.
- Mind ground effect on take-off. Helicopters get extra lift when hovering close to the ground (ground effect, a cushion of air under the rotor). Expect the climb to feel stronger right off the pad and to need a touch more collective once you climb out of it.
- Let speed help you. As you build forward airspeed the rotor becomes more efficient (translational lift, or ETL). A hover that needs a lot of collective will feel lighter once you are moving forward.
- Run the Validator and Project Doctor early. After the wizard finishes, the Validator flags any remaining configuration problems with one-click fixes, and the Project Doctor confirms your project settings (input handler, render pipeline, color space, TMP) are correct. See Editor Tools.
- Drop in the camera and UI with one click. The GameObject ▸ BoneCracker Games ▸ RHCP menu has ready-made create helpers for a Camera Rig (auto-bound to the helicopter you have selected), a HUD, Mobile Controls, a Settings Panel, and a Controls Panel — no manual prefab dragging. See the menu reference in Editor Tools.
Common First-Time Issues
If something does not behave on your first run, check these before digging deeper:
- The helicopter does not respond to any input. This is almost always the active input handler. RHCP requires the New Input System — "Input System only" is the target, and "Both" also works. Only legacy "Input Manager (Old)" breaks it, and the asset flags that with a clear "requires the New Input System" error telling you exactly what to change. Set the handler in Project Settings > Player and restart the editor — see Installation and Troubleshooting.
- The cursor disappears or the camera spins on its own. That is the intended cursor capture while flight input is live: mouse motion is driving the cyclic. Open the settings panel with Esc, click out of the Game view, or stop Play mode to release the cursor.
- No text appears on the HUD. The HUD uses TextMesh Pro. If TMP Essential Resources are missing the gauges render without labels; the Project Doctor's TMP check (and its fix) handles this. See HUD and Mobile.
- Your own helicopter tumbles or will not hover. This is usually mass, collider, or center-of-mass configuration. Re-run the Setup Wizard (its Physics and COM steps), or use the Validator to catch the specific problem. See Setup Wizard.
R/H/Escdo nothing in your own scene. Those are Demo action-map keys driven by the demo scripts, which are present only in the demo scene. They are not part of the core controller, so they will not work in a scene you build yourself unless you add the equivalent components or your own input handling.
Next Steps
You now have the demo flying and know how to build your own helicopter. From here, pick the path that matches what you want to do next:
- A) Build your own airframe — work through Setup Wizard step by step on your model, then validate it with Editor Tools.
- B) Customize controls and feel — remap inputs in Controls and Input, then dial in the flight model with Flight Tuning, including the arcade-to-realistic
profileBlend. - C) Set up cameras, HUD, and mobile — configure views in Cameras and wire up the on-screen readouts and touch controls in HUD and Mobile.
If you get stuck, Troubleshooting and the FAQ cover the most common questions. For scripting against the asset, the runtime types carry XML documentation comments on every public member, so your IDE's IntelliSense shows the signatures and summaries as you write against them.