Add Your Own Vehicle
Turn a car model into a drivable, purchasable player vehicle. Three stages: make it an RCCP car, attach the CCDS components, then register it in the roster.
Stage 1 — Make it an RCCP vehicle
CCDS does not implement vehicle physics; RCCP does. Every player and AI car is an RCCP_CarController.
- Drag your model into the scene.
- Select it.
- Open Tools → BoneCracker Games → Realistic Car Controller Pro → Vehicle Setup → Setup Wizard.
- Work through the wizard — wheels, engine, drivetrain, colliders, lights.
Two helpers on the same menu are worth knowing:
| Menu item | Does |
|---|---|
| Vehicle Setup → Body Colliders | Generates body collision meshes |
| Vehicle Setup → Light Setup | Configures headlights, brake lights and indicators |
Confirm it drives before continuing. A vehicle that misbehaves here will misbehave in CCDS, and the CCDS layer is not where you will find the cause.
Stage 2 — Add CCDS components
When the RCCP wizard finishes creating a vehicle, CCDS intercepts and asks what kind of car it is:
Is this a player car or an AI car? Player car / AI car... / Skip CCDS
Choosing AI car... opens a second prompt: Mission AI or Cop AI.
What each choice adds
| Choice | Components added |
|---|---|
| Player car | PhotonView, CCDS_Player, RCCP_PhotonSync, CCDS_AutoHandbrake |
| Mission AI | PhotonView, RCCP_PhotonSync, NavMeshModifier, RCCP_AI |
| Cop AI | The Mission AI set plus CCDS_AI_Cop and CCDS_AI_CopPhotonSync |
| Skip CCDS | Nothing — the vehicle stays a plain RCCP car |
For a player car, the prompt also wires the Photon observed components and configures RCCP_Customizer with autoInitialize = true, autoSave = false and autoLoadLoadout = false.
Every component is added through Undo.AddComponent, so a single Ctrl+Z reverts the whole operation.
If the prompt does not appear
Use the menu directly. Select the vehicle, then Tools → BoneCracker Games → CCDS → Vehicle Setup →:
| Menu item |
|---|
| Prompt For Selected Vehicle |
| Add Player Components To Selected |
| Add Mission AI Components To Selected |
| Add Cop AI Components To Selected |
These require a selected GameObject carrying an RCCP_CarController. Without one you get "Select a GameObject that has an RCCP_CarController."
Stage 3 — Register it in the roster
Save the vehicle as a prefab, ideally in Assets/CCDS/Resources/Player Vehicles/, then:
- Open Tools → BoneCracker Games → CCDS → Player Vehicles.
- Click Add New Vehicle.
- Assign your prefab to the Vehicle field.
- Set the price and the three performance stats.
- Click Sync All Vehicles.
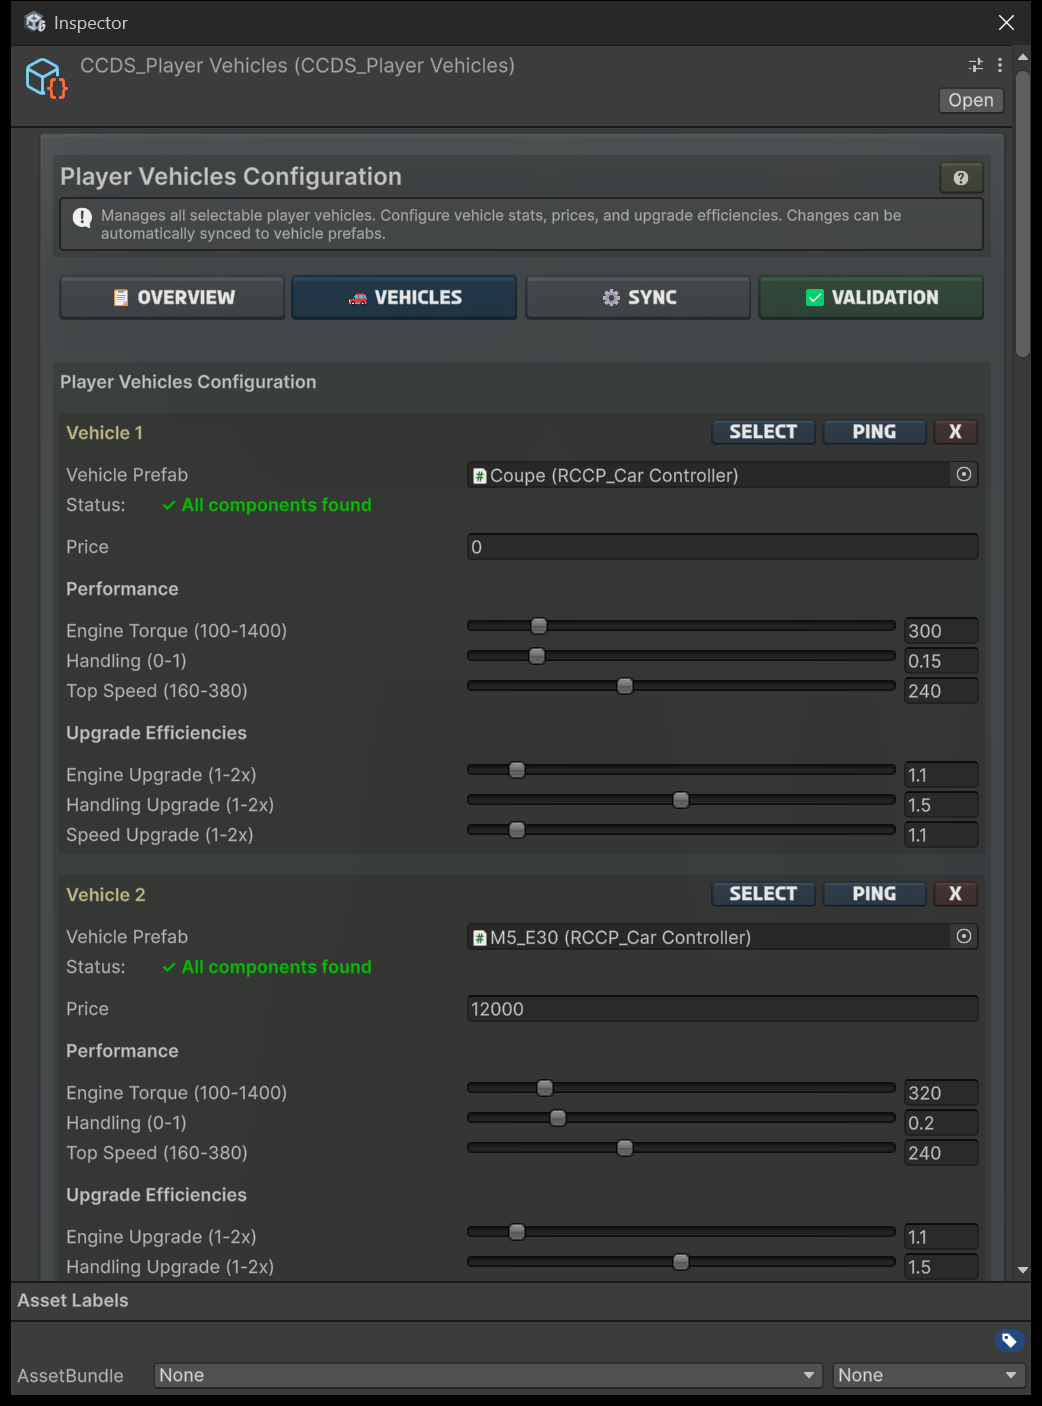
The inspector has four tabs — Overview, Vehicles, Sync, Validation. Entries live on Vehicles; the sync button is on Sync. Each entry shows a Status line that reads "All components found" once every component the roster writes to is present on the prefab — check it before assuming a vehicle is set up.
The array index is the vehicle ID. It is what gets written to the save file as the selected and owned vehicle. Reordering or removing entries reassigns cars for every existing player — append rather than insert.
The fields
| Field | Type | Range | Default | Meaning |
|---|---|---|---|---|
vehicle |
RCCP_CarController |
— | none | The prefab. Required. |
price |
int |
≥ 0 | 0 |
In-game cost. 0 means owned from the start. |
engineTorque |
float |
100–1400 | 350 |
Base engine torque in Nm |
handling |
float |
0–1 | 0.1 |
Base handling rating |
speed |
float |
160–380 | 240 |
Base top speed in km/h |
upgradedEngineEfficiency |
float |
1–2 | 1.2 |
Torque multiplier at full engine upgrade |
upgradedHandlingEfficiency |
float |
1–2 | 1.2 |
Handling multiplier at full handling upgrade |
upgradedSpeedEfficiency |
float |
1–2 | 1.2 |
Speed multiplier at full speed upgrade |
What Sync All Vehicles actually does
Sync writes into your prefabs and saves them. It is not a preview. For every entry it:
| Roster field | Written to |
|---|---|
engineTorque |
RCCP_Engine.maximumTorqueAsNM |
speed |
RCCP_Engine.maximumSpeed |
handling |
RCCP_Stability.steerHelperStrength |
upgradedEngineEfficiency |
RCCP_VehicleUpgrade_Engine.efficiency |
upgradedHandlingEfficiency |
RCCP_VehicleUpgrade_Handling.efficiency |
upgradedSpeedEfficiency |
RCCP_VehicleUpgrade_Speed.efficiency |
then calls PrefabUtility.SavePrefabAsset on the vehicle.
So the roster is the source of truth for these six values. Editing maximumTorqueAsNM directly on the prefab works until the next sync overwrites it. Change the number in the roster instead.
Components that are absent are skipped silently — a vehicle with no RCCP_VehicleUpgrade_Speed simply will not receive the speed efficiency, and no warning is raised.
Verify
- Play
CCDS_MainMenu_City. - Find the vehicle in the selection carousel.
- Confirm the stat bars match what you set.
- Buy it if it has a price, select it, start a gameplay scene, drive it.
The menu stat bars read the roster values, so a bar at the wrong length means the roster is wrong, not the prefab.
Common problems
| Symptom | Cause |
|---|---|
| Vehicle missing from the menu | Not added to CCDS_PlayerVehicles.asset, or the vehicle field is empty |
| Menu shows it but selecting spawns nothing | Prefab moved out of Resources/, or the reference broke |
| Stat bars do not move when upgrades are bought | Missing RCCP_VehicleUpgrade_* component on the prefab |
| Handling bar never changes | RCCP_Stability missing, so steerHelperStrength has nothing to write to |
| Drives in the sandbox, not in multiplayer | PhotonView and RCCP_PhotonSync missing — use Add Player Components To Selected |
| Prefab values keep reverting | Expected. Sync rewrites them from the roster. |
Next
- Customization and the Garage — make the vehicle paintable and upgradable.
- Create a Mission — give the player somewhere to drive it.
- Multiplayer — the networking side of vehicle setup.