Quick Start
This guide gets you into a working garage in about ten minutes using the shipped showroom demo. By the end you will have browsed content, previewed items on a car, put something in the cart, and completed a purchase - and you will understand what each of those steps actually did.
Prerequisites
- RCCP and RCCP Tuner are imported and the Welcome Window shows three checkmarks (Installation).
- No other setup is needed - the demo ships fully wired.
⚠ The Welcome Window auto-opens once per machine, not once per project - the "already shown" flag lives in Unity's
EditorPrefs, which every project on that Unity installation shares. If you have imported RCCP Tuner before, no window appears and nothing is wrong. Open it yourself from Tools > BoneCracker Games > RCCP Tuner > Welcome Window (Editor Tools).
Step 1: Open the Showroom Demo
Open Tools > BoneCracker Games > RCCP Tuner > Setup > Open Demo Scene.
This opens Assets/RCCP Tuner/Demo/RCCPT_Showroom.unity: a night-city showroom with a Skyline prototype vehicle, studio lighting, and everything the garage needs already placed. If the scene file is ever missing, this same menu item offers to build it for you.
⚠ Setup > Build Demo Scene is a full rebuild, not a refresh. It overwrites the shipped scene, the demo catalog assets under
Demo/Catalogs, and the demo sky and floor materials - and asset writes cannot be undone with Ctrl+Z. It asks first and lists exactly what it will replace, so read that dialog before clicking Rebuild. Every menu item is listed in Editor Tools.
Step 2: Press Play
Press Play. The garage opens by itself and the camera swings to a front three-quarter view of the car. What opens it is the RCCPT_TunerController component, on the object called RCCPT_TunerController in the Hierarchy: it is the brain of the whole garage, and the demo ships it with Open On Start ticked. You will meet it properly in Scene Setup.
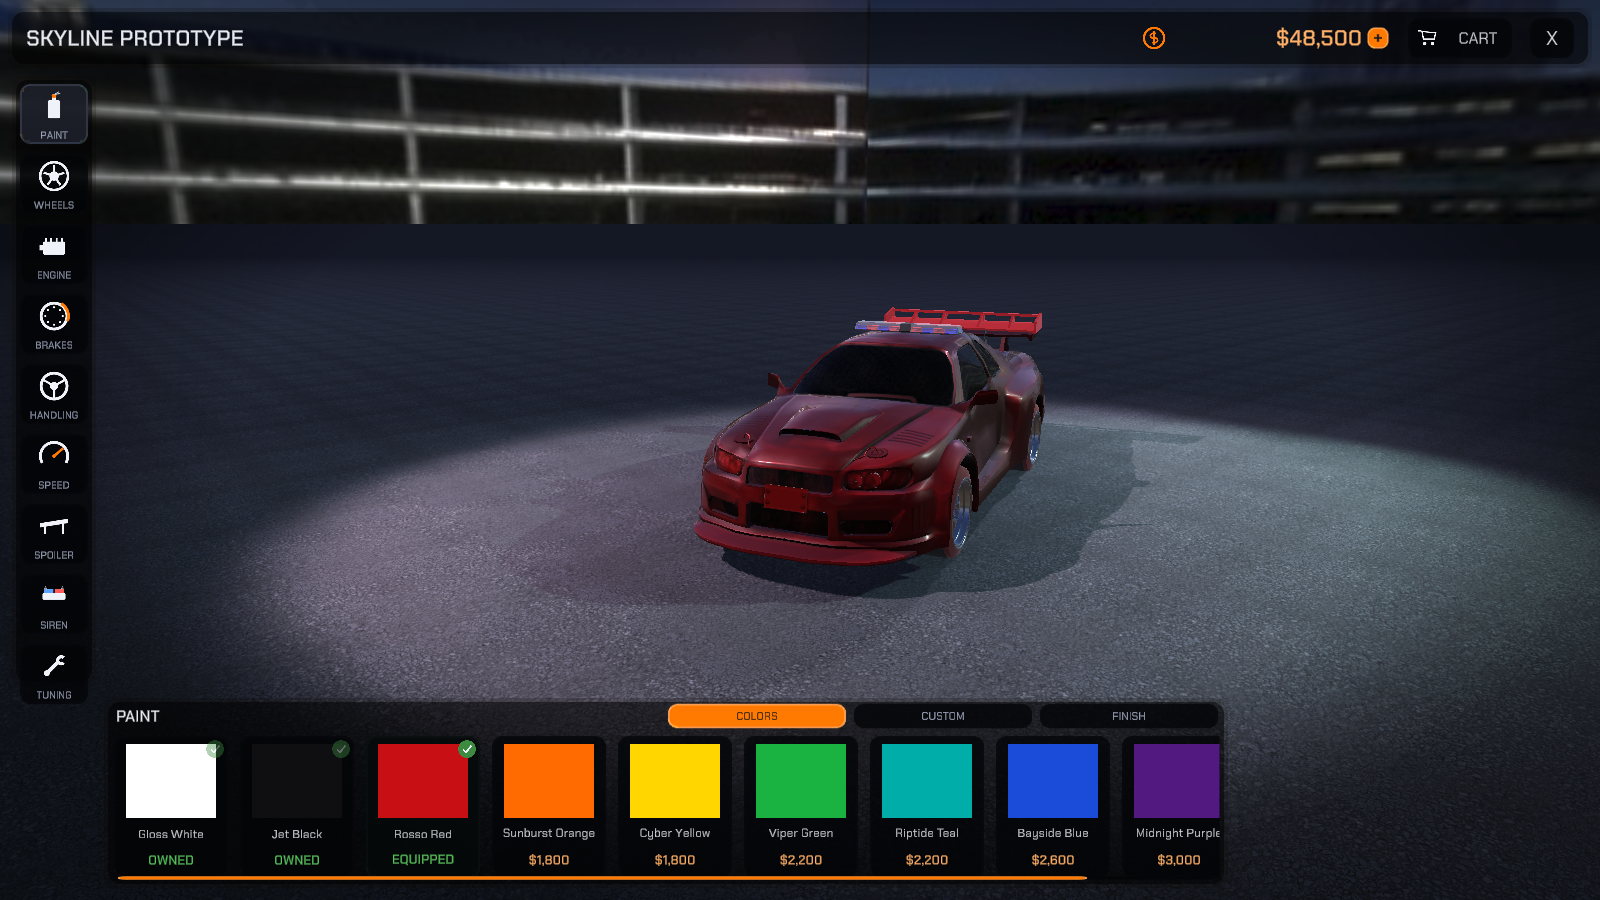
Take a second to find the main regions:
+--------------------------------------------------------------------+
| Vehicle name                              (+) $Balance  CART   X   |   <- top bar
+------+-------------------------------------------------------------+
|PAINT |                                                             |
|WHEELS|                                                             |
|ENGINE|                    the car, live in 3D                      |
|BRAKES|        (drag empty space to orbit, scroll/pinch to zoom)    |
| ...  |                                                             |
|TUNING|                                                             |
+------+-------------------------------------------------------------+
| CATEGORY   [item] [item] [item] [item] [item] [item]  ...          |   <- item strip
+--------------------------------------------------------------------+
- Left rail - customization categories. Only categories the vehicle actually supports (and that have content) appear.
- Bottom strip - the items offered in the current category.
- Top bar - the vehicle name, your wallet balance, the cart button, and the exit button (X).
- The small + next to the balance is a test-only button that grants free credits - handy while you learn. It is controlled by a setting you will turn off before shipping (Prices & Economy).
The vehicle name is never the raw GameObject name. The garage first looks for a Display Name on the car's RCCPT_VehicleId component (the showroom sets it to Skyline Prototype, so the demo reads SKYLINE PROTOTYPE). With that field left empty it tidies the object name up instead: (Clone) and a leading RCCP_ / RCC_ / BCG_ are stripped, underscores and hyphens become spaces, camel-case words are split, and the result is uppercased. Setting the field yourself is covered in Scene Setup.
Step 3: Hover and Click - the Core Loop
- Hover any paint swatch and hold the pointer there for a moment. The car temporarily tries on that color, the hovered card gets an outline, and a small PREVIEW chip appears above the item strip so a try-on can never be mistaken for a purchase. Move the pointer away - the color reverts and the chip disappears. Hovering never costs anything.
- Click a swatch marked OWNED or FREE - it equips instantly, no charge. Its badge then reads EQUIPPED.
- Click a swatch with a price - the car keeps previewing it and the item goes into the cart (watch the cart badge in the top bar). Nothing has been purchased yet.
What just happened: the car always shows what you own plus what is in your cart - a live preview of what you would drive away with. Unpurchased previews are never silently kept: leave without paying and the car reverts.
Each card tells you where you stand with it at a glance:
| The card shows | State | Clicking it |
|---|---|---|
| A price | Not owned, and you can afford it | Stages it in the cart |
| A price in red, whole card dimmed | Not owned, and you cannot afford it yet | Still stages it - see the warning below |
| An IN CART badge, card tinted toward the accent color | Staged, not paid for | Takes it back out of the cart |
| An OWNED badge, faded | Paid for, but not on the car right now | Equips it, free and instantly |
| An EQUIPPED badge, vivid, green-tinted card | Paid for and currently worn | Nothing - you are already wearing it |
⚠ A dimmed card is not a disabled card. Elsewhere in Unity a greyed-out control means "you cannot click this", but here the 55% dim only means "you cannot afford this yet". The card stays clickable on purpose so the player can stage the thing they are saving up for, and the cart then tells them exactly how short they are. Nothing is charged until checkout. The five states are shown side by side in Using the Garage.
Step 4: Explore Two More Categories
Click WHEELS in the rail - the camera dives to a wheel-level shot. Click ENGINE - the camera frames the hood and a stat panel appears above five purchasable levels:
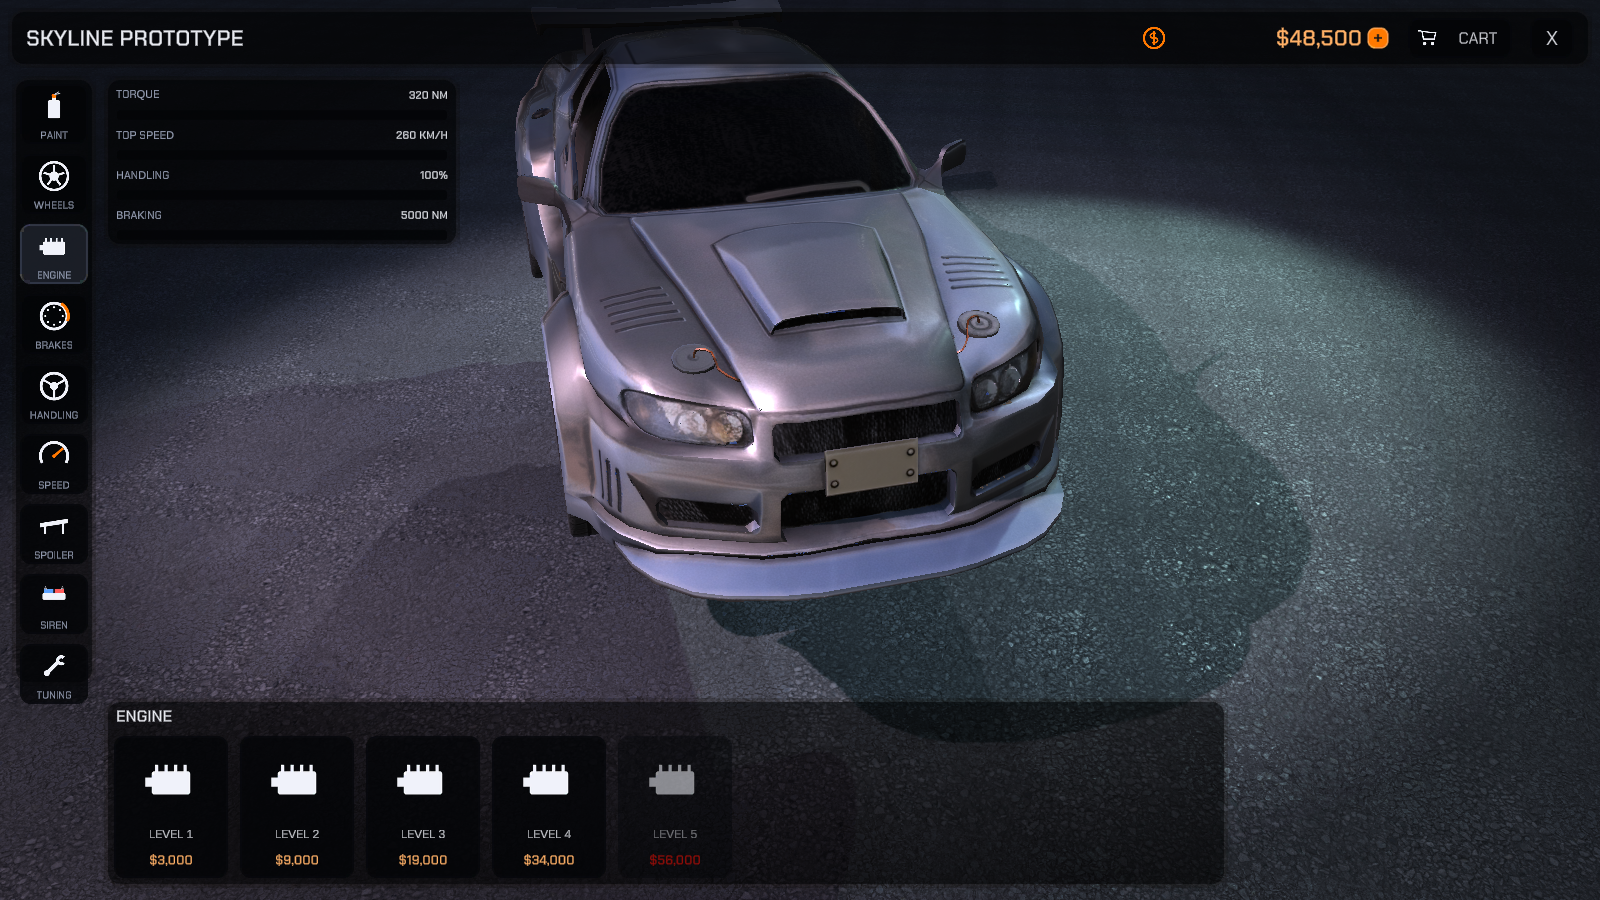
The panel reads the vehicle's real RCCP values, and every number carries its unit:
| Row | Unit on screen | What it reads |
|---|---|---|
| TORQUE | NM |
Engine torque. The row is labelled TORQUE, not "acceleration", because torque is what RCCP actually exposes and what the upgrade moves. |
| TOP SPEED | KM/H |
Maximum speed |
| HANDLING | % |
Traction assist, as a percent of this car's stock value. It rides on a 0-1 traction-helper factor inside RCCP that means nothing to a player as a raw number, so the garage prints the improvement instead |
| BRAKING | NM |
Brake torque |
Hover a level card and the readout becomes a before/after delta with the unit printed once at the end - 358 > 371 NM - green when you are hovering a level above the one the car wears, red when you are hovering a lower one. Full detail in Using the Garage.
Level prices are cumulative: the card charges every rung between the level you own and the level you clicked, so buying LEVEL 3 from scratch pays for levels 1 + 2 + 3 in one purchase. The demo's engine ladder makes it concrete:
| Level | Price of that rung | Card price if you own nothing yet |
|---|---|---|
| 1 | $3,000 | $3,000 |
| 2 | $6,000 | $9,000 |
| 3 | $10,000 | $19,000 |
| 4 | $15,000 | $34,000 |
| 5 | $22,000 | $56,000 |
Already own level 2? Then the LEVEL 4 card charges rungs 3 and 4 only, so it reads $25,000. Prices shown in red are the ones you cannot currently afford - those cards dim, and stay clickable.
Step 5: Check Out
Click CART in the top bar. The cart drawer slides in listing everything you staged, with the running TOTAL, a balance line, and a CHECKOUT button. While the cart is open, browsing is locked (the strip dims) - close the cart to keep shopping.
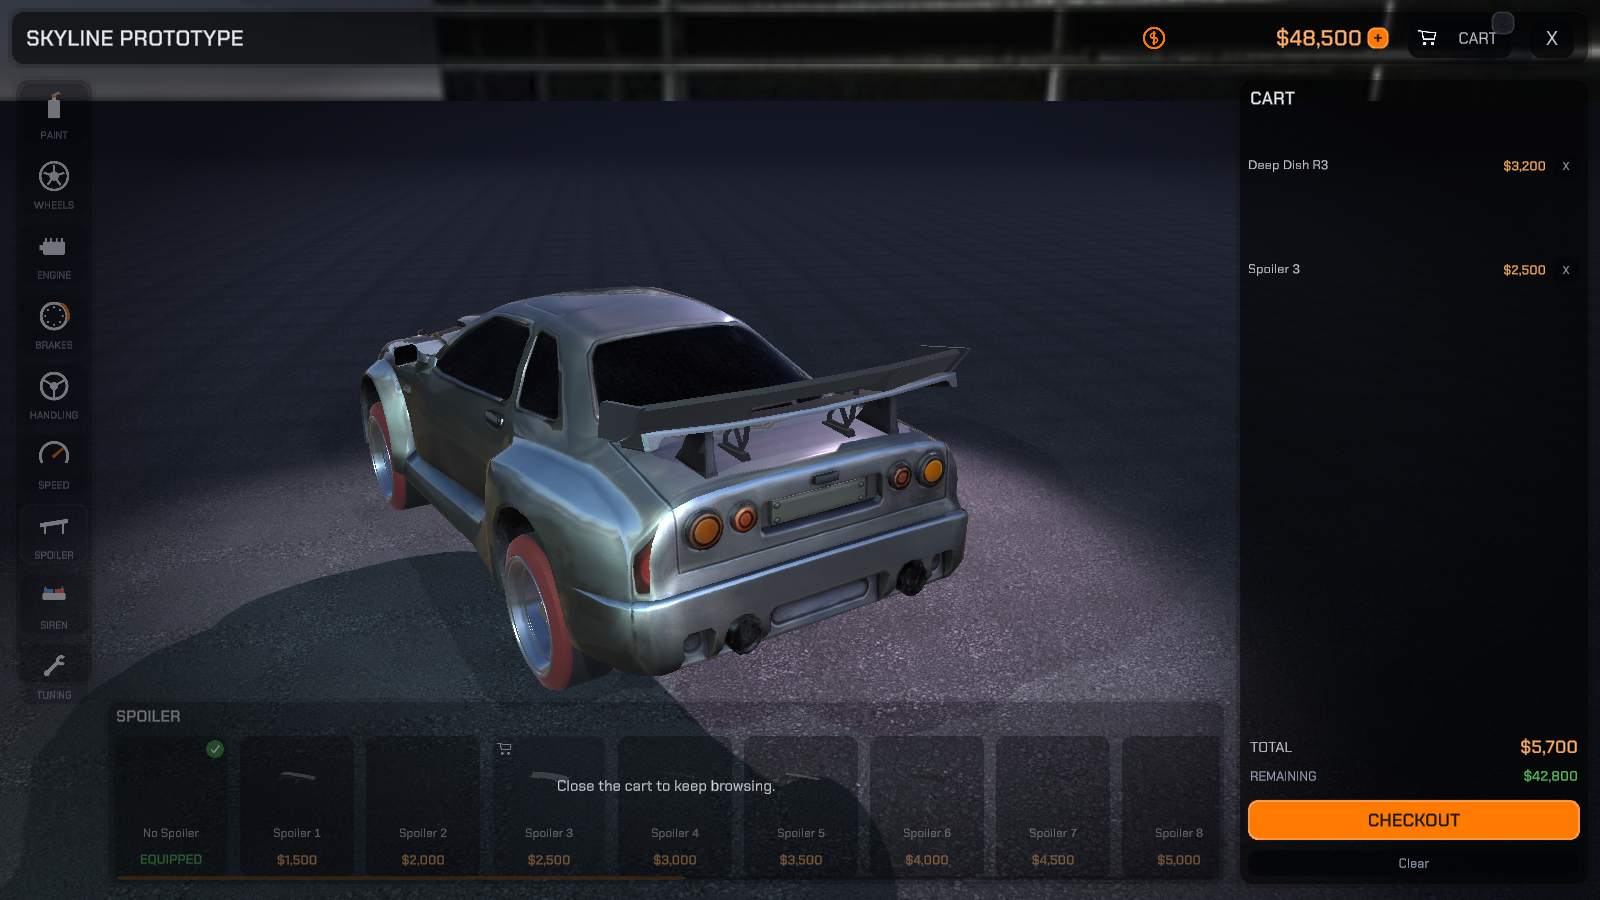
The balance line does the arithmetic for the player:
| Line | When it shows | What the number is |
|---|---|---|
| REMAINING (amount in green) | The cart fits your balance | What you will have left after checking out |
| MISSING (label and amount in red) | The cart costs more than you have | Exactly how much more you need |
The line is hidden while the cart is empty or the economy is turned off. MISSING is also the answer to "why is CHECKOUT greyed out?" - the button only enables once the whole cart is affordable.
Click CHECKOUT. Checkout is atomic: funds are validated for the whole cart, debited once, and every item is committed and saved together. If you cannot afford the total, nothing changes - no partial purchases.
What just happened: your purchases are now owned and persisted. Stop and re-enter Play Mode - the car spawns wearing everything you bought, and your balance is remembered too.
Step 6: Leave the Garage
Click X in the top bar. If your cart still holds unpurchased items, the garage asks once before discarding them and reverting the car to what you own. With an empty cart it simply closes: the car and your HUD return to their pre-garage states.
Closing also hands the scene back to RCCP. The showroom keeps RCCP's own RCCP_Camera and RCCP_Canvas objects in the Hierarchy but parked inactive while you shop, so they never fight the garage's camera and UI; exiting switches both back on and gives the camera the car you were customizing.
The car's control state is restored exactly as it was before the garage opened - the garage puts it back, it does not switch it on. If you want the car live the moment the player exits, tick the three Post-Exit Vehicle Handoff toggles on
RCCPT_TunerController: Register As Player After Exit, Start Engine After Exit and Enable Inputs After Exit. All three ship off, and the demo leaves them off. See Scene Setup.
You can re-open the garage at any time with the T key.
Quick Tips
- Orbit and zoom: drag any empty screen space to orbit the camera, scroll (or pinch with two fingers on touch) to zoom. Leave the camera alone on the Paint category and it starts a slow idle orbit.
- Free experimentation: hover previews and cart previews cost nothing. The only moment money moves is the CHECKOUT click.
- Starting over, without writing code: the demo economy seeds your wallet once. While still in Play Mode, select the RCCPT_TunerController object in the Hierarchy - its inspector becomes a live session panel with Open Garage / Close Garage, an Add $10,000 credits button (the demo economy's debug reward - your own economy's amount appears there instead), Reset To Stock (enabled only while the garage is open) and Reset Progress, which asks first and then wipes balance, ownership and unlocks before reseeding the starting balance. The panel is documented in Editor Tools; the scripted equivalent is
ResetProgress()in Scripting API.
Common First-Time Questions
Why don't I see Decal / Neon categories?
RCCP renders decals and neons only under URP or HDRP. On the Built-in pipeline those categories hide automatically instead of selling invisible content - which is why the demo's rail shows nine of the eleven categories listed in RCCPT_Settings > Category Order. A category has to clear three gates before it appears in the rail, and Troubleshooting walks through all three.
The garage didn't open when I pressed Play in my own scene
The demo opens automatically because its controller has Open On Start ticked - your own scenes will not until you set that up. Follow Scene Setup.
Next Steps
- Scene Setup - put the garage in your own scene, on your own vehicle.
- Using the Garage - the full tour: Paint Studio, tuning, stat ghosts, mobile layout.
- Creating Items - replace the demo catalogs with your own content.