Installation
Goal: import Realistic Car Controller Pro (RCCP) and get ready to drive the included car. You do not need to write code or have your own car model.
Already imported RCCP and finished setup? Go to Your First Drive.
Before you start
Use a Unity 6 project (6000.0 or newer). For your first try, use a separate practice project so you can explore the included scenes freely.
Two Unity terms used below:
- Package Manager is the window where you install Unity packages and your Asset Store purchases.
- Console is the window where Unity reports errors. Open it from Window > General > Console.
1. Install Unity's Input System
The Input System lets RCCP read the keyboard, gamepad and other controls. It is required even if you only want to try the included car.
- Open Window > Package Manager.
- Choose Unity Registry, search for Input System, and install it. If it is already installed, leave it installed.
- Open Edit > Project Settings > Player > Other Settings.
- Find Active Input Handling and select Input System Package (New) or Both.
- If Unity asks to restart the Editor, accept and wait for the project to reopen.
Check: Input System appears as installed in Package Manager, and Active Input Handling is set to one of the two options above.
2. Import RCCP
- In Package Manager, choose My Assets.
- Find Realistic Car Controller Pro and click Download, then Import.
- Leave all files selected in the import dialog and click Import.
- Wait for Unity to finish importing and compiling. Compiling means Unity is preparing the scripts to run; RCCP's initial setup can trigger another compilation.
Check: the RCCP Welcome Window opens after setup. If it does not, open it from Tools > BoneCracker Games > Realistic Car Controller Pro > Welcome Window. If there are red Console errors, use the checks below before continuing.
3. Finish the welcome checks
If a Welcome to RCCP! setup panel appears, check its Input System message, then click Continue to Welcome Window. Importing the optional demo assets can wait until after your first drive.
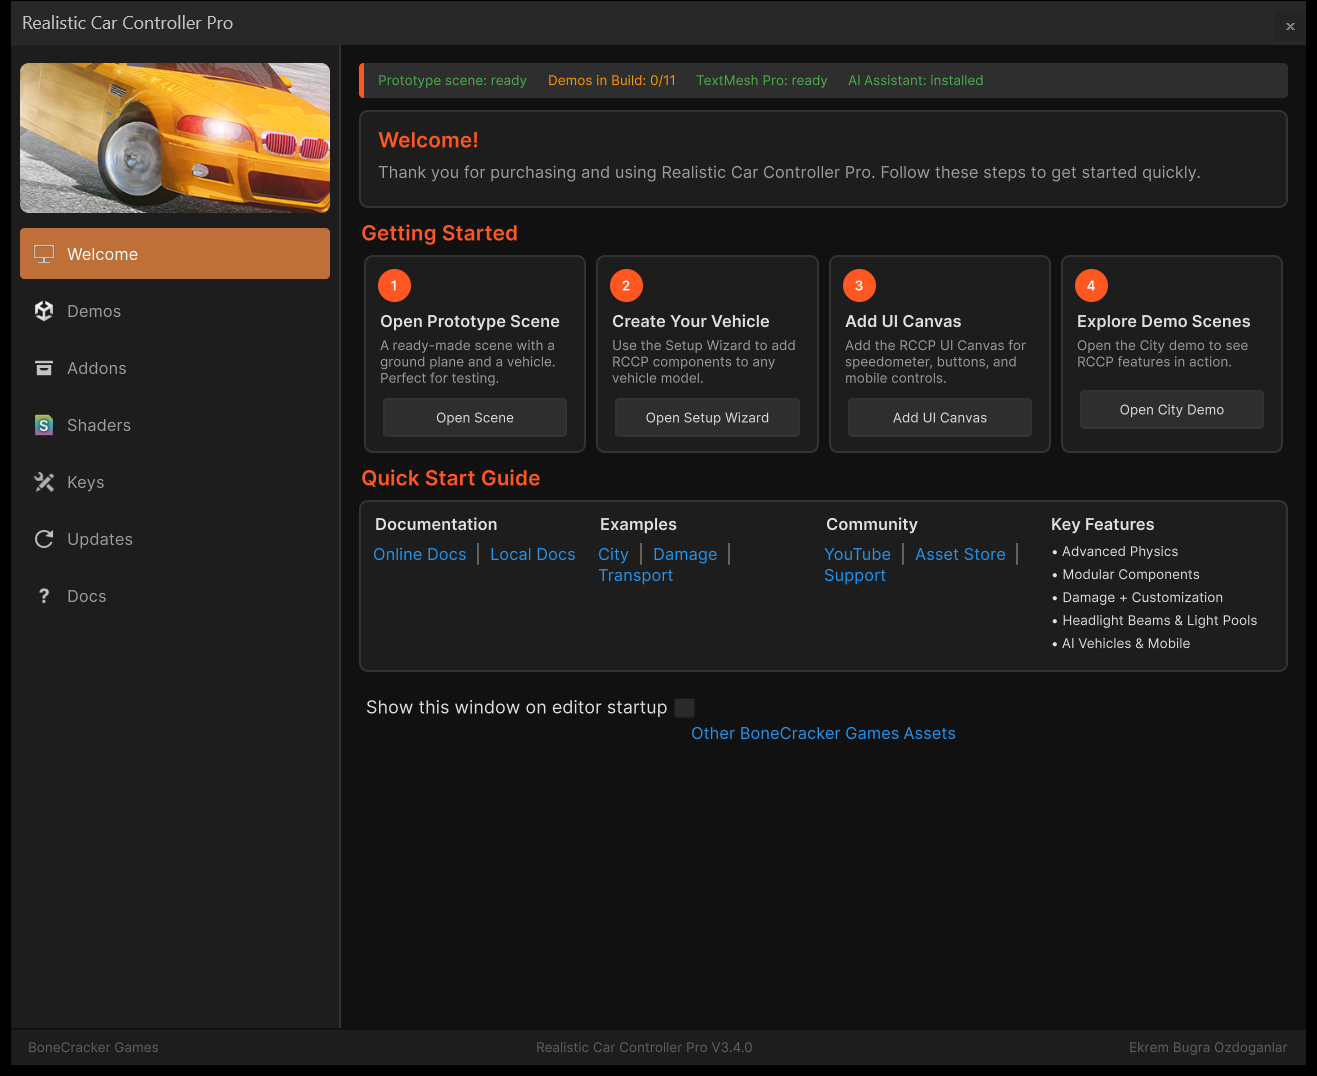
On the Welcome tab:
- If Import TMP Essential Resources appears, click it and complete Unity's import dialog. TextMesh Pro (TMP) draws the dashboard numbers and button labels; these resources provide its fonts and settings.
- Open the Shaders tab to check whether your materials need conversion. A render pipeline is the system Unity uses to draw the scene. If you use URP or HDRP, follow Render Pipelines before driving. For Built-in, no conversion is needed.
Check: the TMP warning is gone, and any required render-pipeline conversion is complete.
4. Open the included driving scene
On the Welcome tab, find the Open Prototype Scene card and click Open Scene. If Unity asks about unsaved changes in your current scene, save your work before switching.
Check: the prototype scene opens. Continue to Your First Drive for the Play button, controls and a short driving check.
If setup does not work
Start with the row that matches what you see. After fixing an error, let Unity finish compiling before trying again.
| What you see | What to do |
|---|---|
| Red errors mentioning the Input System | Check that Input System is installed, then repeat step 1 above. |
| The Welcome Window did not open | Open it from the Tools menu shown in step 2. If that menu is missing, read the first red Console error. |
| The dashboard or buttons have no text | Import TMP resources from Window > TextMeshPro > Import TMP Essential Resources. |
| Pink materials or shader errors | Open the Welcome Window's Shaders tab, then follow Render Pipelines. |
| A different error remains | Follow Troubleshooting. Start with the first red error; later errors may be consequences of it. |
Optional: what setup changes
RCCP creates its physics layers and configures which kinds of objects can collide. It also assigns layers to existing vehicle-related prefabs and updates RCCP's own scenes. Let the initial setup finish; you do not need to configure these layers by hand for the tutorial.
If you cancel the prefab scan, existing prefabs may still need their layers assigned manually. Keep RCCP's layers: they help prevent unwanted collisions between vehicles, wheels and detached parts.
The Demo Content addon contains the city and additional example scenes. Import it later from Welcome Window > Demos > Import Demo Content; Demo Content explains how to open and run them. The prototype is included in the core package.
Other addons are optional. Install one when you need its feature, following its integration guide; some require a separate package first. The Welcome Window's Keys tab lists addon scripting symbols, which tell Unity which integrations are installed. For driving keys, use Controls.
Next step
Your First Drive → — press Play and drive the included car.