Tuning Recipes
Goal: choose a test for a problem you can see or hear, change one relevant setting, and check whether it helped.
Before you start
Use a working vehicle and save a copy of your scene. Stop Play Mode before editing settings you want to keep.
Select the vehicle root in the Hierarchy, then click its module cards to open the relevant parts. Wheel settings are on the wheel collider objects under the axles.
How to read a recipe
- Choose the symptom below.
- Record the original setting and repeat the problem once.
- Stop Play Mode and change one setting.
- Repeat the same road, starting position, speed and input.
- Keep the change only if the result improves.
Check: you can say what improved, such as fewer rollovers in the same turn, less bouncing after the same bump, or a smoother audio transition.
The expandable notes preserve the earlier prototype measurements. They help explain the tests; use your own results to tune your vehicle.
| Symptom | Start here |
|---|---|
| Wheels spin but the car barely moves | Grip and traction |
| The car tips over | Rollover |
| Steering feels late, or the body bounces | Floaty handling |
| Impacts are silent or too quiet | Crash sound |
| Engine layers sound out of tune | Engine sound |
Who owns this number
A behavior preset can replace or limit a car's settings when it is enabled. Before tuning, choose whether to edit the shared preset or let this car Ignore behavior presets.
Read Assists and Presets if a value changes back when Play starts.
How tire grip is actually worked out
Grip on an RCCP wheel multiplies the friction of the road beneath it. Handbraking, the traction helper, flat tires and drift settings can also alter the final result.
Check both the wheel and the surface. A low-grip surface may be intentional. Surfaces and Effects explains that setup.
Half of this vehicle is not an RCCP component
Some settings belong to Unity components or scene objects:
| Where | What to check |
|---|---|
| Vehicle root's Rigidbody | Mass, interpolation and angular damping |
| Dynamics module's Select the center of mass button | Selects the COM marker you can move in Scene view |
| Each Wheel Collider | Suspension travel, spring and damper |
| Body and ground colliders | Whether the car rests on the road without overlaps |
The center of mass is the point the car balances around. Move its marker with Play Mode stopped, then start a new run to compare.
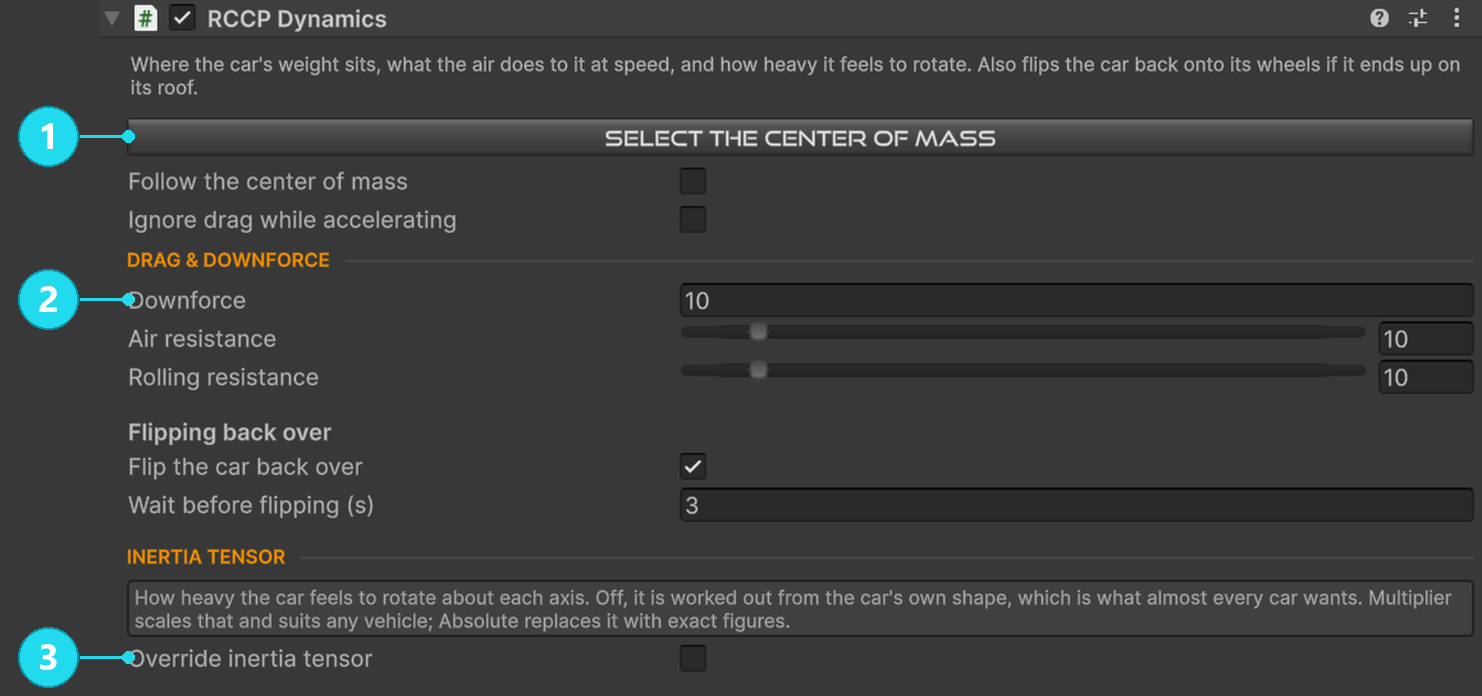
Open the screenshot at full size. 1 Click this button to select the balance marker, then move that marker in Scene view. 2 Downforce affects the car at speed; it does not move the center of mass. 3 The inertia tensor changes how hard the car is to rotate; leave the override off for your first center-of-mass test. The values shown belong to the example car, not a tuning recipe.
The car turns parts of itself off when you are not near it
The optional LOD module reduces work on distant cars. That can explain why damage, lights or effects stop at a distance.
For a test that requires full vehicle behavior, inspect Always full detail and LOD distance factor on LOD. See Performance and Platforms.
Grip and traction
One wheel spins and the car goes nowhere
- Confirm the car is in gear, the brakes are released and the body is not caught on another collider.
- On each driven wheel, check Touching the ground and Grip.
- Restore any accidentally reduced Grip values, then repeat a standing start.
- If the fault appears only on one surface, inspect that surface's friction settings.
- If no axle is powered, check Connected axle on the differential using How the Car Drives.
Check: the car covers more distance during the same starting test. Do not judge improvement from wheel RPM alone.
RCCP's differential behavior differs from a conventional open differential; changing its type is not a universal cure for poor traction.
Optional: recorded prototype test and detailed notes
These are previously documented measurements from a specific prototype setup. They were not rerun for this guide rewrite and are not current defaults or guarantees for your car.
RCCP's Open differential uses wheel-speed difference to bias torque toward the slower wheel. This differs from a conventional open differential, so check the behavior of this implementation before selecting a differential solely from real-car expectations.
All the numbers below come from the same test on the prototype used in this recorded test: a standing start from idle, full throttle, five seconds, flat asphalt, no steering. First, one rear wheel's Grip (grip) lowered while the other stays at 1:
| One rear wheel's Grip | Distance | Torque to the slipping wheel | Torque to the gripping wheel |
|---|---|---|---|
| 1 — both gripping | 51.3 m | 1110 Nm | 1108 Nm |
| 0.5 | 45.0 m | 1184 Nm | 1315 Nm |
| 0.25 | 37.2 m | 1210 Nm | 1405 Nm |
| 0.1 | 32.2 m | 1173 Nm | 1366 Nm |
| 0 — on ice, or in the air | 19.4 m | 566 Nm | 869 Nm |
In these runs, losing grip on one wheel reduced acceleration but did not stop the vehicle. Even with a rear wheel contributing nothing at all, the car pulled away and reached 26.8 km/h.
In this reproduction, severe loss of grip on both driven wheels produced the near-stationary result. Other cars can also be held by brakes, collisions or broken drivetrain connections. Same test, both rear wheels lowered together:
| Both rear wheels' Grip | Distance | Speed after 5 s | How fast the wheels spun |
|---|---|---|---|
| 0.5 | 31.5 m | 44.6 km/h | 866 rpm |
| 0.25 | 13.8 m | 20.0 km/h | 1381 rpm |
| 0.12 | 5.8 m | 8.1 km/h | 1409 rpm |
| 0.05 | 1.7 m | 2.3 km/h | 2124 rpm |
The last row is the car in the complaint: wheels spinning at 2124 rpm, 1.7 m of travel in five seconds. Everything below was measured against that car.
What to change
| Setting | Where | Move it |
|---|---|---|
Grip (grip) |
RCCP Wheel Collider, on each driven wheel | Raise it. It produced the clearest improvement in this test: 0.05 → 0.1 took it from 1.7 m to 4.6 m, and 0.15 took it to 7.7 m. Check for accidentally reduced values before changing other systems. |
| Surface stiffness | Ground Materials, for the surface the car is standing on | Raise it for that surface. Grip multiplies the road's own number, so check whether the low-grip surface is intentional. See How tire grip is actually worked out above, and chapter 11, Surfaces and Effects. |
The COM child object |
Unity Transform, on the vehicle | Move it toward the driven axle. Worth 24% on its own: 0.2 m rearward took the stranded car from 1.7 m to 2.1 m. That improvement applies to this setup; changing weight distribution also affects handling. |
| Rigidbody → Mass | Unity Rigidbody, vehicle root | Confirm it is a real vehicle weight in kg — 1600 on the prototype. An incorrect mass changes the relationship between tire load and applied forces; check it before tuning around the symptom. |
Powered axle (isPower) |
RCCP Axle | Read-only, and worth reading. If it is off on every axle during a driving attempt, check differential connections and whether the drivetrain is delivering power. |
What did not help in this test
- Differential type (
differentialType) — it did not make a clear difference in these runs. Three runs of each type against one wheel at Grip 0.1 averaged 31.5 m for Open, 30.7 m for Limited, 32.0 m for Full locked and 31.8 m for Direct, while two runs of the same type differed by as much as 4 m. The type is lost in the noise. - Limited-slip ratio (%) (
limitedSlipRatio) — it changes how much torque crosses to the other wheel, and the first table helps explain why it did not resolve this reproduction: the torque is already going to the wheel that grips. - TCS (traction control) (
TCS) — switching it off changed the distance not at all, 1.7 m either way, while letting the wheels spin up from 2120 to 2581 rpm. It governs wheelspin, and wheelspin is not what is holding the car. - TCS threshold (
engageTCSThreshold) and TCS strength (TCSIntensity) — same reason. Raising the strength cut the wheel speed by a third and moved the car 1 cm further. - Feathering the throttle. Quarter throttle covered 1.69 m against 1.58 m at full throttle on the same car — a real effect, and nowhere near a fix.
- Downforce (
downForce) — raised tenfold it changed nothing. Downforce scales with speed, and a stranded car has no speed. - Engine torque — halved, it changed nothing. The car is not short of torque.
Read more: Surfaces and Effects · Field Reference
Handling and stability
The car rolls over in corners
- Check that the wheel colliders sit at the actual wheel positions and the model has sensible scale.
- On Dynamics, click Select the center of mass.
- With Play Mode stopped, move the marker a small amount lower.
- Repeat the same corner at the same speed.
- Compare suspension and Anti-roll force only after checking geometry.
Check: repeat several turns and count wheel lifts or rollovers. Also check a bump and braking so the change does not create another problem.
The prototype's rollover threshold below applies only to its test configuration. Curbs, impacts and a different wheel layout can change the result.
Optional: recorded prototype test and detailed notes
These are previously documented measurements from a specific prototype setup. They were not rerun for this guide rewrite and are not current defaults or guarantees for your car.
Center-of-mass height and physical wheel spacing strongly affect rollover. This flat-road cornering test found a threshold in the tested configuration; it does not cover kerbs, collisions, slopes or every vehicle.
The test: full lock held while the target speed climbs 5 km/h every second on flat asphalt, until the inside wheels leave the ground or the car goes over. Every result below is counted across repeated runs, because the speed at which it happened was not reproducible — one setting produced anything between 31 and 48 km/h across five runs — while whether it happened was reproducible every single time.
The unchanged prototype did not roll in these four cornering runs. Four runs, no inside wheel ever left the ground, and the body leaned 3.0–3.3°. It runs wide instead. Raising the COM object is what changes that:
COM height above tested |
Runs | Went over |
|---|---|---|
| 0 — as tested | 4 | never |
| +0.15 m | 4 | never |
| +0.30 m | 8 | every time |
| +0.45 m | 8 | every time |
Between +0.15 m and +0.30 m this test changed from no rollovers to rollovers in every run. Do not reuse that boundary as a guarantee for a different car or road.
What to change
| Setting | Where | Move it |
|---|---|---|
The COM child object |
Unity Transform, on the vehicle | Lower it and retest. In this test, a small reduction was insufficient: dropping it 0.15 m on a car that rolls left it rolling in both runs, because it was still above the line. |
Anti-roll force (N) (antirollForce) |
RCCP Axle, both axles | Compare carefully. On a car that went over in all three control runs, four times the tested 1000 N was a coin flip — one run over, one clean — and at eight times and above it never lifted a wheel again, in six runs across three values, while still reaching higher cornering speeds than the control. Those results do not establish a useful universal range; high anti-roll settings also affect bump response. |
| Rigidbody → Mass and the body collider | Unity Rigidbody and colliders | Mass does not appear above because it cancels: it scales the sideways force and the resistance to tipping equally. What does matter is where the wheels are. A vehicle modelled narrow rolls at a height a wider one survives. |
What did not help in this test
Each of these was tried on the same car that rolled in every control run, and each of them still rolled every time:
- Grip (
grip) — dropping it to 0.7 on all four wheels. It buys time, not safety: with less grip the car needs more speed to reach the same sideways force, so it goes over slightly later and just as certainly. - Downforce (
downForce) — ten times the tested value. Downforce presses down through the wheels, which raises the sideways force the tires can make at the same rate it raises the resistance to tipping. - ESP (stability control) (
ESP) — switching it off changed nothing, and switching it on is not what was holding the car up in the first place. - Override inertia tensor (
overrideInertiaTensor) with the roll figure tripled. It changes how fast the body rolls, not how far it can roll before the weight passes over the wheels. - Track width (m) (
trackWidth) on the wheels. This is not the geometry — the physical track is where the wheel colliders actually sit. This number feeds the steering geometry and the stability assists, so widening it changes how the car steers and what ESP expects, and moves the tipping point not at all.
Read more: Field Reference
The car feels floaty and light
First choose the specific symptom:
| What feels wrong | Start by comparing |
|---|---|
| The body keeps bouncing after a bump | Damper on the wheel colliders |
| The body leans or dives too far | Suspension Spring and center-of-mass height |
| The car responds late to steering | Steering setup and any Override inertia tensor on Dynamics |
| Rotation continues after input ends | Suspension damping and Rigidbody angular damping |
- Choose one row and repeat a simple test.
- Stop Play Mode and note the original setting.
- Change one value, using small steps.
- Repeat the same maneuver.
Check: compare the number of bounces, body lean, or time to settle. A car can have good steering response and still need suspension damping.
Optional: recorded prototype test and detailed notes
These are previously documented measurements from a specific prototype setup. They were not rerun for this guide rewrite and are not current defaults or guarantees for your car.
The recorded tests separated slow steering response, excessive body movement and slow settling. Identify which one you want to improve before changing settings.
| The complaint | What it is | On the prototype used in this recorded test |
|---|---|---|
| It answers the wheel late | How long the car takes to start turning after the wheel moves | 0.30 s to reach nine tenths of its steady turn rate |
| It leans and dives | How far the body tips in a corner and under the brakes | 2.25° of lean in a steady turn at 60 km/h; 1.12° of dive in a full stop from 80 km/h |
| It keeps moving after you stop | How long the body carries on after the input ends | 0.64 s to go still after the wheel is released; dropped from 0.6 m it bounces once and is still after 0.80 s |
Every figure below was measured on that car, one change at a time. "No change" means the number came back inside the spread of two control runs, which agreed with each other to better than 2%.
| Change | Answers the wheel | Leans | Dives | Goes still | After a drop |
|---|---|---|---|---|---|
| Suspension Spring ×2 | no change | 2.25 → 1.18° | 1.12 → 0.55° | 0.64 → 0.44 s | 0.80 → 0.44 s |
COM 0.15 m lower |
no change | 2.25 → 1.18° | 1.12 → 0.50° | 0.64 → 0.42 s | no change |
| Suspension Damper ×2 | no change | no change | 1.12 → 0.94° | no change | 0.80 → 0.48 s, and the bounce is gone |
| Rigidbody Angular Damping ×5 | no change | 2.25 → 1.91° | no change | 0.64 → 0.38 s | no change |
Override inertia tensor (overrideInertiaTensor) at ×2 |
0.30 → 0.64 s | no change | 1.12 → 1.24° | 0.64 → 0.86 s | no change |
| Suspension Damper ×0.5 | no change | no change | 1.12 → 1.48° | no change | 0.80 → 1.02 s |
Downforce (downForce) ×10 |
no change | 2.25 → 2.54° | 1.12 → 1.76° | no change | no change |
Steering speed (steerSpeed) ×2 |
no change | no change | no change | no change | no change |
Steering speed (steerSpeed) ÷4 |
0.30 → 0.42 s | no change | no change | 0.64 → 0.76 s | no change |
What to change
| If it | Change | Where |
|---|---|---|
| answers the wheel late | Override inertia tensor (overrideInertiaTensor), then lower the Pitch · yaw · roll multiplier (inertiaTensorScale) |
RCCP Aero Dynamics. This setting moved the response substantially in this test, and it moved it a long way: at ×2 the car took twice as long to answer. Leave the override off and the figures come from the car's own shape, which is a useful baseline before introducing a manual override. |
| leans and dives | Suspension Spring, or move the COM object down |
Unity Wheel Collider, and the vehicle's COM child. They did almost exactly the same thing here — each roughly halved both the lean and the dive — and the COM change also shortened the stop from 80 km/h by 13% in this test. Compare handling after either change. |
| keeps moving after you stop | Suspension Damper, and Rigidbody Angular Damping | Unity Wheel Collider and Unity Rigidbody. They work on different things: the damper is what stops the car bouncing on its springs (doubling it removed the bounce entirely), while angular damping is what stops the body rolling on after the corner (five times the tested value cut the settle by 42%). ⚠️ A behavior preset overwrites Angular Damping — see Who owns this number above. |
What did not help in this test
- Steering speed (
steerSpeed) for a car that feels late. Doubling it from the tested 1 changed nothing at all, because at 1 it is already quicker than anything else in the chain. Reducing it slowed this particular car's response: quartering it to 0.25 pushed the response out from 0.30 to 0.42 s. This result does not exclude a steering-speed bottleneck on other setups. - Downforce (
downForce) did not reduce body motion in this setup. Ten times the tested value increased the lean by 13% and the dive by 57%, because pressing the car down compresses the springs and leaves them less to work with. It buys grip at speed, and that is all it is for. - Suspension Damper for the lean in a steady corner. A damper only resists movement while it is happening, so it does nothing once the body has settled into a constant lean. That belongs to the spring.
- Suspension Spring for a late-feeling car. Doubling it did not change the response by a measurable amount.
Read more: Field Reference
Looks & sound
Crash sounds are inaudible
- Open Presentation > Audio on the vehicle.
- Check the Crash clip list contains usable clips and no empty slots.
- Check its Max Volume and any assigned mixer.
- Read Crash volume by mass and the units of Full-volume crash.
- Lower Full-volume crash gradually to make comparable impacts louder, then repeat the same impact.
Check: the impact is audible at the expected loudness. Also test a small bump so it is not louder than intended.
With mass normalization on, severity is collision impulse divided by mass, expressed as a change in velocity. With it off, the reference is raw impulse. Switching modes without adjusting the reference can make crashes unexpectedly quiet.
Optional: recorded prototype test and detailed notes
These are previously documented measurements from a specific prototype setup. They were not rerun for this guide rewrite and are not current defaults or guarantees for your car.
Crash loudness is one division: how hard the hit was, divided by the hit you nominated as full volume. In the recorded vehicle setup that division is done in impact-related change in velocity, because Crash volume by mass (normalizeCrashByMass) is on — so the impulse is divided by the car's weight first and the result is meters per second. Full-volume crash (crashMaxVolumeReference) is 14.3, meaning a severity of 14.3 m/s plays at full volume and anything softer scales down in proportion. A 5 m/s severity therefore plays at 35%. To make ordinary impacts louder you make that number smaller, not larger. Below the result sits one hard floor: anything computing under 0.04 is dropped and no sound is created at all, which at the tested settings is a severity under about 0.57 m/s at Max Volume 1.
What to change
| Setting | Where | Move it |
|---|---|---|
Full-volume crash (crashMaxVolumeReference) |
RCCP Audio | Lower it. The recorded setup used 14.3. Try 10, or 8 if you want hard hits to saturate early — 8 turns that 5 m/s severity from 35% up to 63%. Behavior presets do not overwrite these audio settings. |
Crash volume by mass (normalizeCrashByMass) |
RCCP Audio | Leave it on. It is a unit switch, not a volume knob — see the warning below. |
Crash (crashSound) → Audio Clips |
RCCP Audio | Must hold at least one clip and no empty slots. The recorded setup had 4 on the prototype and 6 on the demo cars. An empty slot is still eligible for the random pick, so some crashes are silent and others are not. |
Crash (crashSound) → Max Volume |
RCCP Audio | Confirm it is 1. Lowering it scales every crash down and raises the silence floor, so small bumps stop making any sound at all. |
| Rigidbody → Mass | Unity Rigidbody, vehicle root | Confirm it is a real vehicle weight in kg — 1600 on the prototype. A mass entered ten times too high divides crash severity by the same factor and quietly mutes crashes while everything else still sounds right. |
The one that bites. That reference number changes unit with the switch above it, and nothing rescales it when the switch moves. With Crash volume by mass on it is meters per second (about 14.3). With it off it is raw impulse in N·s (about 20000). Type an impulse-sized number into the speed-sized field and ordinary impacts can fall below the playback threshold and become silent. RCCP's audio inspector raises a "unit mismatch" warning the moment the reference goes above 1000 with the switch on — believe it.
What did not help in this test
- Minimum impact force (
impactMinImpulse) — the obvious first guess, and it does nothing here. It gates the gameplay impact event only; crash audio is fired straight from the collision and never passes through it. - Impact cooldown (s) (
impactCooldown) — same trap, debounces the gameplay event and not the sound. - Pitch variation (
pitchRandomness) — only detunes the clip so repeats do not sound identical. It never touches volume. - Effect fade speed (
effectVolumeSmoothing) — smooths the looping effects: turbo, reverse, brake squeal, flat tire, nitrous, wind. A crash is a one-shot and is not smoothed.
A one-shot crash sound is separate from a sustained scraping sound.
Read more: Engine Audio · Field Reference
The engine sounds out of tune
- Open Audio > Engine sounds and inspect each layer's recording.
- Check Ref against the RPM at which that recording was made.
- Give the Off recording its own Off Ref RPM if it differs.
- Check each RPM window covers the transition to neighboring references.
- Select Equal Power, enter Play Mode and inspect Blend running now under Live values.
- Listen from idle through acceleration, then coast back down.
Check: the blend actually runs as intended and overlapping layers do not hold different notes. A validator or pitch readout supports the check; listening is still required.
RCCP sorts reference RPM internally, so Idle can remain the last card in the standard set. See Engine Audio for the authoring workflow.
Optional: recorded prototype test and detailed notes
These are previously documented measurements from a specific prototype setup. They were not rerun for this guide rewrite and are not current defaults or guarantees for your car.
An RCCP engine is several recordings playing at once. They only agree with each other if each one is pitched from the engine speed it was recorded at, and there are two separate ways that stops happening. They sound different, so start by working out which one you have.
All the numbers below were measured on the prototype used in this recorded test, revving in neutral against the handbrake, by reading the pitch every audible engine voice was actually playing at and converting it back into the engine speed that voice was sounding. The figure in each row is the widest gap between two voices heard at the same moment, in semitones. A semitone is a musical pitch interval; 3 semitones is a minor third. Audibility depends on the recordings and listening conditions.
Case one: in tune at the top, wrong lower down. This is the prototype used in this recorded test, with Engine blend (engineBlendMode) on Equal power:
| Rev band | Widest gap between two voices |
|---|---|
| 1000 – 1500 | 4.1 semitones |
| 1500 – 2000 | 8.4 semitones |
| 2000 – 2500 | 7.7 semitones |
| 2500 – 3500 | 0.0 – 0.2 semitones |
| 3500 – 4000 | 1.9 semitones |
| 4000 – 4500 | 3.6 semitones |
| 4500 – 5000 | 2.6 semitones |
| 5500 – 8000 | 0.0 semitones |
The cause is one thing doing two jobs. The RPM pair on each layer's card sets where that layer is heard, and it also limits how far that layer's pitch is allowed to move. The equal-power blend keeps a layer audible all the way to the next layer's Ref (rpm) — so whenever a window stops short of its neighbour's reference, the layer carries on playing but its pitch is pinned at the edge of its own window, and it holds a fixed wrong note for as long as it is heard. On the tested car the idle layer's window ends at 1200 while the blend keeps it audible to 2000, which is the 8.4-semitone band exactly.
The fix is to give every layer a window that reaches the Ref (rpm) of the layers on either side of it. Measured on the same car, with each window widened to its neighbours' references: every band fell to 0.5 semitones or less, and most to 0.0 — 8.4 became 0.0 at 1500 – 2000, and 2.6 became 0.0 at 4500 – 5000. Nothing else was changed.
Case two: out of tune everywhere, and worst at the top. That is the Legacy blend, where each layer follows its own authored pitch ramp and nothing ties the layers to each other:
| Rev band | Widest gap between two voices |
|---|---|
| 2000 – 2500 | 11.1 semitones |
| 3000 – 3500 | 10.3 semitones |
| 5500 – 6000 | 16.7 semitones |
| 7500 – 8000 | 19.1 semitones |
Nineteen semitones is more than an octave and a half between two voices of the same engine, and it gets worse the harder you rev — which is why this one is usually described as a high-RPM problem.
And it can happen without anyone choosing it. Equal power requires each layer to have an On clip and a distinct Ref (rpm) above 1. RCCP sorts the references internally. If any of that fails, the whole component drops back to Legacy silently. Measured: giving one layer the same Ref (rpm) as another turned Equal power off and produced 17.6 semitones at the rev limiter, with nothing reported anywhere. The audio inspector's Blend running now readout is what tells you the truth here — it shows the law actually in force, not the one the dropdown is asking for.
What to change
| Setting | Where | Move it |
|---|---|---|
The RPM pair on each layer card (minRPM and maxRPM) |
RCCP Audio, Engine layers (engineSounds) |
Widen each one to its neighbours' references. The lowest layer starts at 0, the highest ends at the engine's maximum, and every layer in between runs from the Ref (rpm) below it to the Ref (rpm) above it. This is the whole fix for case one. |
Engine blend (engineBlendMode) |
RCCP Audio | Set it to Equal power, then check Blend running now underneath it. If it still says Legacy, the ladder below has not qualified. |
Ref (rpm) (referenceRPM) |
RCCP Audio, each layer card | Every layer needs a distinct value above 1. The standard Idle card can stay last; the runtime sorts the references. Use known recording RPM or the layer's Measure button, then confirm by listening — a reference is the speed the clip was recorded at, not the middle of its window. |
Off Ref RPM (referenceRPMOff) |
RCCP Audio, each layer card | Only if the layer's Off clip was recorded at a different speed from its On clip. Left at 0 it inherits the on-throttle reference, so a differently recorded Off clip may need its own measured reference. Measure writes the figure it finds. |
What did not help in this test
- Pitch variation (
pitchRandomness) — measured with it at the tested value and at 0, the gaps above were unchanged. It exists so repeated one-shots do not sound identical. - The Pitch pair on the layer card — Equal power ignores both of them entirely and pitches from the reference instead. They only do anything under Legacy, and under Legacy they are the cause.
- Vol (
maxVolume) — it changes which voice dominates, not what note either voice is playing. A mistuned layer turned down is still mistuned, and will still beat against its neighbour. - Replacing the clips. The tested recordings are in tune with each other above 5500 rpm on the same car that is 8.4 semitones out at 1800, so these results pointed to layer authoring in that setup.
Read more: Engine Audio · Field Reference
If your symptom is not here
Use Troubleshooting for a car that does not function, or How the Car Drives to find the relevant component.
Read next
- Assists and Presets — stop presets overwriting a test.
- Field Reference — individual settings and tooltips.
- Engine Audio — measured recording references and blend validation.