Controls
Goal: use the keyboard or a gamepad, change a key binding, and check that the new binding is remembered.
Before you start
Complete Your First Drive. For keyboard, gamepad or a physical wheel, turn off Use mobile controller in RCCP Settings. Use Mobile for touch controls.
A binding connects a physical control, such as W, to an action, such as Throttle. Change bindings to change keys; keep RCCP's action names unchanged.
1. Check the basic controls
- Press Play and click inside the Game view, away from text fields.
- Hold W to accelerate, A/D to steer, then S to brake.
- For a connected gamepad, try its right trigger, left stick and left trigger instead.
Check: the player car responds to your chosen device. RCCP enables its action maps together; there is no separate gamepad scheme switch to set.
If nothing responds, check the registered player vehicle and the engine before changing bindings. Scenes and Spawning explains player registration.
2. Change a binding in the Editor
- Stop Play Mode.
- In the Project window, open Assets > Realistic Car Controller Pro > InputActions.
- Double-click RCCP_InputActions.inputactions to open the Input Actions editor.
- Select the action you want, then edit or add its binding. Keep the existing action and map names.
- Click Save Asset, press Play, and test the new key.
Check: the new control performs the intended action. If a saved in-game rebind overrides it, reset that rebind before testing the edited asset.
Open the screenshot at full size.
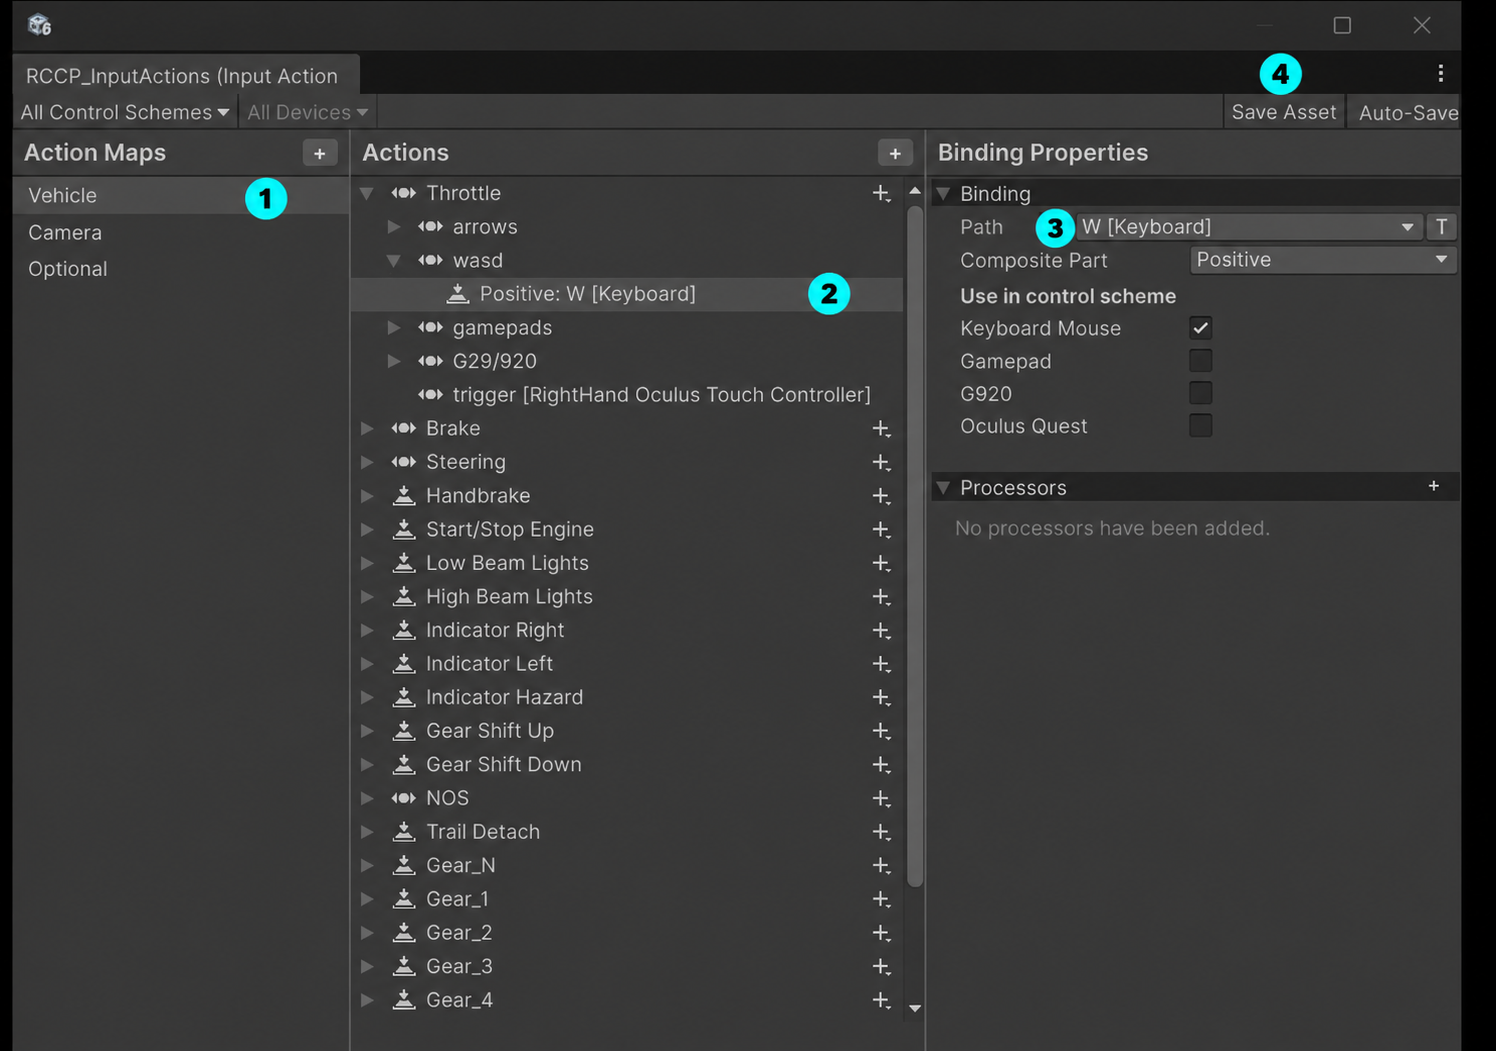
For the example shown, select 1 Vehicle, expand Throttle > wasd, then select 2 Positive: W [Keyboard]. Change 3 Path to the key you want and click 4 Save Asset. Select the binding beneath the action to see its Path field.
The asset contains Vehicle, Camera and Optional maps, with Keyboard Mouse, Gamepad, G920 and Oculus Quest control schemes. RCCP looks actions and maps up by name: renaming one breaks its connection and produces a Console message.
3. Let players change bindings in game
The current RCCP canvas includes a Rebind panel:
- Open its rebinding screen during Play Mode.
- Choose an action and press the replacement control when prompted.
- If it asks for several controls, finish each prompt. Keyboard steering is a composite binding made from separate left and right keys.
- Test the action, then restart the game to check persistence.
Check: the row displays the new binding and the control works after restarting. Enable Remember key bindings in RCCP Settings > Controls > Input to save and load overrides automatically. The Reset button restores default bindings.
Overrides are saved in PlayerPrefs under rebinds. They can survive leaving Play Mode; code that clears PlayerPrefs can remove them.
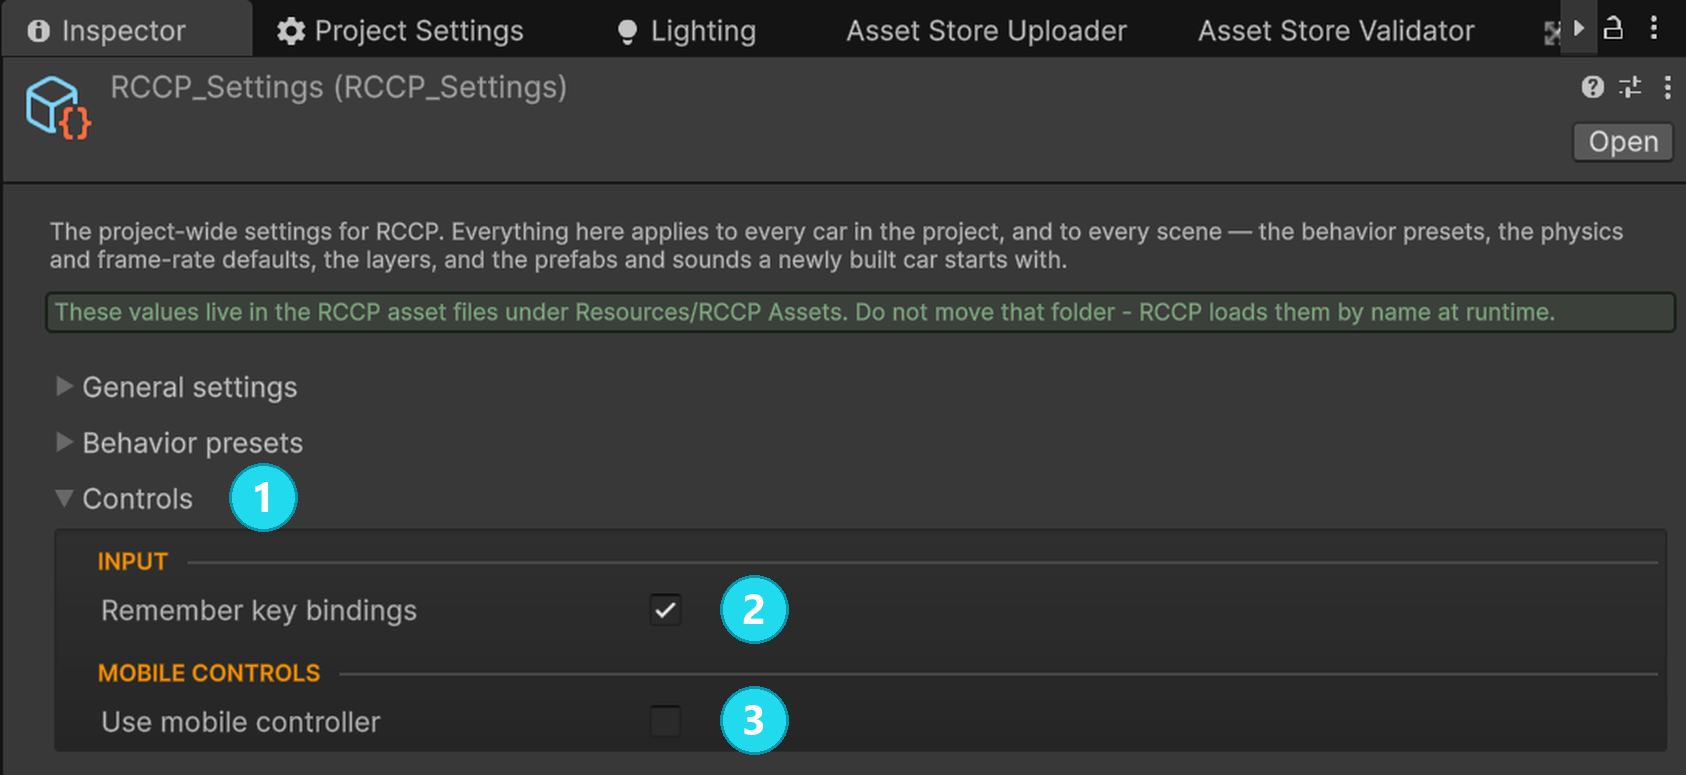
Open the screenshot at full size. These are project settings; the Input Actions editor above changes individual bindings.
What are the default keys?
These tables describe the included input asset. Your edited bindings and saved player overrides can differ. Features such as nitrous, lights and trailer detachment need the corresponding vehicle components.
Driving
| Action | Keyboard | Gamepad |
|---|---|---|
| Throttle | W or Up Arrow | Right trigger |
| Brake | S or Down Arrow | Left trigger |
| Steering | A / D or Left / Right Arrow | Left stick, left / right |
| Handbrake | Space | Button South (A / Cross) |
| Nitrous | F | Button East (B / Circle) |
| Clutch | M | — |
| Start / stop engine | I | Button North (Y / Triangle) |
| Low beam lights | L | D-pad up |
| High beam lights | K | Left stick down |
| Left indicator | Q | D-pad left |
| Right indicator | E | D-pad right |
| Hazards | Z | D-pad down |
| Shift up | Shift (either side) | Right shoulder |
| Shift down | Ctrl (either side) | Left shoulder |
| Neutral | N | — |
| Gears 1 to 6 | 1, 2, 3, 4, 5, 6 | — |
| Reverse gear | — | — |
| Detach trailer | T | Right stick press |
Reverse has a direct binding on the wheel scheme only. On keyboard and gamepad you reach reverse by shifting down out of first, or by letting the automatic gearbox select it for you — see Auto reverse when braking at rest below.
Camera and extras
| Action | Keyboard and mouse | Gamepad |
|---|---|---|
| Change camera | C | Left stick press |
| Look back (hold) | B | Button West (X / Square) |
| Orbit the camera | Mouse movement | Right stick |
| Hold to orbit | Left mouse button | Right stick press |
| Zoom | Mouse scroll wheel | — |
| Record | R | — |
| Play back | P | — |
| Feature Lab panel | Tab | — |
Record controls the per-vehicle recorder. P plays that recorder when present, or can start the scene Replay Director. Both are covered in Replay and Recording. The Feature Lab panel only exists in the demo scenes — see Demo Content.
If controls do not work as expected
| What happens | What to check |
|---|---|
| Keys do nothing while typing a name | RCCP suppresses driving input while a UI text field has focus. Click back in the Game view. |
| Input stops after switching applications | RCCP resets inputs when the application loses focus. Return focus to the game. |
| Only one car responds to lights, gears or recording keys | These actions belong to the registered player vehicle. This prevents all cars responding together. |
| Number keys do not hold a gear | Use a manual transmission for direct gear selection; automatic shifting can choose another gear afterward. |
| A stick or pedal applies input at rest | Inspect device values and adjust the relevant vehicle-input deadzone. Change the drifting axis rather than every axis. |
| Steering edits seem to revert | An active behavior preset can overwrite steering settings. See Assists and Presets. |
| A rebind disappears after restarting | Check Remember key bindings, the saved key and any code that clears PlayerPrefs. |
Optional: connect a physical steering wheel
- Connect the device and open Window > Analysis > Input Debugger.
- Check that the Input System detects it and that its axes change when you turn the wheel and press each pedal.
- Try the included G920 bindings if they match your device. Otherwise, add bindings for the controls your device reports.
- Test steering direction, full pedal travel and released values before driving at speed.
Being detected is the first check; a different wheel can still need different axis bindings or processors. An Invert processor can correct a reversed axis. Combined throttle/brake axes need bindings that separate the two directions.
Included G920 bindings
| Action | Control |
|---|---|
| Steering | Wheel axis (stick/x) |
| Throttle | Accelerator pedal (stick up / down) |
| Brake | Brake pedal (z) |
| Clutch | Clutch pedal (rz) |
| Handbrake | Button 2 |
| Nitrous | Trigger |
| Start / stop engine | Button 7 |
| Low beam / high beam | Button 10 / Button 9 |
| Indicators left / right | Hat left / right |
| Hazards / look back | Hat up / hat down |
| Change camera | Button 8 |
| Shift up / down | Button 5 / Button 6 |
| Gears 1 to 6 | Buttons 13 to 18 |
| Reverse | Button 12 |
Neutral has no wheel binding. Trailer detachment, recording, playback and Feature Lab have no G920 binding in the included asset.
RCCP's wheel support reads input. It does not provide force feedback or gamepad rumble; those effects require a separate device integration.
Optional: adjust the input response
On the vehicle's input module, use these settings for the behavior you want:
| Setting | Purpose |
|---|---|
| Steering curve by speed | Reduce the available steering angle as speed increases. |
| Steering limiter | Limit steering correction during a slide. |
| Counter steering and Counter steer strength | Adjust automatic steering correction into a slide. |
| Auto reverse when braking at rest | Let holding brake at rest request reverse with an automatic gearbox. |
| Swap pedals in reverse | Swap throttle/brake behavior in reverse for automatic driving. |
| Cut throttle while shifting | Reduce throttle during a gear change. |
| Apply brake / Apply handbrake | Hold the car when player control is disabled. |
| Per-axis deadzones | Ignore a small input around the resting position. |
Keep car handling and device calibration separate: first make sure the released wheel or stick reports a clean resting input, then adjust the vehicle's response. Scripting explains the input-processing path.
Optional: build custom rebind buttons
Add RCCP UI Rebind Input to a UI object and assign its action reference, binding ID and binding-text label. Action label, rebind prompt and overlay are optional.
Connect the button's On Click () event to StartInteractiveRebind(). To reset that row, call ResetToDefault(). For a shared reset button, RCCP UI Rebind Input Reset accepts a list of rows and exposes OnClick().
If your options screen manages persistence itself, these calls save and load the overrides:
RCCP_RebindSaveLoad.Save(); // When applying the player's changes.
RCCP_RebindSaveLoad.Load(); // When loading saved controls.
Choose when your integration calls them; do not run both together as an initialization routine. Avoid competing with the scene manager's automatic save/load behavior.
Next step
- Mobile — touchscreen and tilt input.
- How the Car Drives — transmission behavior.
- UI and HUD — the ready-made rebinding interface.
- Scripting — feed inputs from your own code.