Damage
Goal: make a crash dent the car, check that repair works, then add optional broken parts or mechanical damage.
Before you start
Use a working RCCP vehicle in a test scene with a solid obstacle. Save the scene and stop Play Mode before setup.
Denting changes mesh vertices: the points that make up the model. The source model must allow Unity to read and write those points.
1. Enable damage
- Select the vehicle root in the Hierarchy.
- Find Features > Damage in the module cards.
- Add it with + if missing, then click the card to open its Inspector.
- Enable Collect parts automatically and Dent the bodywork.
- Check Damage from layers includes the layer of your test obstacle.
Check: the Damage module is enabled and configured to collect the vehicle's parts.
The Setup Wizard can also add Damage from its Modules step.
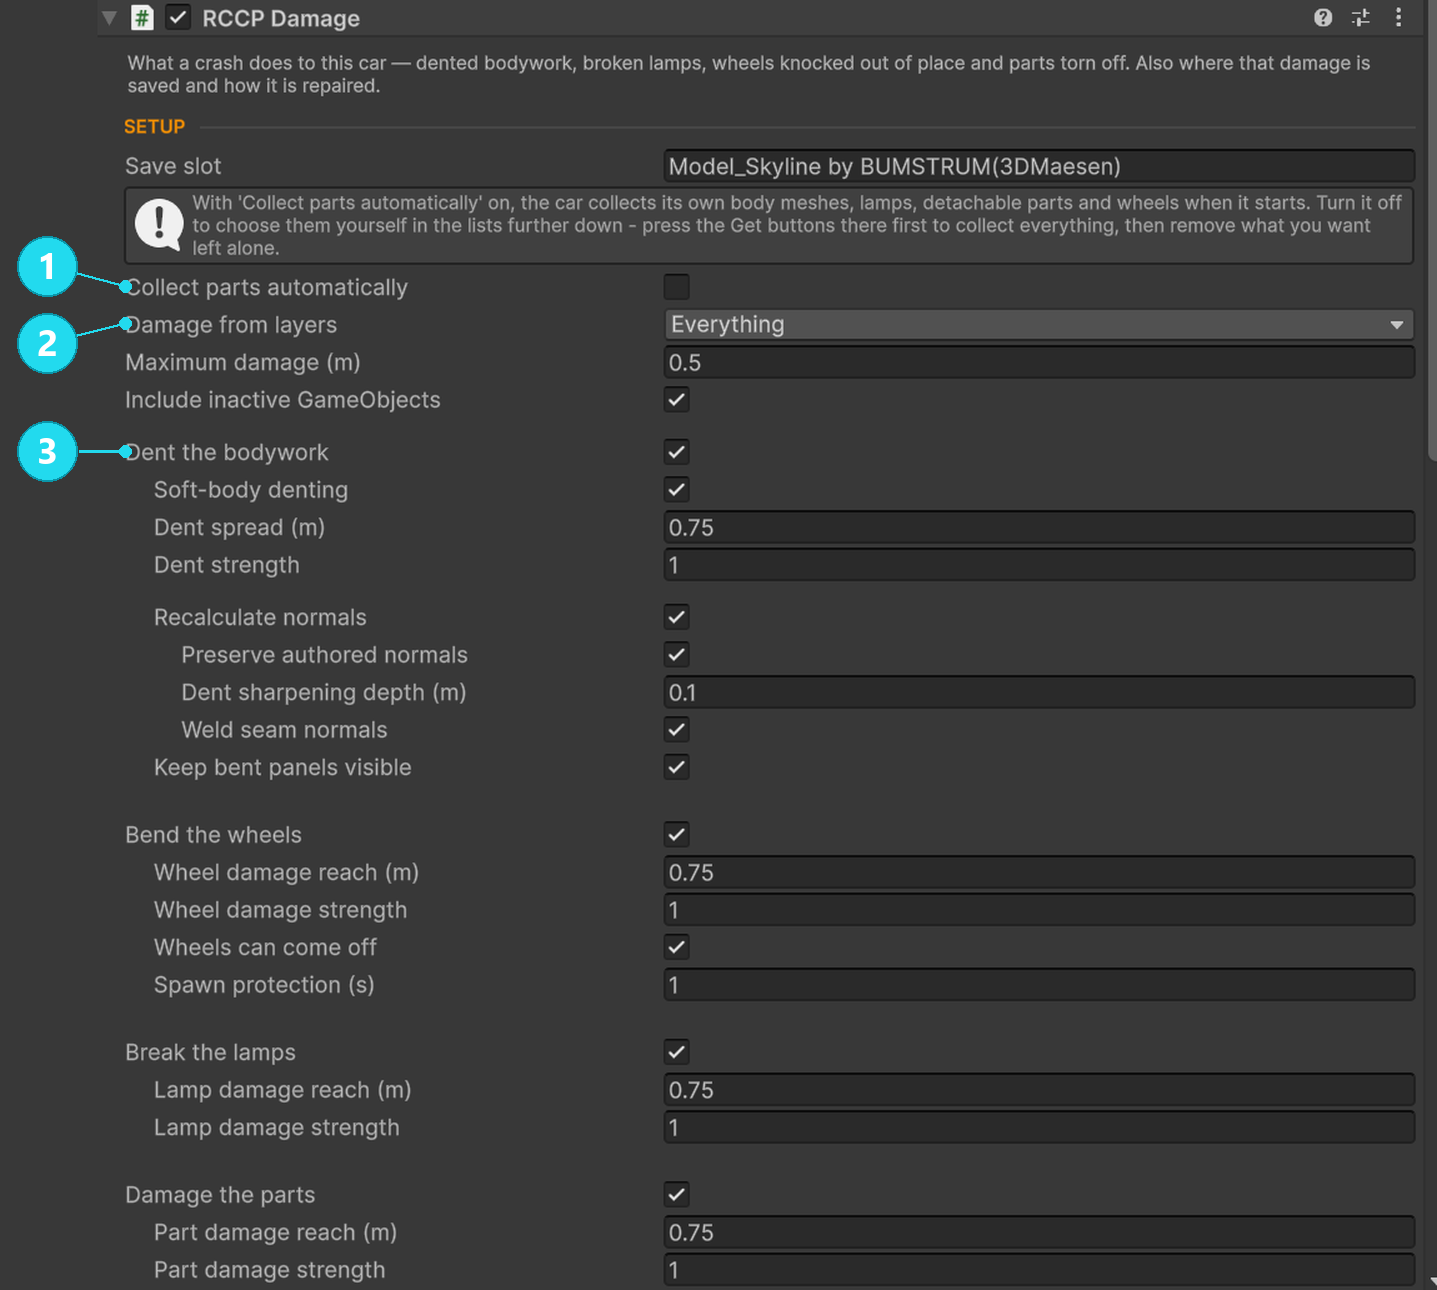
Open the screenshot at full size. 1 Enable automatic collection for this first setup; the example car shown uses manually assigned parts, so its box is unchecked. 2 Include your obstacle's layer. 3 Enable bodywork dents. The other values shown belong to this example car; you do not need to copy them or enable soft-body denting to follow this guide.
Turning damage on
If you want to choose exactly which objects can be damaged, turn off Collect parts automatically and fill the body, wheel, lamp and detachable-part lists. Get Meshes, Get Lights, Get Parts and Get Wheels can help populate them.
Use Include inactive GameObjects when parts that start inactive should be collected too.
2. Make the model readable
If the Setup Wizard already enabled Read/Write for your model, continue to the driving test.
Otherwise:
- Select the original imported model in the Project window.
- In its model import settings, enable Read/Write Enabled.
- Click Apply and wait for the reimport.
Check: there are no unreadable-mesh warnings for the intended body panels in the Console.
This changes the model asset used by its instances and adds memory cost. A model that is not readable can still render, but its panels cannot be deformed by this system.
3. Test a dent and repair it
- Press Play and drive into the test obstacle.
- Stop the car and inspect the struck panel. A very light touch may be ignored.
- Select the Damage module while still in Play Mode.
- Click Repair Now near the bottom of its Inspector.
- Wait for Repaired in Live values to become true.
Check: the crash changes the body shape and repair restores it. The repair button is a Play Mode control; it is disabled outside Play Mode.
Stop Play Mode before changing the saved setup.
Controlling how bad the dents look
Start by changing one of these, then repeat the same impact:
| Setting | Use it to |
|---|---|
| Dent spread | Change how widely an impact affects the panel |
| Dent strength | Change how strongly an impact deforms it |
| Maximum damage | Limit displacement from the original shape |
| Dent direction | Choose Legacy or Corrected impact direction handling |
The same impact can look different on models with different mesh detail. Increasing strength cannot add missing vertices to a very simple panel.
Dents that look flat or faceted
Recalculate normals updates the lighting after deformation. Preserve authored normals preserves authored shading away from the deformation, and Weld seam normals helps avoid unwanted hard seams.
Leave Keep bent panels visible enabled so the bounds used for visibility follow the deformed shape.
For crowded scenes, profile the cost of normal recalculation and the soft-body settings before increasing visual detail.
Soft-body denting
Classic denting changes the panel shape immediately. Soft-body denting lets panels bend and wobble before settling, and supports animated repair.
To try it:
- Stop Play Mode.
- Enable Soft-body denting on the Damage component.
- Open the added Deformation Solver and choose a Stiffness preset.
- Repeat the impact-and-repair test.
Check: the panel moves after the hit and eventually settles. Confirm repair finishes before relying on it in gameplay.
Turn the feature off using its checkbox. Deleting the solver child while the feature remains on causes it to be recreated.
Preparing panels uses memory and processing time. Solver passes, Substeps and relighting affect cost; scene-wide deformation budgets live in RCCP Settings. Performance and Platforms and Field Reference cover those controls.
Do not assume a classic-denting strength change produces the same proportional response under soft-body denting; compare your own vehicle.
Bumpers, hoods and doors that fall off
The panel must be a separate object in the vehicle hierarchy.
- Select that panel.
- Use Add Component > BoneCracker Games > Realistic Car Controller Pro > Misc > RCCP Detachable Part.
- Set Part Type to its role.
- On the Damage module, enable Damage the parts.
- Test nearby impacts.
| Part setting | Meaning |
|---|---|
| Strength | Remaining resistance to damage |
| Loose Point | Strength at which the part begins to move on its joint |
| Detach Point | Strength at which it separates |
| Is Detachable | Whether full separation is allowed |
| Deactive After Seconds | How long a detached part remains before being disabled |
| Add Torque After Loose | Adds a twist while the part is loose |
Check: the panel starts attached, can loosen or detach as configured, and returns on repair.
On Damage, Part damage reach sets how close the impact must be; Part damage strength scales the damage.
Wheels knocked out of place
Enable Bend the wheels for impact displacement. Wheel damage reach and Wheel damage strength control how impacts affect them.
Wheels can come off allows detachment after sufficient damage. Spawn protection delays wheel detachment just after spawning; if wheels detach immediately, also check whether the starting car overlaps the ground or other objects.
Broken lamps
Enable Break the lamps on Damage and Can be smashed on the individual lamps. Lamp damage reach and Lamp damage strength control the impact response.
Check: a hit near a breakable lamp can turn it off, and repair restores it. Lights explains the lamp setup.
Knowing how wrecked the car is
Track damage by area records separate front, rear, left and right condition scores. These support the damage HUD and engine-related mechanical damage.
Tracking a score alone does not dent a panel or reduce power. The corresponding damage features must also be enabled.
Making damage affect how the car drives
Enable Mechanical damage to add Damage Mechanics, then choose the effects you need.
| Effect | Main setting | Dependency |
|---|---|---|
| Reduced engine power and overheating | Engine loses power | Track damage by area |
| Steering pulls after a collision | Steering pulls after a hit | Wheel displacement and positive Maximum damage |
| Tires slowly deflate | Tires go flat slowly | Wheel displacement and positive Maximum damage |
| Smoke, fire and eventual engine failure | Engine can catch fire | Track damage by area; particles for visible effects |
Set Engine location to the correct end of the vehicle. Then test damage at that end.
Health to torque shapes power loss. Radiator and overheating controls set how damage builds into heat. Leak starts at and Time to go flat control tire leaks. For fire, keep Goes out above higher than Catches fire below to avoid rapid on/off changes.
Smoke and flames need the particle setup described in Surfaces and Effects. Recompute inertia on detach optionally recalculates weight distribution after detachments.
Repairing a car
Repair Now restores body shape, wheel positions and attachment, tires, detachable parts, lamps and tracked area health. Mechanical repair clears its consequences, including fire.
Soft-body repair can take time unless configured as instant. In a script, use the public repair-status API instead of assuming the car is fully restored in the same frame; see Damage and repair API.
Saving a damaged car
- Give the vehicle a unique Save slot before running.
- In Play Mode, damage it and click Save.
- Repair it, then click Load.
- Confirm the saved damage returns.
Check: the slot restores the saved condition. A healthier save can also reattach parts and reinflate tires. Delete removes that slot's saved damage.
These buttons store damage on the device. Give different persistent vehicles different slot names so they do not share the same damage record.
If damage does not work
| What you see | What to check |
|---|---|
| No dents | Damage enabled, Dent the bodywork, readable meshes, obstacle layer and impact strength |
| One panel stays unchanged | Automatic collection or the manually assigned body list |
| A distant car stops denting | Its LOD settings may disable damage. |
| A deleted solver or mechanics object returns | Disable its feature checkbox first. |
| Steering pull or slow leaks never happen | Maximum damage must be positive and wheel damage must occur. |
| Repair button is unavailable | Enter Play Mode and damage the car first. |
| Whole pile-ups stutter | Deformation budgets and relighting costs, then target-device profiling |
Read next
- Lights — breakable lamps.
- Surfaces and Effects — sparks, smoke and fire.
- Field Reference — detailed damage and solver fields.