Customization and Upgrades
Goal: let the player repaint a car and restore that choice on the next run. Add wheels, accessories and performance upgrades afterward.
Before you start
Start with a working RCCP vehicle and the current UI Canvas. Use your own vehicle prefab copy, and stop Play Mode before configuring it.
A manager groups one category of customization, such as paint or wheels. The vehicle's loadout is the saved set of colors, fitted parts and upgrade levels.
1. Add the Customizer
- Select the vehicle root in the Hierarchy.
- In its module grid, add Customizer from Features. Vehicle Setup explains the module grid.
- Open the Customizer's Inspector and enter a stable, unique Save slot name.
- For this first test, enable Set up automatically, Load the saved set and Save changes automatically. Leave Apply when at Start.
Check: the Customizer shows its list of category managers. Adding Customizer alone provides saving and initialization; you still need managers for the features you want.
Give cars different save slot names when they should remember different choices. An empty name receives a random runtime key, which cannot reliably find the same loadout next session. Renaming the vehicle object does not update an existing save slot name.
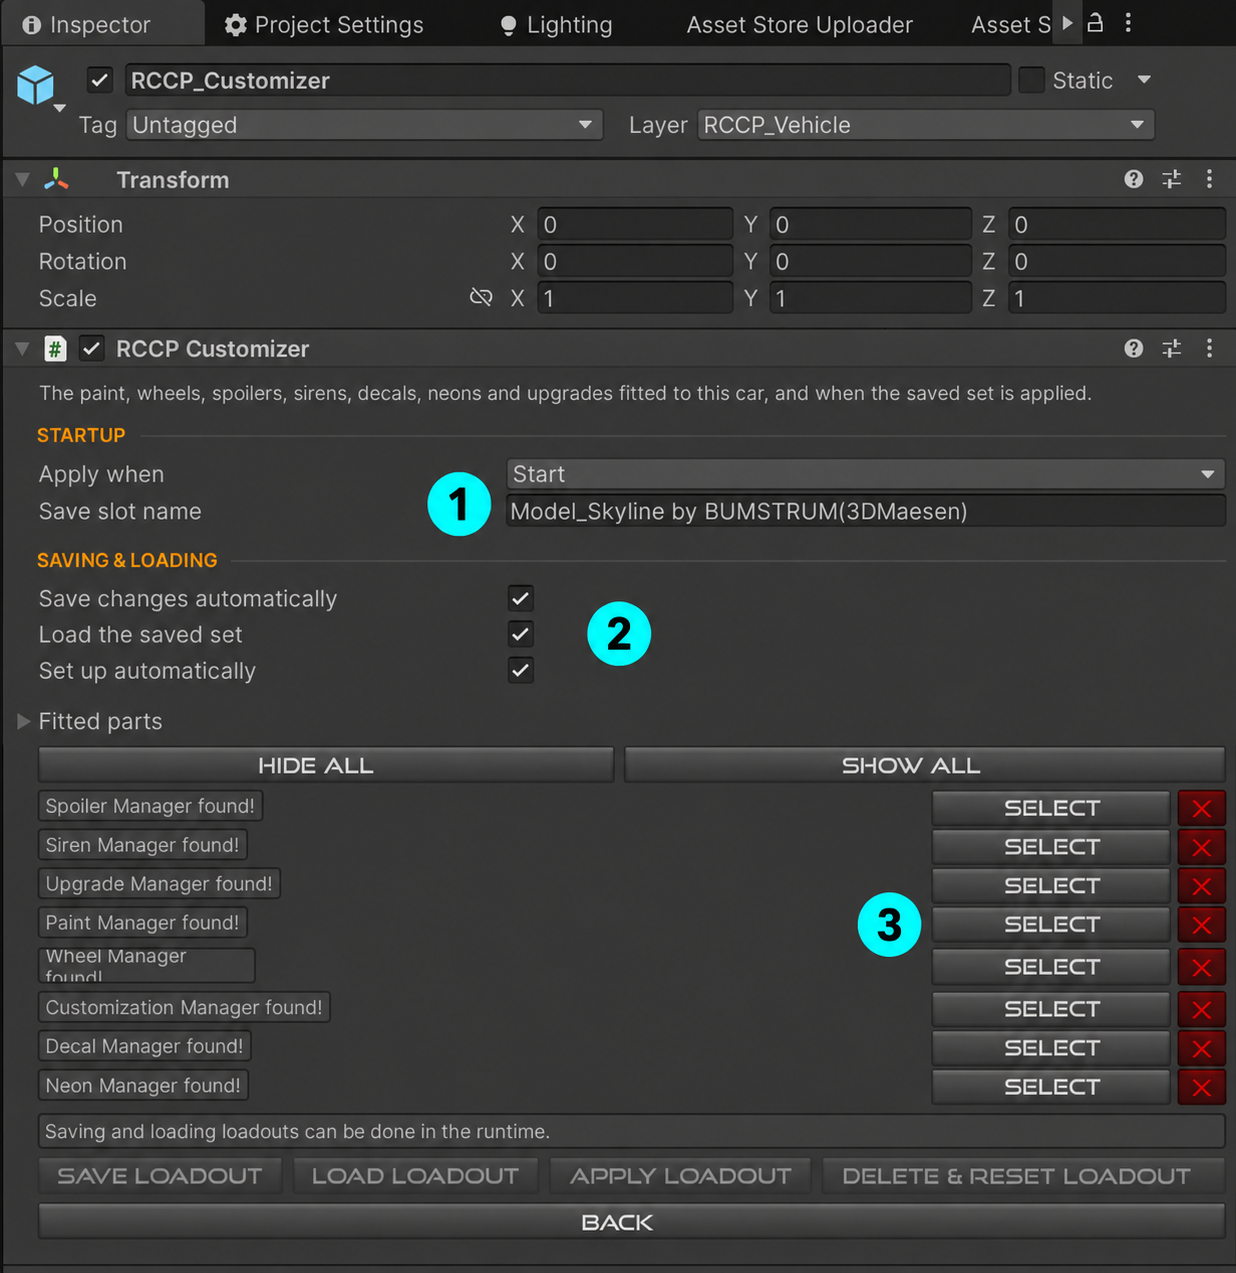
Open the screenshot at full size. Use your own stable name at 1, enable the three options at 2 for this tutorial, then open Paint Manager with 3 Select. This example already has its managers; a missing manager shows Create instead.
2. Set up body paint
- In the Customizer Inspector, find Paint Manager. Click Create if missing, then Select to open it.
- Select an existing painter beneath the manager, or click Create New Painter.
- Assign Paint Material to the exact material used by the car's paintable body panels. Select a body mesh and inspect its renderer's Materials list to find that asset.
- Set Shader Keyword to the shader's color property. RCCP's car paint shader uses
_BaseColor; a shader using another property needs that name instead. - If other panels use a different material, add another painter for that material. On Paint Manager, click Get All Painters after editing the painters.
- Save the scene and your vehicle prefab changes.
Check: each paintable material has a painter. The painter matches materials used by MeshRenderers on this vehicle and colors runtime instances, leaving the shared material asset unchanged.
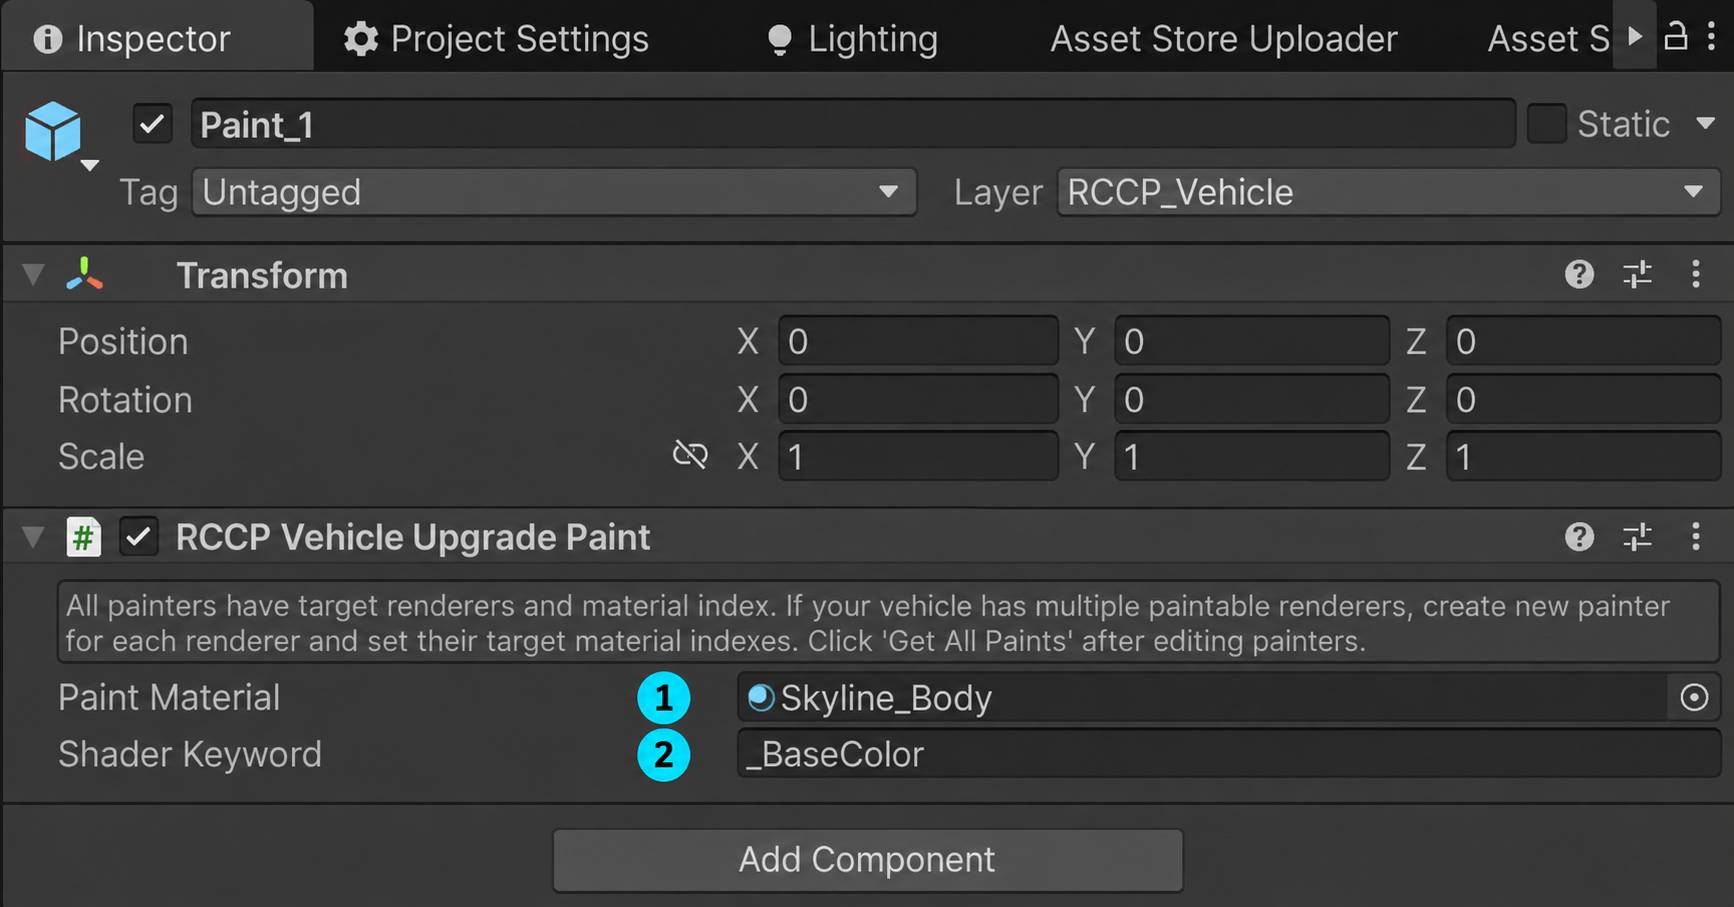
Open the screenshot at full size. 1 must match your vehicle's material; the example uses Skyline_Body. 2 is _BaseColor for the included car paint shader. Despite its Inspector label, this field expects a color-property name, not a shader feature switch.
3. Test painting and saving
- Press Play with this car registered as the player.
- Open the canvas's customization panel and choose a paint color.
- Stop Play Mode, then start again.
Check: the intended panels change color, and the saved color returns on the next run.
This choice can persist: automatic customization saves use PlayerPrefs, Unity's local settings store. Unlike ordinary scene edits in Play Mode, these choices can survive stopping the game.
If your own game requires payment or an Apply button, turn off Save changes automatically and save from your game flow after confirming the choice. RCCP's core customization settings do not implement your shop's purchase rules.
If paint or saving does not work
| What you see | What to check |
|---|---|
| No color changes | The painter needs the exact body material and a valid color-property name in Shader Keyword. |
| Only some panels change | Add a painter for each additional paintable material. |
| A material replacement stops painting | Update Paint Material to match the replacement. |
| Another car gets the same saved choices | Give them separate Save slot name values. |
| Choices disappear next run | Use a nonempty stable save name, enable automatic saving/loading, and check whether other code clears PlayerPrefs. |
| The manager's changes do not appear | Confirm the relevant manager exists and initialization is enabled or called by your integration. |
Optional: wheels, spoilers and sirens
Create the relevant managers from the Customizer Inspector first.
| Category | How to add options |
|---|---|
| Wheels | Open Tools > BoneCracker Games > Realistic Car Controller Pro > Configuration > Wheels and add wheel prefabs to Wheels. This list is shared by vehicles. |
| Spoilers | Put each model under the Spoiler Manager and add RCCP Vehicle Upgrade Spoiler to it. |
| Sirens | Put each light rig under the Siren Manager and add RCCP Vehicle Upgrade Siren to it. |
The accessory components are under Add Component > BoneCracker Games > Realistic Car Controller Pro > Customization. Only the selected spoiler or siren option remains active. An index of -1 means original wheels, or no spoiler/siren fitted.
Turn off Paint Spoilers on the Spoiler Manager if those models should retain their own finish. Hide All and Show All on the Customizer are editing aids for inspecting accessory models.
Optional: decals and neons
These use projected materials and need URP or HDRP. Follow Render Pipelines before setting them up. On Built-in, the selection can be saved but no projector effect is displayed.
Create a Decal Manager or Neon Manager. Decals provides materials shared by the front, back, left and right slots, each with its own selected index. Neons provides the underglow materials and one selected index. Test the projection placement on your model after assigning options.
Optional: performance upgrades
Create the Upgrade Manager to offer four upgrade categories. Each runs from level 0 (stock) to 5. Efficiency on each upgrade object sets the multiplier reached at level 5; intermediate levels divide the increase evenly.
| Upgrade | Affected setting |
|---|---|
| Engine | Maximum engine torque. |
| Handling | Traction helper strength. Needs the Stability module. |
| Brake | Brake torque on the axles. |
| Speed | The vehicle's maximum road-speed limit on its Engine module. |
For example, an Efficiency of 1.2 makes level 5 target 120% of the captured stock value. This is a setting multiplier, not a promise of a measured lap-time or top-speed gain. Engine and speed upgrades need an Engine module.
The upgrades capture their baseline when first initialized. Test them after finalizing the vehicle's basic tuning, and check Assists and Presets if other systems overwrite a setting.
Optional: suspension and colors
The Customization Manager exposes front and rear spring force, damping, travel, ride height and camber, plus headlight and tire-smoke colors. It remembers the initial values for restoring the car.
Some tuning data fields store choices without applying them: ABS, ESP, TCS, steering helper, nitrous, rev limiter, automatic transmission, shift/clutch thresholds and the counter-steering/steering-limiter switches. Configure those through the vehicle's own modules; do not rely on stored tuning data to enable them.
Optional: control when a loadout is applied
| Customizer setting | Purpose |
|---|---|
| Fitted parts | The current loadout data. |
| Save changes automatically | Write a change immediately, or let your code choose when to save. |
| Load the saved set | Load the stored loadout when the car starts. |
| Set up automatically | Let the managers initialize themselves. Network integrations may need to manage this. |
| Apply when | Choose Awake, On Enable, Start or Delayed With Fixed Update initialization. |
For a reset button, call Delete() on the vehicle's Customizer to clear its saved choice and restore defaults. The same component exposes Save(), Load() and Initialize() for a custom save/apply flow. For multiplayer, follow Multiplayer so local saves and network state do not compete.
Next step
- Demo Content — try the customization scene.
- UI and HUD — restyle the customization interface.
- Field Reference — detailed category settings.