Setting up your own vehicle
Goal: turn a four-wheel car model into a drivable RCCP vehicle, then save it for reuse.
Before you start
Complete Your First Drive. Use a copy of your scene for this tutorial and stop Play Mode before editing.
You need a model with a separate body and four separate wheel objects. Expand the model in the Hierarchy to see its children; click each wheel to check that only that wheel is selected.
| Check your model | Why it matters |
|---|---|
| Each wheel is separate from the body | RCCP must move and rotate the wheels individually. |
| The body faces local +Z, with its right side along +X | The wizard uses these directions to identify the four corners. |
| Wheel axles run along local X | Automatic wheel detection expects this orientation. |
| The model uses a sensible real-world scale | Unity physics uses meters. A car hundreds of units long needs correcting before setup. |
If the wheels are part of the body mesh, separate them in your modeling software first. Renaming objects cannot separate a mesh.
1. Put the model in your scene
- Find your model in the Project window.
- Drag it into the Hierarchy. This creates an instance in the scene.
- Select its top-level object: the parent that contains the body and all four wheels. This is the vehicle root.
- Open Tools > BoneCracker Games > Realistic Car Controller Pro > Vehicle Setup > Setup Wizard.
Check: the wizard's Target Vehicle is your scene object. A model selected only in the Project window is not a valid target. A car that already has an RCCP controller should be edited directly instead of running the wizard again.
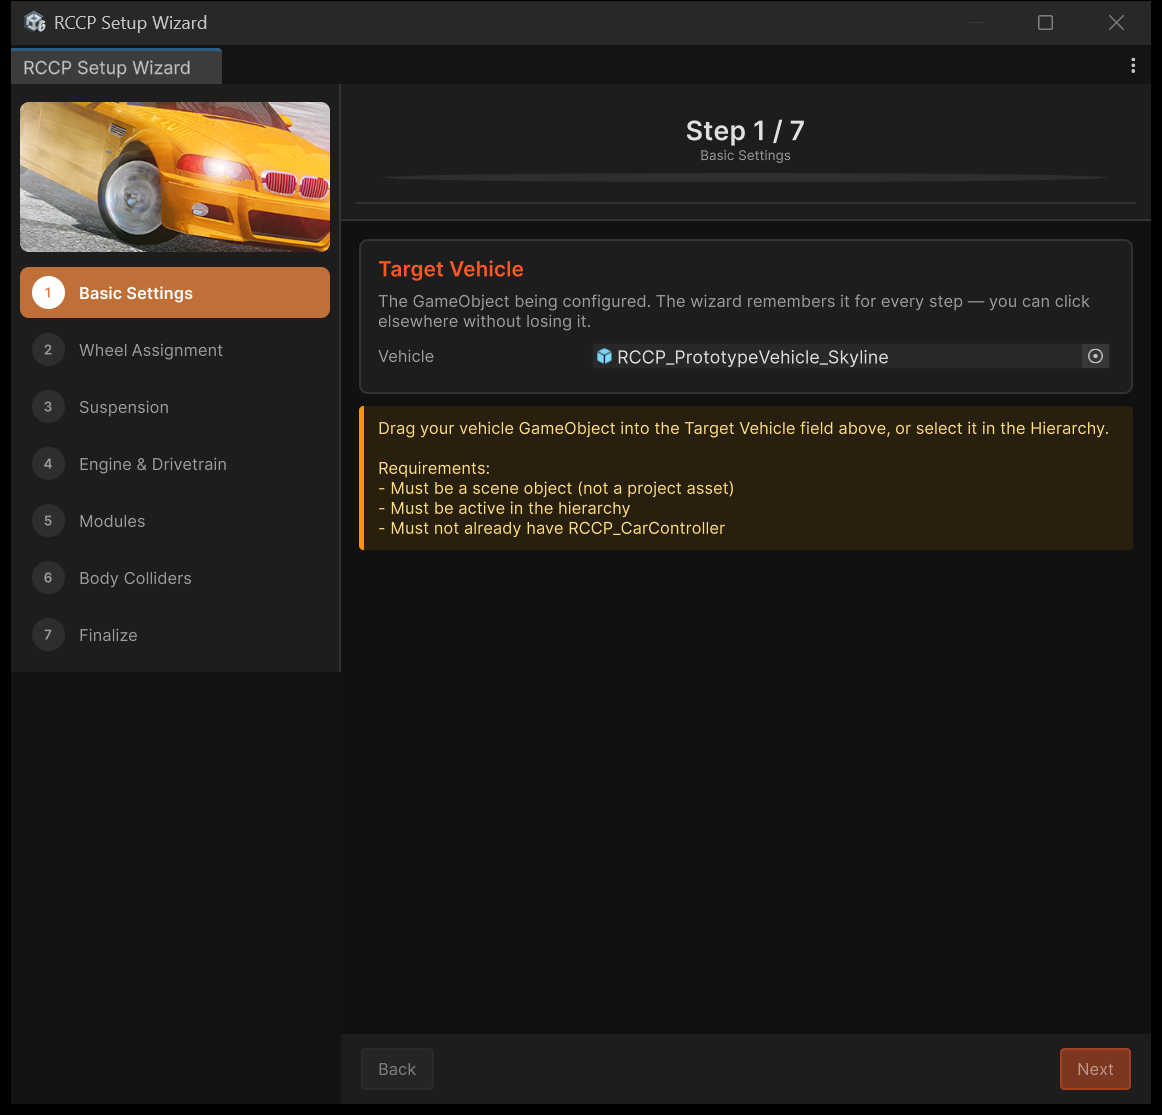
2. Set the basic vehicle information
On Basic Settings:
- Give the vehicle a recognizable name.
- Enter an approximate mass in kilograms. The wizard uses it to suggest suspension and engine values.
- Start with Balanced handling.
- If the model is a prefab instance, use the offered unpack option so the wizard can build its hierarchy. Use the cleanup options for old Rigidbodies and WheelColliders when converting a model from another vehicle setup.
- Leave Fix pivot position on if the model's origin is unsuitable. It creates a new parent for the vehicle; it does not reshape the model.
- Click Next.
Check: the wizard accepts the target and opens Wheel Assignment.
3. Assign the four wheels
The wizard tries to detect the wheels automatically.
- Check all four slots: FL is front left, FR front right, RL rear left, and RR rear right, viewed from the driver's seat.
- If a slot is empty or wrong, drag the correct wheel object from the Hierarchy into it.
- Use Swap L ↔ R if a pair is reversed. Re-detect Wheels runs detection again.
- Start with the Balanced wheel type and leave the substep override alone for now.
- Click Next.
Check: all four slots contain different wheels at the correct corners. Green circles in Scene view identify the assigned wheels.
Detection uses mesh shape, not wheel names. Manual assignment is fine when a detailed wheel or unusual mesh is not detected.
4. Keep the first suspension and engine setup simple
On Suspension, start with the suggested values:
- Suspension Distance is how far the wheel can travel up and down.
- Spring Force holds the vehicle up.
- Damper Force reduces bouncing.
If you went back and changed mass, click Recalculate from Mass.
On Engine & Drivetrain, choose Drive Type:
| Choice | Wheels receiving engine power |
|---|---|
| FWD | Front wheels |
| RWD | Rear wheels |
| AWD | Front and rear wheels |
Keep the suggested torque, RPM and speed values for your first test. RPM means engine revolutions per minute; torque describes how strongly the engine turns the wheels.
Check: no validation warnings remain before you continue. Tune performance after the car can drive.
5. Choose modules and body colliders
A module is one part of the vehicle, such as its audio or lights.
On Modules, keep Inputs for player controls and the starting selection of modules. The required drivetrain modules are added automatically. Optional modules can be changed later.
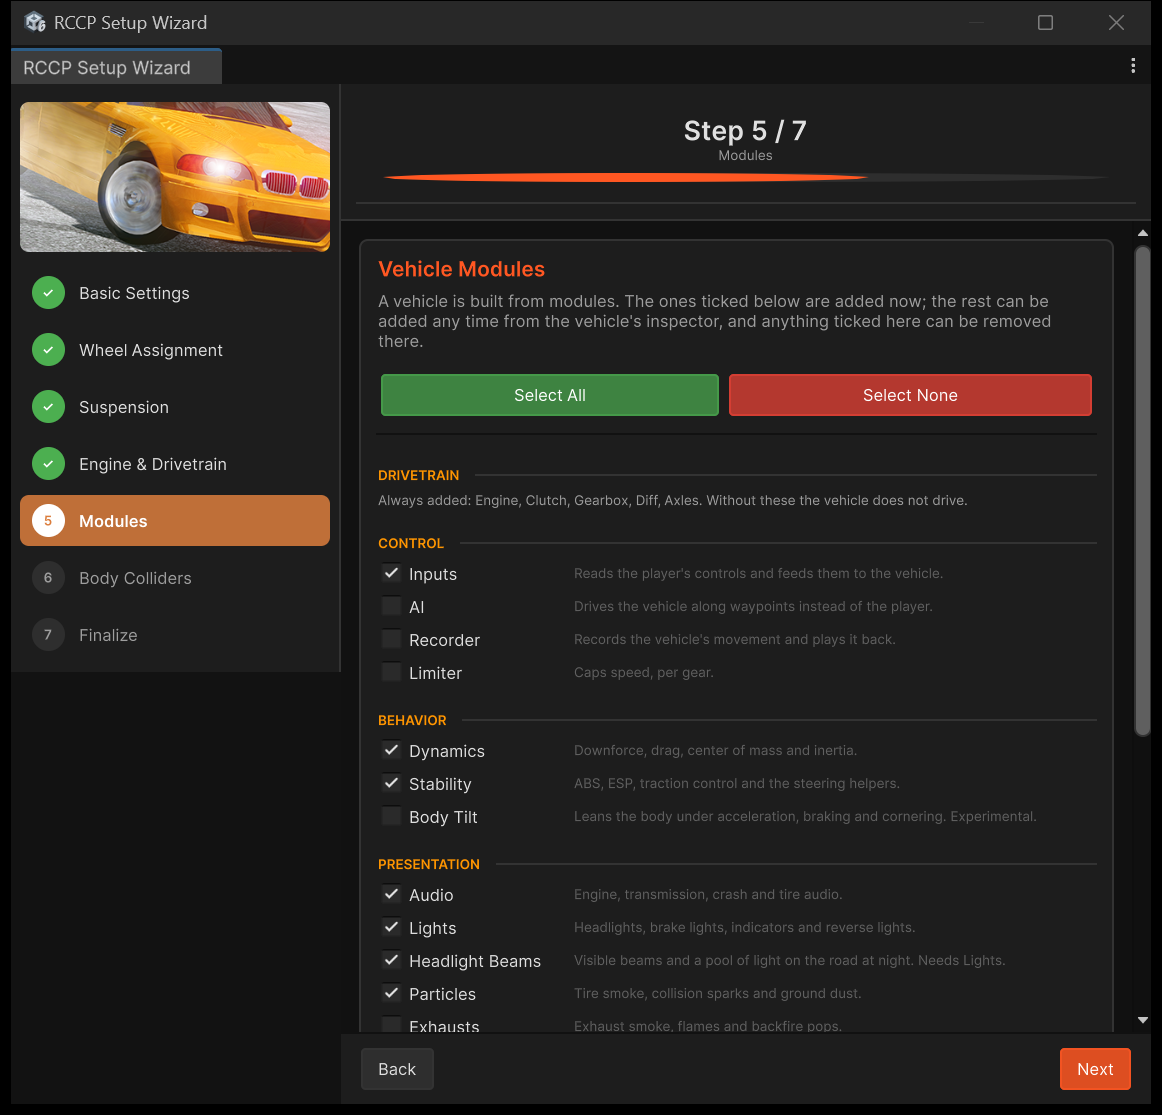
On Body Colliders:
- Check that the body shell and other large solid body parts are selected.
- Exclude the visible wheels; their physics colliders are created separately.
- Leave Convex Colliders on.
A collider is the invisible shape Unity uses for collisions. Wheel colliders support the wheels, but the body still needs its own collider to hit walls and other cars.
Check: at least one suitable body part will receive a collider. If the list is empty, add a suitable body collider before driving.
6. Finish the scene setup
On Finalize:
- Review the summary. Click a summary row to return to that step if needed.
- Use Add RCCP Camera if the scene has none.
- Use Add Ground Plane if it has no ground collider.
- Add the offered RCCP UI Canvas if you want the dashboard.
- Click Finish Setup and read any prompts.
| Prompt | What to do |
|---|---|
| Model Collider Audit | Review the reported collider problems. Use Fix & Continue for unintended trigger, wheel-mesh or non-convex body colliders. |
| Meshes not Readable | Choose Enable Automatically if you want denting. This enables Read/Write on the model assets and reimports them. |
| Scene Not Ready | Return to the scene checks and provide a camera and ground before the driving test. |
Check: the completed vehicle has an RCCP controller on its root, its modules below it, and wheel colliders at the wheel positions.
7. Drive, then save the vehicle
- Position the car above the ground, with its wheels clear of other objects.
- Press Play, click inside the Game view, and test acceleration, steering and braking as in Your First Drive.
- Watch the wheels. Each visible wheel should follow the correct corner and rotate with the car's movement.
- Stop Play Mode before making changes you want to keep.
- Save the scene.
- Drag the completed vehicle root from the Hierarchy into a folder in the Project window to create a prefab: a reusable copy of the finished vehicle.
Check: the car drives and you have a prefab in the Project window. Keep the original imported model as well; the prefab uses its meshes and materials.
If another car receives the controls or camera, follow Scenes and Spawning to select the player vehicle.
Adding and removing modules afterward
Select the vehicle root to see its module cards.
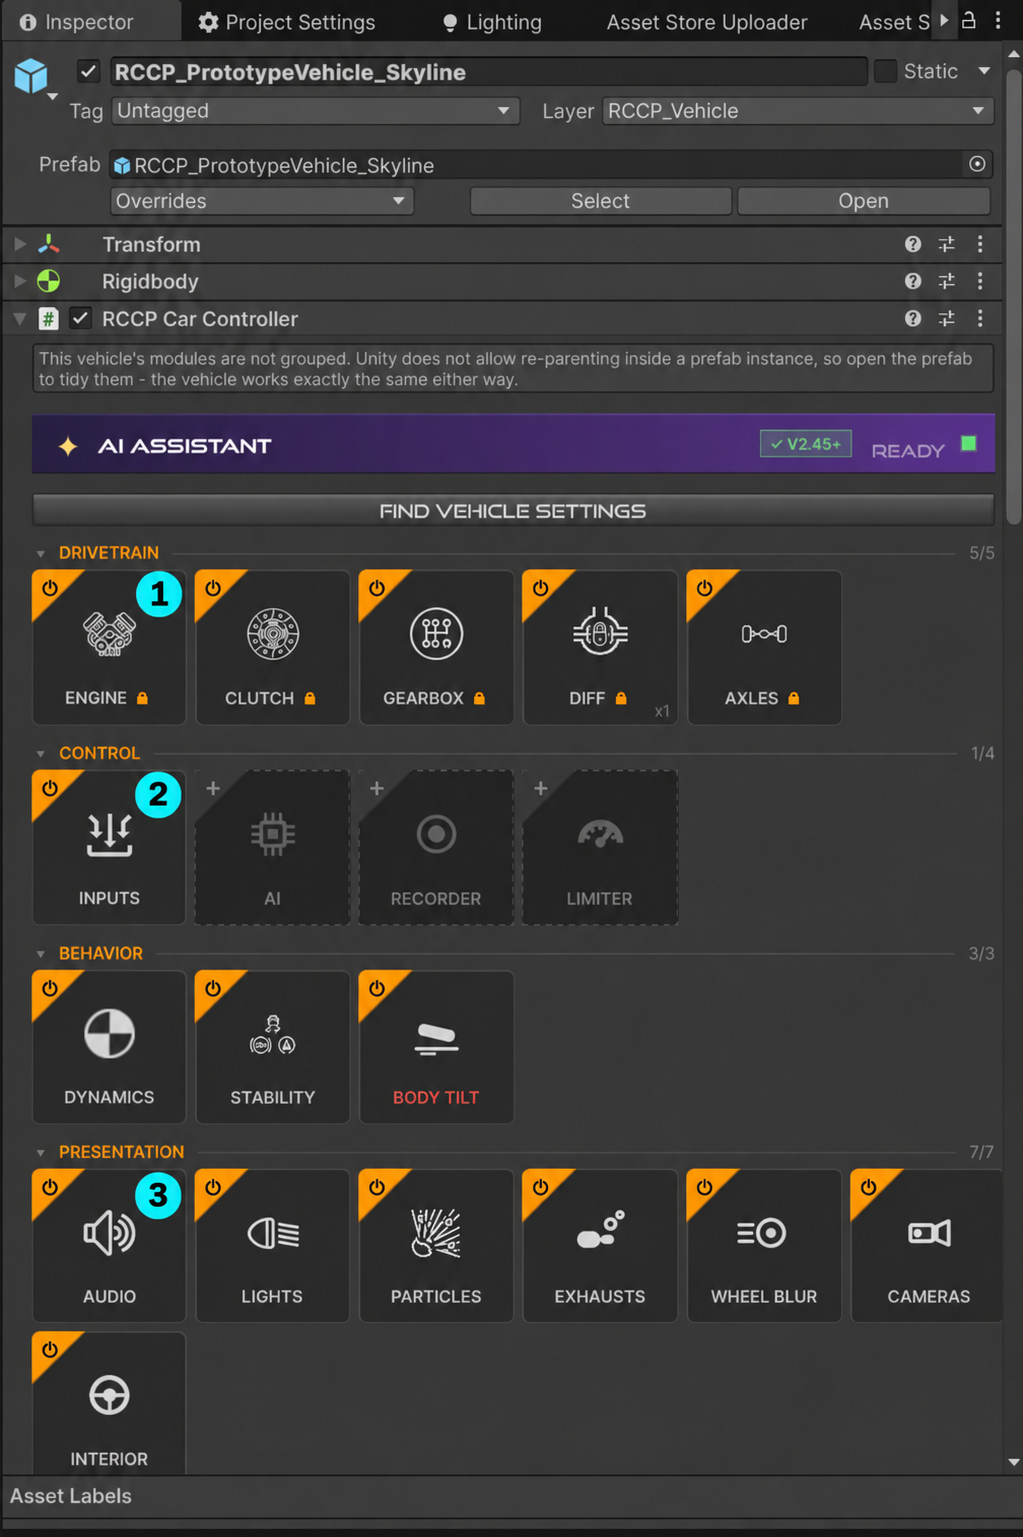
Open the screenshot at full size.
The numbered examples show where to begin: 1 Engine changes engine performance, 2 Inputs changes driving input response, and 3 Audio changes vehicle sounds. Scroll down for the remaining groups. The cards present depend on the modules installed on your car.
| Click | Result |
|---|---|
| + on a dim card | Adds the module |
| The body of an installed card | Selects that module so you can edit it |
| Power symbol | Enables or disables the module |
| × shown on hover | Removes the module |
| Padlocked card | Required module; it cannot be removed here |
The groups are Drivetrain, Control, Behavior, Presentation, Features and Optimization. For example, audio and cameras are under Presentation; damage is under Features.
Diff can represent several differentials. Its menu lets you select the one connected to each axle.
The module bar in the Scene view opens the same cards; see Scene Panels.
Scene Panels
When you select an RCCP vehicle, the Scene view shows its parts and its most-used settings around the car itself, so everyday tuning does not need a trip to the Inspector.
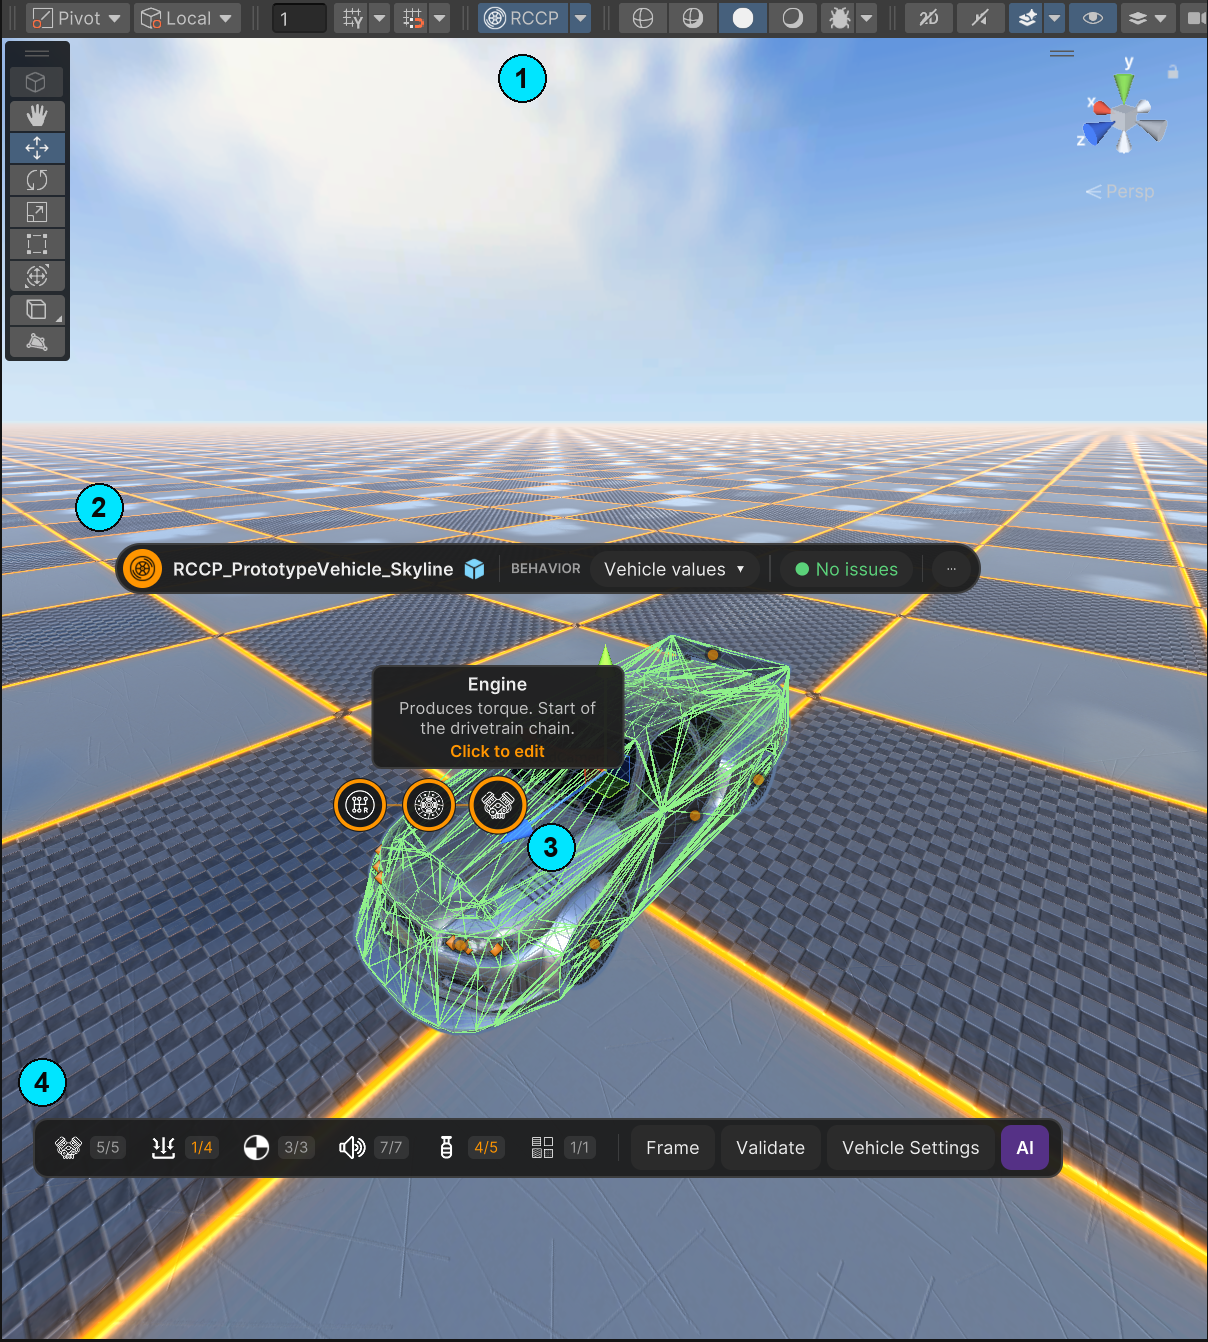
Open the screenshot at full size.
| Part | What it does |
|---|---|
| 1 RCCP button | In the Scene view toolbar. Turns Scene Panels on or off. Its arrow holds Part dots and radials, Open Scene Tools panel and Scene Panels documentation. |
| 2 Vehicle chip | Above the car: its name, its behavior preset and its checks. Click the preset to choose one for this vehicle only. Click the checks to see what needs attention, with a fix where one is available. ⋯ has Frame, Select vehicle root, Open Vehicle Settings, Validate now and, with the AI Assistant installed, Open AI Assistant. |
| 3 Part dots | Faint dots mark the parts you can see: engine, axles, lights, exhausts, damage and customizer. Point at a dot and it turns into that part's item right where it sits, with what the part does. The engine dot also lines up the clutch and the gearbox beside it, in the order the power flows; move along the row to pick one. Click the engine or an axle to edit it here, or any other part to select that module. For what you cannot point at, rest the pointer on the car away from the dots: a radial opens with that area's hidden parts, like the center of mass inside the body or an engine on the far side, each with a hollow dot and a dashed line to where it sits, and a dimmed item with + for each of these parts the car does not have yet. Click + to add it. |
| 4 Module bar | Below the car: the six module groups from the vehicle Inspector, with their counts, then Frame, Validate, Vehicle Settings and, with the AI Assistant installed, AI. Click a group to add, select, switch or remove its modules, exactly as on the module cards. |
Dots and the camera. A dot under the handle of the Move, Rotate, Scale or Transform tool leaves the handle to the tool. A right, middle or Alt drag that starts on a dot still moves the camera, and the mouse wheel still zooms. With the Hand tool, the dots stay out of the way, since that tool only moves the camera.
Quick cards. Clicking the engine or a wheel opens a card beside the car with that module's most-used settings, the same rows Vehicle Settings shows. The engine card also draws the torque curve. A card edit leaves the car exactly as the same edit in the Inspector would, including the final drive ratio when the engine calculates it. The card opens where the Scene view has room, and never over the module bar or the Scene view's own overlays; when room is short, its rows scroll. Press Esc or click × to close the card.
Zooming out. The panels shrink with the car on screen. When the car is small, the dots and radial items get smaller, radial items show their names only on hover, and the module bar keeps only its group icons and counts; ⋯ on the chip has the bar's actions. When the car is tiny, only the chip stays, with Frame to bring the car back.
Several objects selected. Scene Panels follow one vehicle: the one that holds the active object, which is the object you clicked last. Ctrl-click (Cmd-click on macOS) another car to move the panels to it. When the active object is not part of a vehicle, the panels hide, even if other selected objects are cars. When other cars are selected too, the chip shows +N, the number of them; click it and pick a car to move the panels there. The selection stays as it was. A card or handle edit changes only the car the panels are on.
Steering and suspension handles. While an axle card is open, each steered wheel shows its real steering range; the inside wheel turns further than the outside one. Drag the round handle on that range to change Steering angle. Drag the handle on the travel bar beside the wheel to change Rest position on both wheels. Each drag is one Undo step.
Turning it off. Click the RCCP button. The choice is saved for your user account, not in the project. If the button is missing, press the ` key over the Scene view to open its overlay menu and turn on RCCP.
Check: select your vehicle. The chip, the part dots and the module bar appear around it, and pointing at the engine dot turns it into the Engine item. Scene Panels hide in Play Mode and for a disabled vehicle. The dots, radials and handles need the Scene view's Gizmos on; with Gizmos off, the chip and the module bar stay. The dots also step aside while one of the setup wizards is open or the Lights editor's Edit Light Positions is on.
If setup does not work
| What you see | What to check |
|---|---|
| The wizard refuses the model | Select an active scene object in the Hierarchy that is not already inside an RCCP vehicle. |
| A wheel is missed or assigned to the wrong corner | Assign it manually and check the model's forward direction. |
| Wheels appear twice | The body mesh still contains static wheels; remove those in the modeling software. |
| The car falls through the ground | Check both the ground collider and the vehicle's body colliders. |
| The wheels spin but the car barely moves | Check scale, wheel placement and Tuning Recipes. |
| The body will not dent | Enable Read/Write on the source model and follow Damage. |
Optional: setting up by hand
Use manual setup for vehicles the four-wheel wizard cannot describe, such as unusual axle layouts. Add the car controller, then build the drivetrain and other modules using the module cards.
You must also create and position the axles and wheel colliders, assign visible wheels, connect each differential to its axle, and add body colliders. How the Car Drives explains those connections. For a normal four-wheel car, the wizard is the shorter path.
Read next
- Tuning Recipes — fix a specific handling or sound problem.
- How the Car Drives — understand the engine, gears and wheels.
- Assists and Presets — decide whether handling belongs to this car or a shared preset.