Mobile
Goal: drive with on-screen controls, choose a steering style and save a comfortable button layout.
Before you start
Use a scene with a working player car and the current RCCP canvas. UI and HUD explains how to add it. Try the controls in the Editor first, then test touch input and screen layout on your target device.
1. Turn on touch controls
- Stop Play Mode.
- Open Tools > BoneCracker Games > Realistic Car Controller Pro > RCCP Settings.
- In Controls, enable Use mobile controller.
- Select Touch Screen as the Mobile controller type for a first test.
- Press Play. In the Game view, hold the throttle button with the mouse, release it, then try the brake.
Check: the pedals appear and respond. A mouse can test individual buttons; test simultaneous steering and throttle with multiple fingers on the device.
This is a project setting, not automatic device detection. Leaving it enabled also selects on-screen driving controls in a desktop build. Turn it off when returning to keyboard or gamepad driving.
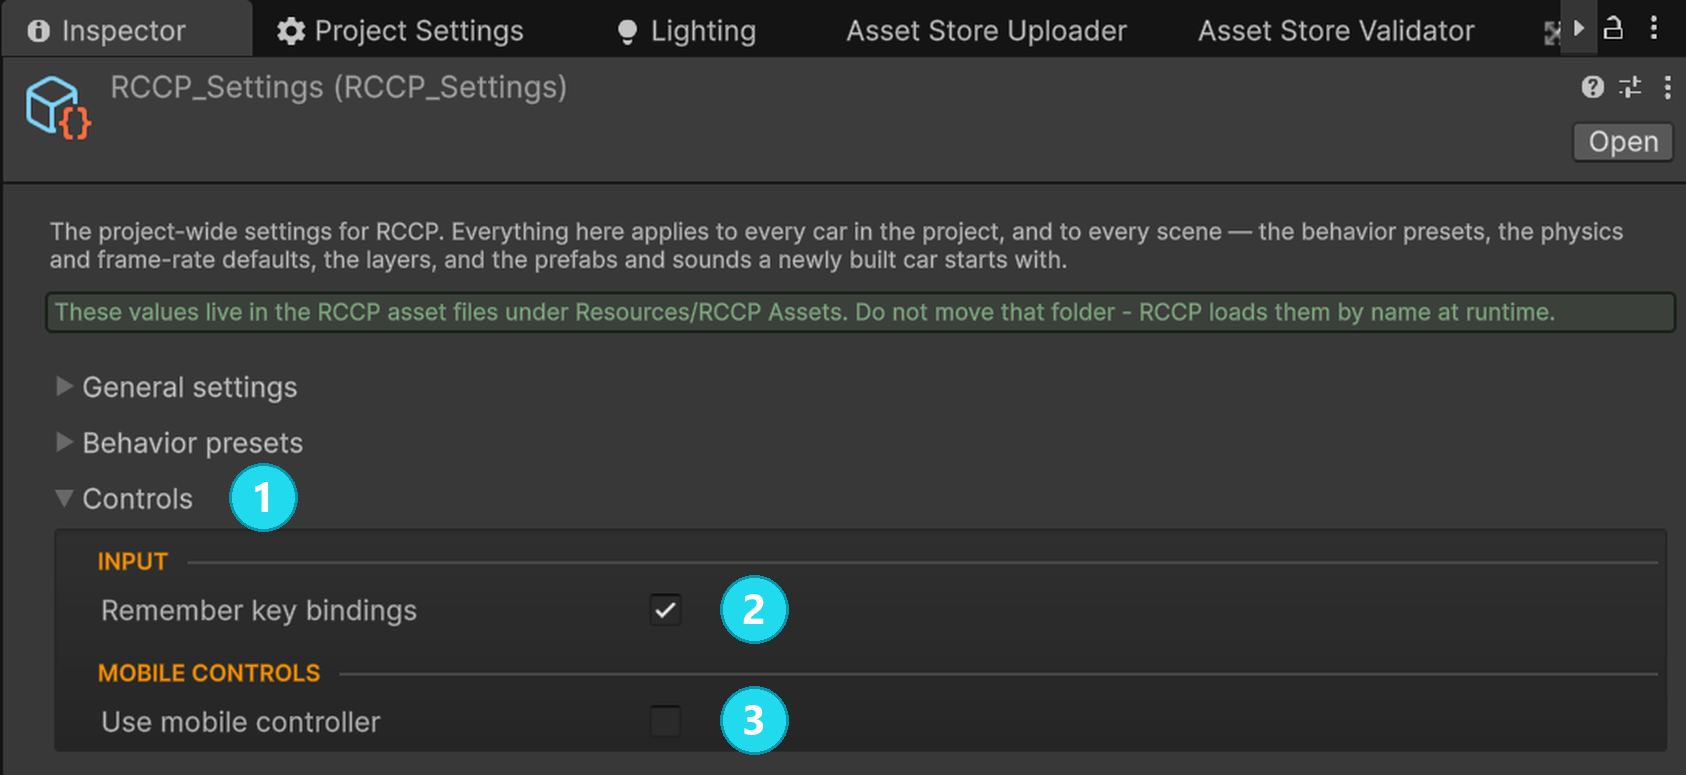
Open the screenshot at full size. 2 Remember key bindings belongs to keyboard/gamepad rebinding. Turning on 3 Use mobile controller reveals the control-style choices described below.
2. Choose how to steer
Stop Play Mode and select a different Mobile controller type, then test again.
| Style | Steering control | Best first check |
|---|---|---|
| Touch Screen | Left and right buttons. | Hold each button and check the steering direction. |
| Steering Wheel | A wheel dragged with a finger. | Turn both ways and release it. |
| Joystick | A thumbstick. | Drag left and right, then release. |
| Gyro | Device tilt, read from its accelerometer. | Test on a device with an accelerometer. |
All styles use the same throttle, brake, handbrake and nitrous buttons. RCCP shows the steering controls for the selected style. The nitrous button appears when the car has nitrous; holding it also applies throttle.
For Gyro, adjust Tilt sensitivity: lower it if small tilts steer too strongly, or raise it if steering needs too much movement. RCCP enables the available accelerometer when this style is selected.
3. Let the player move the buttons
The current canvas includes a layout editor:
- During Play Mode, open the in-game settings panel.
- Select Edit Controls.
- Drag a pedal to a comfortable position.
- Select Done.
- Restart the game and check the position. Use Reset Controls to return to the original arrangement.
Check: the pedal stays where you put it, and dragging it in the layout editor does not accelerate the car. RCCP suspends driving controls during editing and restores the car's previous control state afterward.
Unavailable buttons, such as nitrous on a car without it, are shown while editing so the player can place them in advance. Only the steering controls for the current style are shown. Finish editing before opening other settings panels.
Saving is different here: a completed layout edit is saved in PlayerPrefs, Unity's small local settings store. It can survive leaving Play Mode. Ordinary changes to scene objects made during Play Mode normally do not.
4. Check the layout on a device
- Build and run on your target phone or tablet.
- Hold steering and throttle together, then test braking and handbrake.
- Check every supported orientation and screen shape.
- Confirm that notches and gesture bars leave enough room for your buttons.
Check: all needed controls remain visible, reachable and responsive. Editor mouse testing alone cannot confirm multi-touch, tilt or device safe areas.
If touch controls do not work
| What you see | What to check |
|---|---|
| No pedals | Enable Use mobile controller and add the RCCP UI Canvas. Check whether the player car is usable; UI and HUD explains visibility. |
| Pedals appear but the car does not move | Check the engine and registered player vehicle. Follow Your First Drive and Scenes and Spawning. |
| No nitrous button | The vehicle needs the nitrous addon. Moving the button does not enable the feature. |
| Edit Controls or Reset Controls is unavailable | Enable on-screen controls first. |
| Rebind Inputs is unavailable | Keyboard/gamepad rebinding is disabled while on-screen controls are selected. |
| A manual canvas edit is ignored | The player's saved layout can replace the authored positions. Use Reset Controls for that saved layout. |
| Controls return after you hide one manually | Change the control style; RCCP manages which steering controls are visible. |
Optional: build your own mobile canvas
Keep movable controls as direct children of the controls container. A direct child sits immediately below that container in the Hierarchy. The layout manager recognizes children with RCCP touch button, joystick or steering-wheel components; it does not discover controls nested deeper.
Add RCCP UI Mobile Layout Manager through Add Component > BoneCracker Games > Realistic Car Controller Pro > UI > Mobile, then assign:
| Field | Purpose |
|---|---|
| Controls Container | The RectTransform containing the movable controls. |
| Editor Overlay | The panel shown while arranging them. |
| Hide While Editing | Other HUD objects to hide so their buttons cannot be pressed accidentally. |
| Edge Padding | Space to keep between controls and the container edges, in canvas units. |
Positions are saved relative to the container and anchored toward the nearest edge or corner when a drag ends. Test your custom layout at different sizes. If you change the supplied arrangement after players have saved layouts, increase the layout manager script's LayoutVersion constant so older layouts are discarded. For custom buttons or code, the manager exposes EnterEditMode(), ExitEditMode(), CancelEditMode(), SaveLayout(), LoadLayout() and RestoreDefaults().
Optional: adjust the safe area
The current canvas includes RCCP UI Mobile Safe Area on the controls rectangle. It moves the rectangle inside the usable area reported by the device.
For custom UI, add that component from Add Component > BoneCracker Games > Realistic Car Controller Pro > UI > Mobile to a rectangle stretched across its parent, then place the protected controls beneath it.
| Setting | Purpose |
|---|---|
| Apply Horizontal | Respect left and right safe-area edges. |
| Apply Vertical | Respect top and bottom safe-area edges. |
| Extra Padding | Add an inset beyond the device's safe area, in screen pixels. |
The component updates when screen dimensions or the reported safe area change. Your authored offsets are applied as well, so avoid adding the same notch allowance twice.
Optional: platform prompts
When you switch the build target to Android or iOS, RCCP can offer to enable on-screen controls. It also warns before Play when the setting and build target disagree. These prompts can change the saved project setting; they do not add a canvas.
After accepting a prompt, check Use mobile controller before testing a different platform or sharing the project.
Next step
- Performance and Platforms — prepare the rest of a mobile build.
- Controls — return to keyboard, gamepad or steering-wheel input.
- Field Reference — detailed mobile settings.