Scenes and Spawning
Goal: choose the car the player drives, then learn how to create or move a car during the game.
The scene setup below uses the Inspector. The optional spawning and checkpoint examples require a small C# script.
Before you start
Have one working RCCP vehicle in your scene. A scene contains the objects currently loaded in Unity; a prefab is a reusable object saved in the Project window. Spawning means creating an instance of a prefab while the game runs.
Stop Play Mode before editing the scene, and save changes before testing.
1. Add the scene objects
Use Tools > BoneCracker Games > Realistic Car Controller Pro > Add to Scene:
| Item | Why you need it |
|---|---|
| Scene Manager | Tracks RCCP vehicles and the active player vehicle. Reuse the existing one if already present. |
| RCCP Camera | Follows the player car. See Cameras. |
| UI Canvas | Shows the dashboard and menus. See UI and HUD. |
The scene manager is normally created automatically when a loaded scene contains a vehicle. Auto-Create Scene Manager in the same menu controls that editor convenience. RCCP also creates a manager at runtime if needed; removing it is not a way to disable vehicle management.
Check: the Hierarchy has one scene manager, a camera and a canvas. Save and press Play.
2. Check which car is the player
Select RCCP_SceneManager in the Hierarchy and inspect Active Player Vehicle while the game runs.
With Register Last Vehicle As Player enabled, the most recently enabled eligible car takes the player slot. That slot tells RCCP which car the camera, dashboard and player actions belong to. It can be surprising when a scene contains several cars.
Check: Active Player Vehicle references the car you intend to drive. If it changes when another car appears, choose the player explicitly as shown below. AI vehicles join the vehicle list through a separate registration path and do not automatically take this slot.
The scene manager's camera, canvas, vehicle-list and terrain fields are live information. Use them to diagnose missing scene objects; they are not a list of prefabs to spawn.
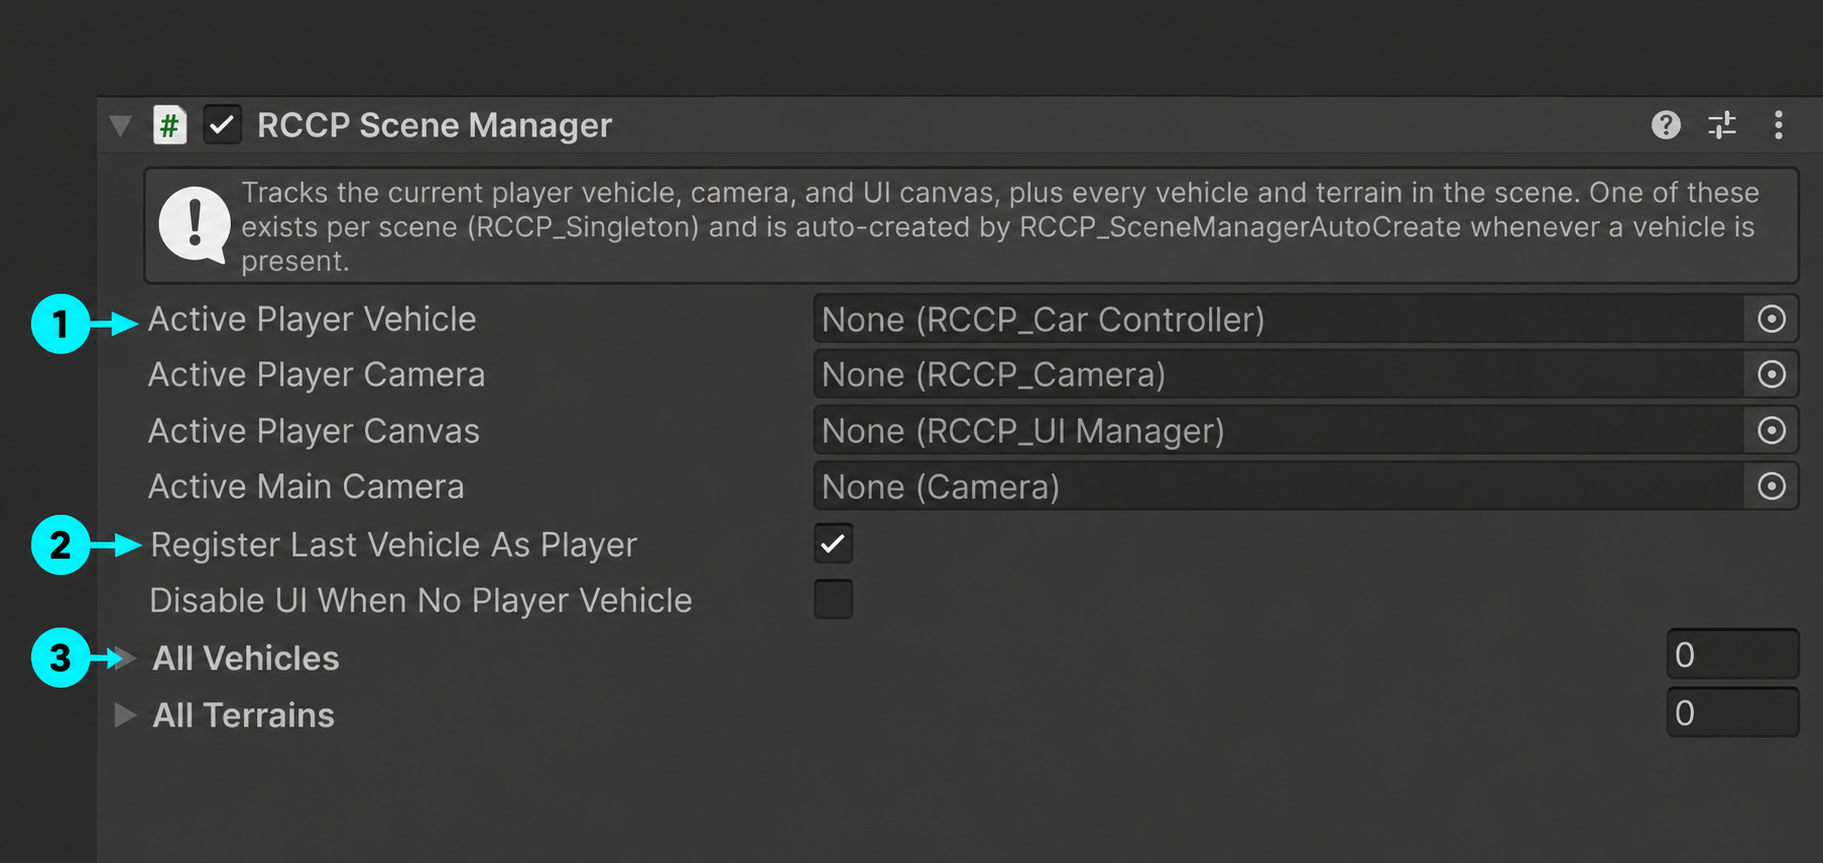
Open the screenshot at full size. 1 Check the player reference during Play Mode. 2 This switch lets the latest eligible vehicle become the player. 3 Expand the list to inspect registered vehicles. This capture was taken with Play Mode stopped, so the references are empty and the counts are zero. Use the running scene to check registration.
3. Choose a car explicitly with a script
For a scene with several cars, stop Play Mode and turn off Register Last Vehicle As Player. Create a script named ChoosePlayerCar.cs, paste this code, and attach it to an empty scene object:
using UnityEngine;

public class ChoosePlayerCar : MonoBehaviour {
    public RCCP_CarController playerCar;

    private void Start() {
        if (playerCar != null)
            RCCP.RegisterPlayerVehicle(playerCar, true, true);
    }
}
Drag your scene's vehicle root into Player Car on this component, save and press Play.
Check: that car becomes Active Player Vehicle, receives controls and starts its engine. The two true arguments enable controls and the engine.
| Call | When to use it |
|---|---|
RCCP.RegisterPlayerVehicle(vehicle) |
Select a player car without changing its control or engine state. |
RCCP.RegisterPlayerVehicle(vehicle, isControllable) |
Also set whether it can be driven. |
RCCP.RegisterPlayerVehicle(vehicle, isControllable, engineState) |
Also start or stop its engine. |
RCCP.DeRegisterPlayerVehicle() |
Clear the player slot, disable the old player's controls and release the camera target. |
Use these calls for car selection rather than assigning the scene manager's field directly. Registration makes the intended control and engine state explicit.
Optional: spawn a car
Add these fields and method inside your own MonoBehaviour script:
public RCCP_CarController carPrefab;
public Transform spawnPoint;

public void SpawnPlayerCar() {
    if (carPrefab == null || spawnPoint == null)
        return;

    RCCP.SpawnRCC(carPrefab, spawnPoint.position, spawnPoint.rotation,
        true, true, true);
}
Assign a vehicle prefab from the Project window to Car Prefab. Create an empty scene object where the vehicle should appear and assign its Transform to Spawn Point. Leave room for the car above the road and away from other colliders. Call SpawnPlayerCar() from your game flow or a UI button's On Click () event.
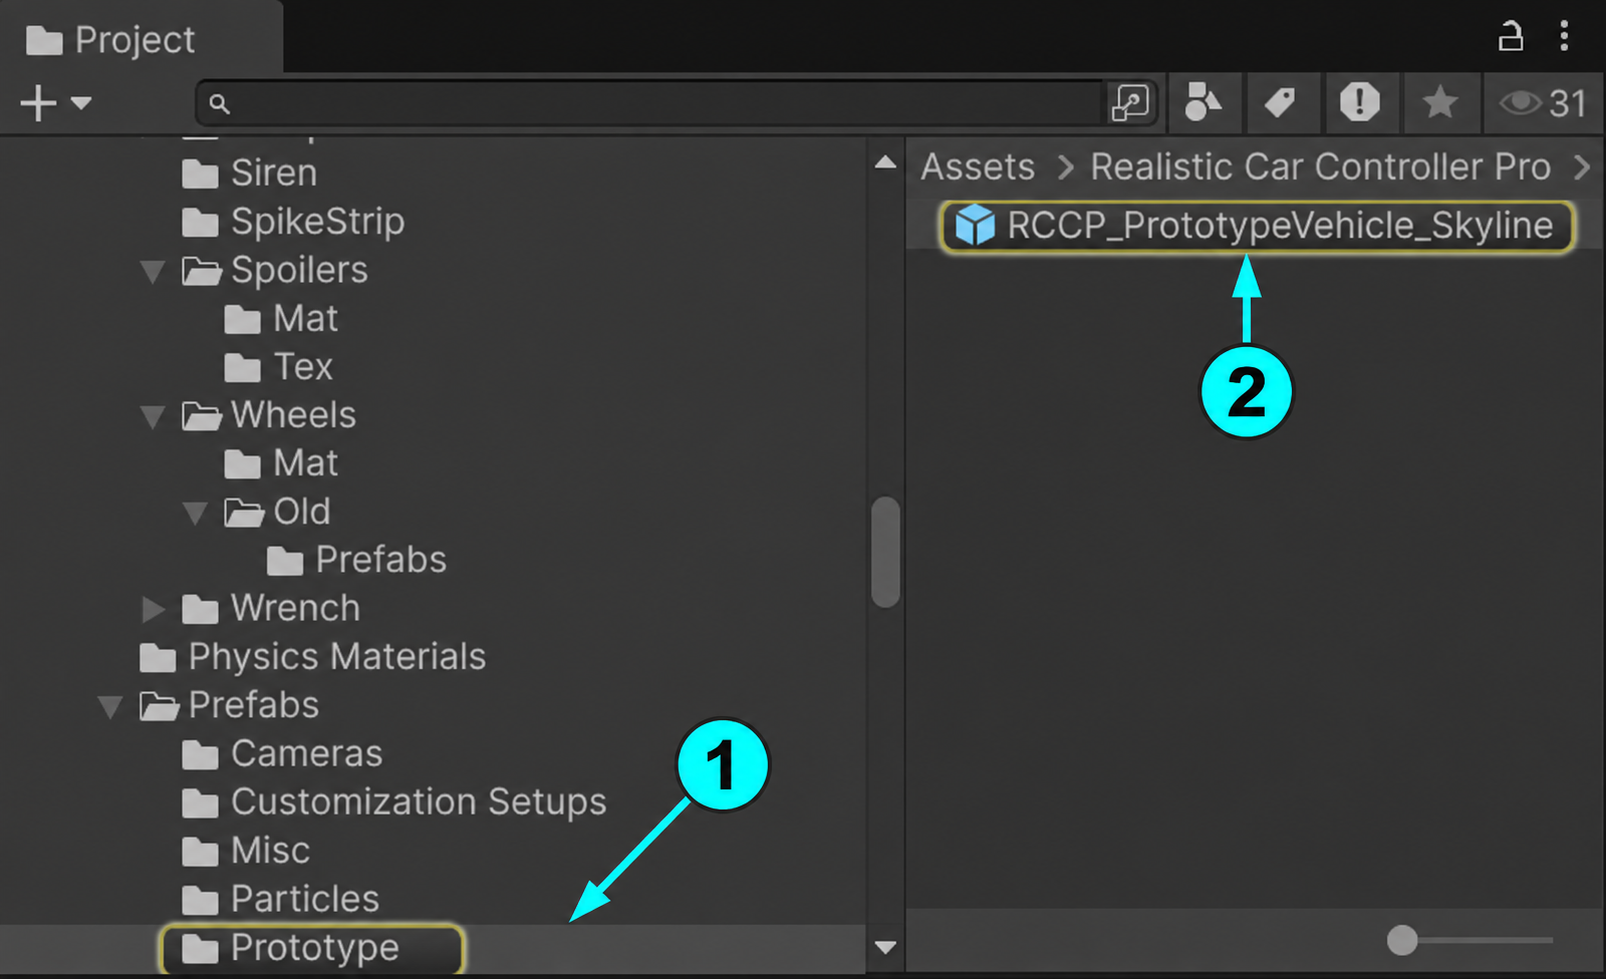
Open the screenshot at full size. 1 This example is in Assets/Realistic Car Controller Pro/Prefabs/Prototype. 2 Drag the vehicle prefab from this Project window into your script's Car Prefab field. Spawn Point is a different reference: assign the empty scene object's Transform from the Hierarchy. You can use your own working RCCP vehicle prefab instead.
The final three arguments mean register as player, enable controls, and run the engine. SpawnRCC returns the new RCCP_CarController if you need to keep it in a variable.
Check: one call creates one new car at the spawn point. This call does not remove an older car; decide when your game should remove or reuse it.
For a background vehicle, pass false for register as player. That instance is excluded from automatic player registration, so it cannot unexpectedly take the camera. Explicit registration remains available if the player should later enter it.
Optional: return to a checkpoint
Use RCCP.Transport to move a vehicle. It handles the vehicle's physics position and smoothing together.
public Transform respawnPoint;

public void Respawn() {
    if (respawnPoint != null)
        RCCP.Transport(respawnPoint.position, respawnPoint.rotation);
}
Assign the checkpoint object to Respawn Point and call Respawn() from your restart flow or UI button.
| Call | Result |
|---|---|
RCCP.Transport(position, rotation) |
Move the current player car and stop it. Does nothing if there is no player car. |
RCCP.Transport(vehicle, position, rotation) |
Move and stop a specific car. |
RCCP.Transport(vehicle, position, rotation, false) |
Move a specific car while preserving its velocity. |
Check: the car appears at the checkpoint without sliding across the gap. The stopping forms clear speed, spin and drive torque; a connected trailer is moved with the vehicle.
Moving only the Transform leaves existing motion behind. Unity's MovePosition also follows a different physics timing contract. Use Transport for an immediate RCCP teleport or respawn.
If scene setup does not work
| What happens | What to check |
|---|---|
| Another car takes the camera | Check Register Last Vehicle As Player and how the extra car is spawned. |
| A script or button does nothing | Assign its vehicle and Transform fields. Check the first red Console error. |
| A respawn button does nothing | The player-targeting Transport overload needs an active player vehicle. |
| Dashboard readouts stay visible with no usable car | Enable Disable UI When No Player Vehicle and use the modern canvas's Hud Roots setup. This hides driving widgets, not the entire canvas. |
| Terrain layers do not change tire grip | Configure the terrain's material and layer mapping in Surfaces and Effects. Terrain collection alone does not assign surfaces. |
Optional: settings applied at scene startup
The scene manager applies RCCP Settings for physics timing and frame-rate limits, creates enabled tuning overlays and loads saved input bindings. It also gathers active terrain data. Review Performance and Platforms before changing timing settings, and Controls for binding persistence.
Next step
- AI Vehicles — make other vehicles drive themselves.
- Demo Content — try scenes with car selection and spawning already connected.
- Public API — integrate player-change events and other calls.