UI and HUD
Goal: add RCCP's dashboard to your scene, check its readouts, then change its appearance.
UI means user interface: the buttons and menus on screen. HUD means heads-up display: the speed, gear and other information shown while driving. A Unity Canvas holds these elements.
Before you start
Use a scene with a working player car and camera. Complete Installation, including the TextMesh Pro resources used for text. Stop Play Mode before changing the scene.
1. Add the interface
- Open Tools > BoneCracker Games > Realistic Car Controller Pro > Add to Scene > UI Canvas.
- Save the scene.
- Press Play and drive the player car.
Check: speed, engine revs and gear respond to the car. RCCP connects the included canvas to the registered player vehicle through its scene manager. If you already have a canvas, the menu selects it instead of creating another.
If the dashboard follows the wrong car, use Scenes and Spawning to choose the player vehicle.
2. Read the dashboard
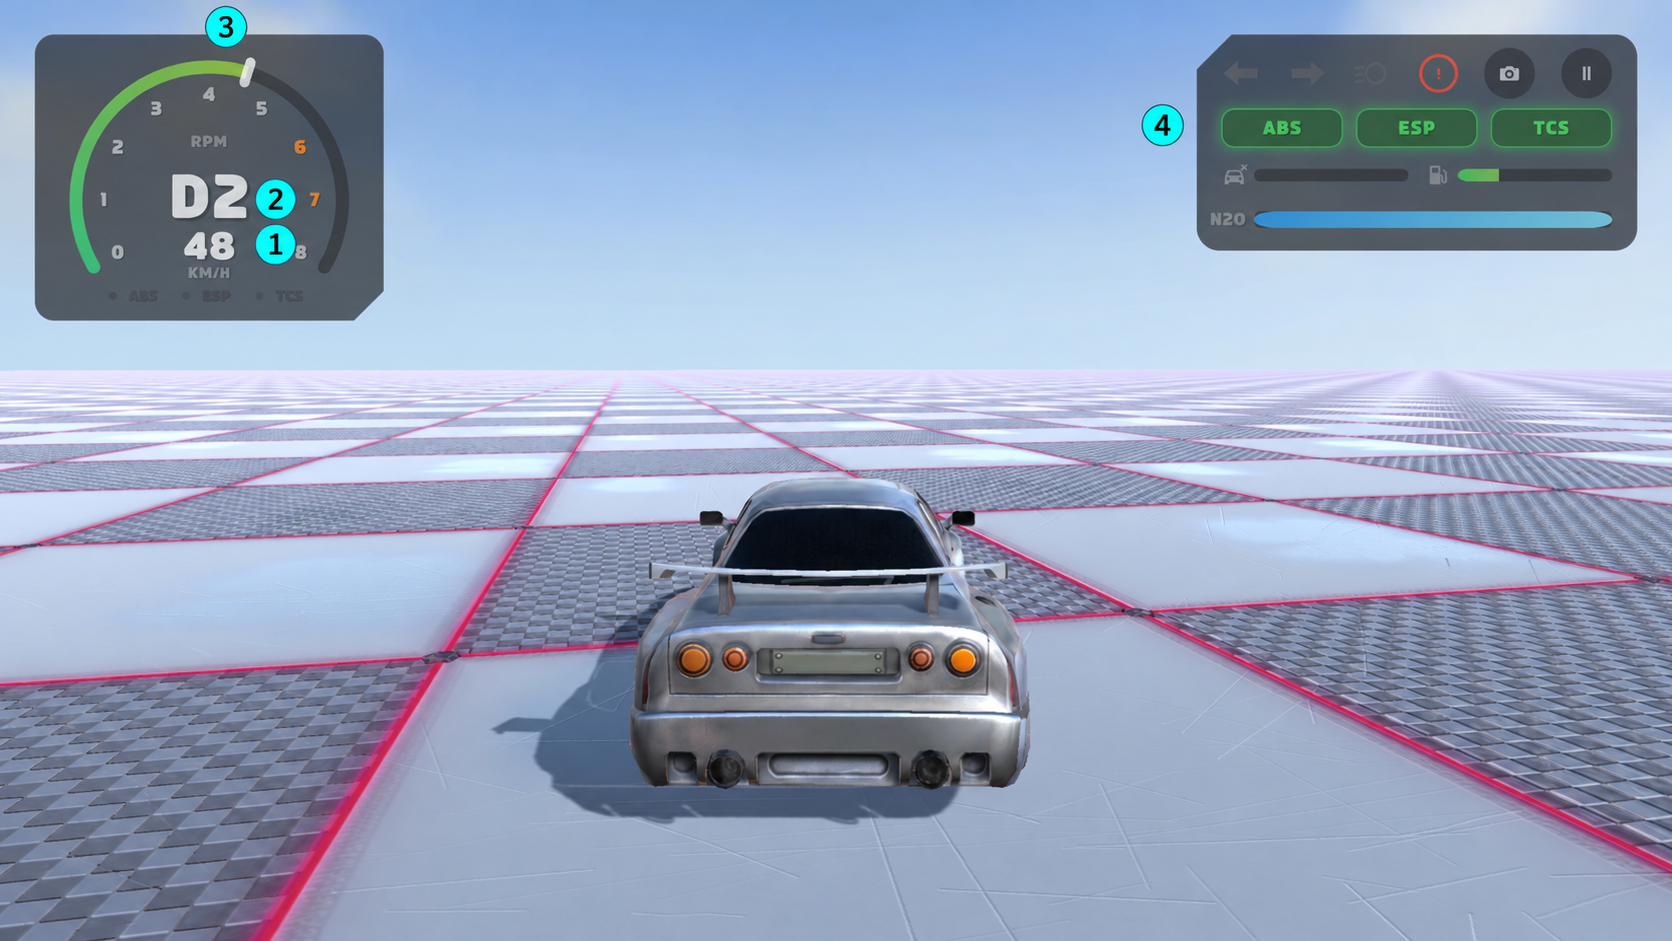
Open the screenshot at full size. In this example, 1 reads 48 km/h and 2 shows D2, a forward driving gear. 3 marks the rev counter. 4 groups lights, assist controls, damage, fuel and nitrous; its green assist buttons are separate from the intervention indicators below the rev counter.
| Readout | What it tells you |
|---|---|
| Speed and unit | How fast the car is traveling. Show speed in mph in RCCP Settings changes the display unit. |
| Rev counter | Engine speed in RPM: revolutions per minute. |
| Gear | The selected gear, including neutral and reverse. Available gear buttons depend on the transmission. |
| ABS, ESP and TCS | Flash when an assist is intervening. Assists and Presets explains each one. |
| Lamp icons | The current headlight and indicator states. |
| Damage | Overall vehicle damage. |
| Fuel and nitrous | Remaining amounts when the vehicle has those features. |
| Record and replay indicators | Whether recording or playback is running. |
Fuel and nitrous read empty on a car without those modules. You can hide those widgets in your own canvas if your game does not use them.
3. Choose a gauge style
Open the in-game settings panel and try a gauge style:
| Style | Appearance |
|---|---|
| Radial | Circular arc. |
| Analog | Traditional dial and needle. |
| Digital | Bar and numbers. |
| Minimal | Compact readout. |
Check: the gauge changes style and still follows the engine. The selected style is saved for the next session.
On the RCCP UI Modern Dashboard component, Auto Max Rpm lets the dial follow the current car's rev limit. With it off, Max Rpm sets the dial's limit. Check those settings if the needle and printed numbers disagree. Radial Ticks and Analog Ticks normally find the label objects automatically; assign them explicitly if you reorganize those labels.
4. Save your own canvas
- Stop Play Mode.
- Make a separate copy of the canvas prefab in your own project folder. A prefab is a reusable saved object.
- Edit that copy's graphics and layout, keeping the existing components and their references.
- Open Tools > BoneCracker Games > Realistic Car Controller Pro > RCCP Settings and assign your copy to Dashboard canvas.
- In a new scene, use Add to Scene > UI Canvas to add your version. Replace existing scene canvases separately if needed.
Check: a newly added canvas uses your copy. This setting chooses what the menu creates; it does not replace canvases already in scenes.
If the interface is blank or incomplete
| What you see | What to check |
|---|---|
| Missing text | Import TMP Essential Resources as described in Installation. |
| White or missing graphics | Check the Sprite Atlas setting below. |
| Readouts do not follow a car | Check the scene manager's Active Player Vehicle. |
| Settings will not open during touch-layout editing | Finish the layout editor with Done first. |
| An old customized canvas lacks new features | Compare it with the current RCCP_Canvas prefab; see the older-canvas notes below. |
Check Sprite Atlas mode
The modern UI uses a Sprite Atlas V2: Unity packs its small images into a shared texture. If the project is configured for an older atlas mode, those graphics can be missing.
- Stop Play Mode and open Edit > Project Settings > Editor.
- Under Sprite Atlas, set Mode to Sprite Atlas V2 - Enabled.
- Wait for Unity to finish reimporting, then test the canvas again.
This affects the whole project. If you use older atlases elsewhere, review their conversion too. Missing graphics can have other causes, so also check the affected Image component's sprite reference.
Optional: hide driving readouts when no car is usable
Enable Disable UI When No Player Vehicle on RCCP_SceneManager. The modern dashboard then hides its Hud Roots when the player car is missing, inactive, disabled or not controllable. Mobile controls follow the same condition. Menus stay available.
Put your own driving readouts in Hud Roots on the modern dashboard. Keep settings and customization panel roots out of that list. This setting does not disable the entire Canvas object; a custom or older canvas needs its own visibility handling.
Optional: make a UI theme
A theme replaces sprites, the images used by UI graphics. It does not rearrange the layout or change the button behavior.
- Create Assets > Create > BoneCracker Games > Realistic Car Controller Pro > UI > UI Theme.
- Set Theme Name to the name the player should see.
- Prepare your replacement sprites. Keep the original dimensions and border settings if you want the same stretching behavior.
- Add Sprite Pairs. Original must be the exact sprite used by the canvas; Themed is its replacement.
- Add the theme to Themes on the canvas's RCCP UI Theme Applier. If you use a theme dropdown, add the corresponding option.
Check: choose your theme, then return to the default. Unlisted sprites keep their original look. If nothing changes, compare the Original reference with the sprite on the affected Image component.
Theme selection 0 means the default appearance; your themes start at 1. Saved choices use these positions. Append new themes rather than reordering the existing list. Each change restores the original sprites before applying replacements, so themes do not build on each other.
Optional: keep an older canvas
The current RCCP_Canvas and the older RCCP_Canvas_Old.prefab are in Prefabs/UI/ under the RCCP folder. Changes made to the older prefab are not automatically transferred to the current one.
Keep your old customized copy by assigning it to Dashboard canvas, or rebuild your changes on a copy of the current prefab to use gauge styles, themes and movable touch controls. The modern dashboard inherits RCCP_UIManager, so that base type remains available to integrations.
Next step
- Mobile — enable touch controls and arrange them.
- Customization — connect paint and upgrade options.
- Replay and Recording — add the replay interface.
- Field Reference — individual UI settings.