Lights
Goal: add working headlights, brake lights and indicators, then make their lenses glow.
Before you start
Use a working RCCP vehicle and stop Play Mode. A lamp is one individual light; the Lights module manages all the lamps on the car.
1. Create the lamps
- Select the vehicle root in the Hierarchy.
- Open Tools > BoneCracker Games > Realistic Car Controller Pro > Vehicle Setup > Light Setup.
- Under Light Types, choose the lamps you need.
- Leave Show Placement Handles In Scene enabled and move the preview handles to the model's lamp positions.
- Click Create Lights.
Check: lamps appear under the vehicle, and the Lights module exists.
Run this creation step once. If the car already has lamps, edit those lamps; running the wizard again creates duplicates.
The wizard estimates positions from the vehicle's bounds. Check the result from the front, rear and side rather than assuming it fits your model.
2. Set brightness and glowing lenses
- Select an individual lamp in the Hierarchy.
- Check its Light function, such as low beam, brake light or left indicator.
- Set Brightness on the RCCP Light component.
- Drag the model's lens mesh renderer into Lens renderer.
- If that mesh uses several materials, choose Lens material slot. Slots count from zero.
- Set Lens color.
Check: when the lamp lights, its lens glows as well as casting light.
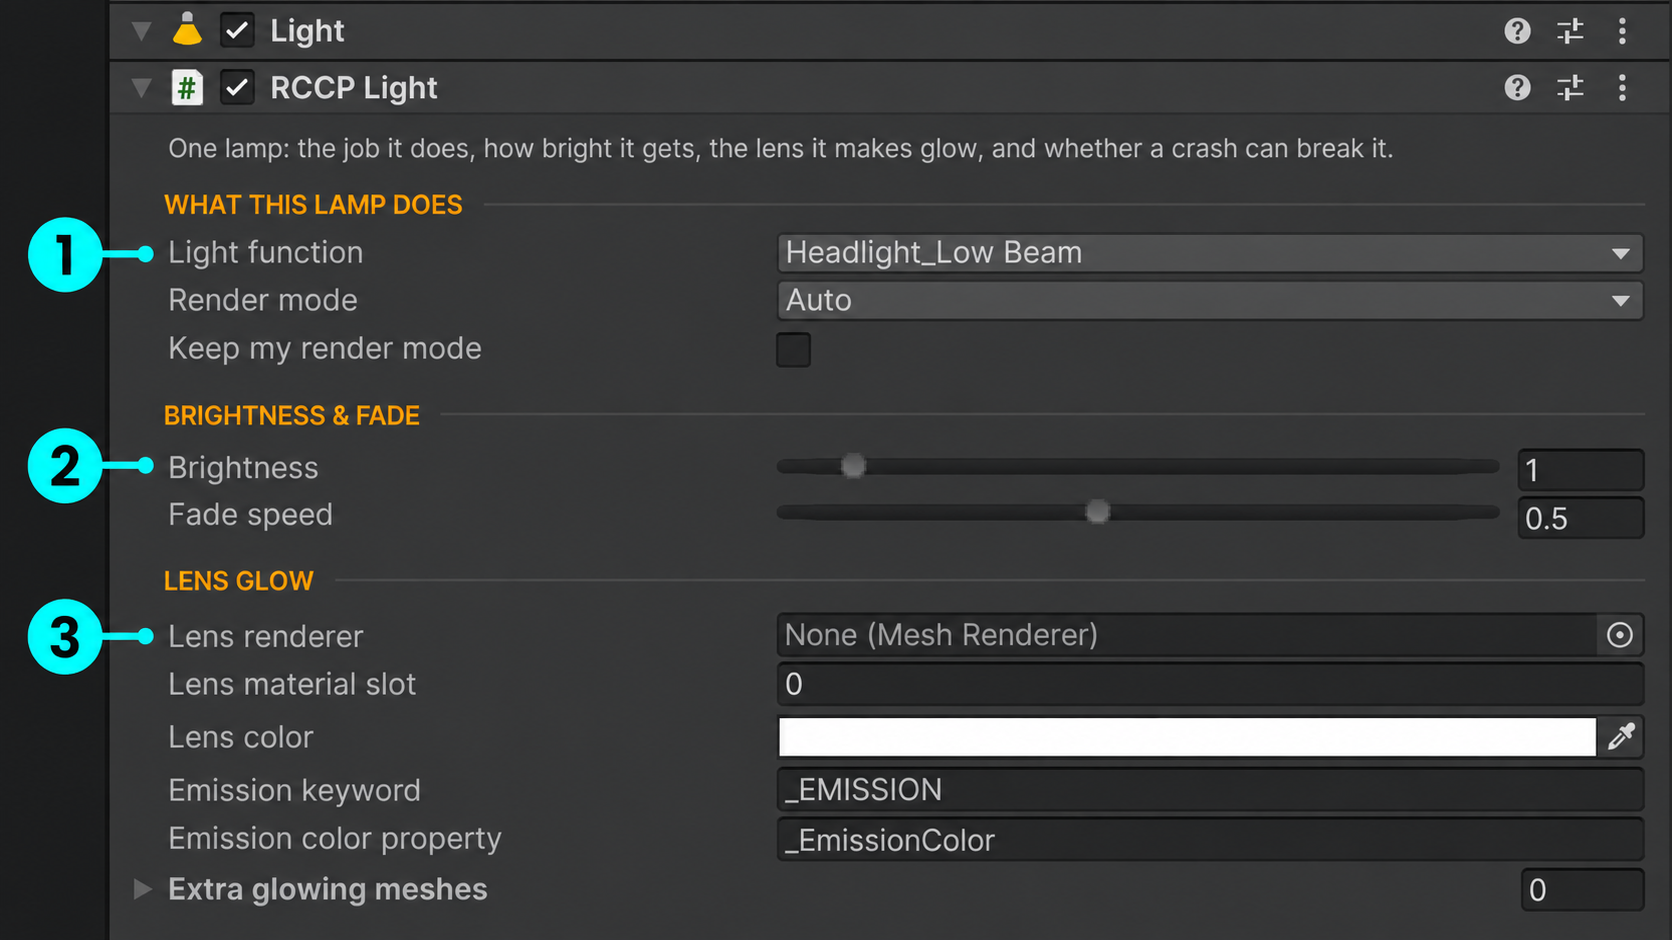
Open the screenshot at full size. 1 Choose the lamp's job. 2 Adjust its brightness here. 3 Assign the mesh that should glow, then choose its material slot below. This example has None in Lens renderer; assign your lens mesh to complete the glow setup.
If the model has no suitable lens mesh, Create LightBox creates a small glowing plate and assigns it. Position and size the plate to fit the model. Duplicate To Other Side mirrors a finished lamp and swaps left/right indicator roles.
Making a lamp look right
| Setting | Controls |
|---|---|
| Brightness | How bright the lamp becomes when on |
| Fade speed | How quickly it lights and fades |
| Lens renderer | Which visible mesh glows |
| Lens material slot | Which material on that mesh receives the glow |
| Lens color | Glow color |
| Extra glowing meshes | Additional meshes that light with the lamp |
Edit Brightness on RCCP Light, not Unity Light's Intensity. RCCP drives the Unity Light value during operation. The Light Setup wizard's intensity preview is also not the final RCCP brightness setting.
3. Test the controls
Press Play, click inside the Game view and try the standard keyboard bindings:
| Key or action | Expected result |
|---|---|
| L | Low beams switch on or off |
| K | High beams switch on or off |
| Q / E | Left / right indicators blink |
| Z | Hazard lights blink |
| Brake while driving | Brake lamps light |
| Engage reverse | Reverse lamps light |
Check: each function lights the correct lamps. Stop Play Mode and save the scene after adjusting the setup.
Controls explains rebinding. If testing while editing, the Lights module also provides Low beam on, High beam on and Hazards on switches.
What each lamp does
Light function chooses when a lamp lights. A tail lamp follows the low beams; a brake lamp follows the brake pedal.
When a car has no dedicated tail lamps, its brake lamps can also glow dimly with the low beams. Adding dedicated tail lamps separates those jobs.
On the Lights module, High beams need low beams makes high beams depend on low beams already being on.
Brake and reverse lights follow vehicle state; they do not need separate manual switches.
Optional: lens flares
A lens flare is the bright effect seen when looking toward a lamp.
- Select the lamp.
- Enable Lens flare.
- Use Create LensFlare to add the pipeline-appropriate flare component.
- Test from different angles and distances.
Flare brightness sets its strength; Flare half-distance changes how quickly it fades with distance. For render-pipeline requirements, see Render Pipelines.
Fake headlight beams and the pool of light on the road
Fake beams use visible geometry to show headlight cones and a lit pool ahead of the car. They help sell headlights in a night or tunnel scene.
Adding them
- Open the vehicle's Lights module.
- Click Add Fake Headlight Beams if the vehicle does not already have them.
- Select the added RCCP Light Cones component on the vehicle root.
- Click Assign Shipped Materials.
- Test the car with its low beams on in your intended lighting.
Check: the beams and ground pool appear, fade with the headlights and disappear when the lamps are off. Test a player build too; do not rely on editor fallback materials.
Only low- and high-beam lamps receive cones. Brake, tail and indicator lamps do not.
Tuning them
| Setting | What it changes |
|---|---|
| Cone Intensity | Visible beam brightness |
| Pool Intensity | Brightness on the road |
| Cone Length / Cone End Radius | Beam length and width |
| Edge Softness | Softness around the beam |
| Pool Width / Pool Length | Size of the ground pool |
| Ground Mask | Layers that count as road |
| Ground Raycast Interval | How often the pool checks road height and slope |
Change shape settings outside Play Mode. Judge intensity in the lighting where the car will be used; bright daylight can make additive beams hard to see.
Which pool you get on which pipeline
Ground Mode > Auto chooses a supported method:
| Method | Behavior |
|---|---|
| Flat quad | A flat pool; works across render pipelines |
| URP decal projector | Follows surface shape when the active URP renderer has the required Decal Renderer Feature and a supported non-deferred setup |
Read the component's status banner to see which method will run. Use Render Pipelines for pipeline setup.
Keeping them cheap
Fade Start and Cull Distance reduce distant beams. A scene-wide budget also prioritizes nearby vehicles, so distant beams can disappear in dense traffic.
Disable Real Headlights optionally switches off the actual headlight illumination while retaining lenses and fake beams. Test the look first: fake geometry does not replace every lighting effect a real light produces.
Smashing lamps in a crash
On each lamp, Can be smashed, Toughness and Smashes below control breakage.
On the Damage module, enable Break the lamps and adjust Lamp damage reach and Lamp damage strength. Test a hit near the lamp, then repair the vehicle.
Check: a broken lamp stays dark and repair restores it. See Damage.
If the lights do not look right
| What you see | What to check |
|---|---|
| Light on the road, dark lens | Lens renderer, material slot and emission-compatible material |
| Lamps overlap or appear twice | The creation wizard may have been run more than once. |
| Brightness resets during Play | Change RCCP Light's Brightness. |
| No high beams | Lamp functions and High beams need low beams |
| Fake beams missing in a build | Assign Shipped Materials, lamp brightness and distance/budget limits |
| Too many lights hurt performance | RCCP Settings > Optimization > Lights and Performance and Platforms |
The global Headlights as vertex lights, brake-light, reverse-light and indicator options trade lighting quality for cost. Test their effect on your target device.
Read next
- Damage — broken lamps and repair.
- Render Pipelines — materials, flares and decals.
- Field Reference — detailed light settings.