AI Vehicles
Goal: make one vehicle drive around a simple route. Add racing behavior, chase targets and obstacle avoidance after that works.
Before you start
Use an RCCP car that already drives correctly and a wide, simple road. Stop Play Mode before editing.
AI needs two different things:
- Waypoints tell the car where to go, in order.
- A NavMesh tells Unity's navigation system where a route can be planned. Baking creates that navigation data from scene geometry.
Waypoints do not replace the NavMesh. All four RCCP AI modes require it.
1. Add the AI module
- Select the vehicle root in the Hierarchy.
- In the module grid, add AI from the Control group. See Vehicle Setup.
- Open the AI module's Inspector. Under Behavior Settings, choose FollowWaypoints for this first route.
RCCP creates a navigation agent if one is missing. While the AI module is enabled, it takes external control of the vehicle. Disable the module to stop it supplying driving inputs.
2. Make a simple route
- Open Tools > BoneCracker Games > Realistic Car Controller Pro > Add to Scene > AI Waypoints.
- Keep the created container selected in the Hierarchy.
- In the Scene view, hold Shift and left-click the road to place each waypoint. Make a broad loop with gentle turns for the first test.
- Follow the green lines to check the order and the connection from the last point back to the first.
- Select the car's AI module and drag the container into Waypoints Container.
Check: the route stays on the road, and the AI references the intended container. Assign it explicitly when there is more than one route.
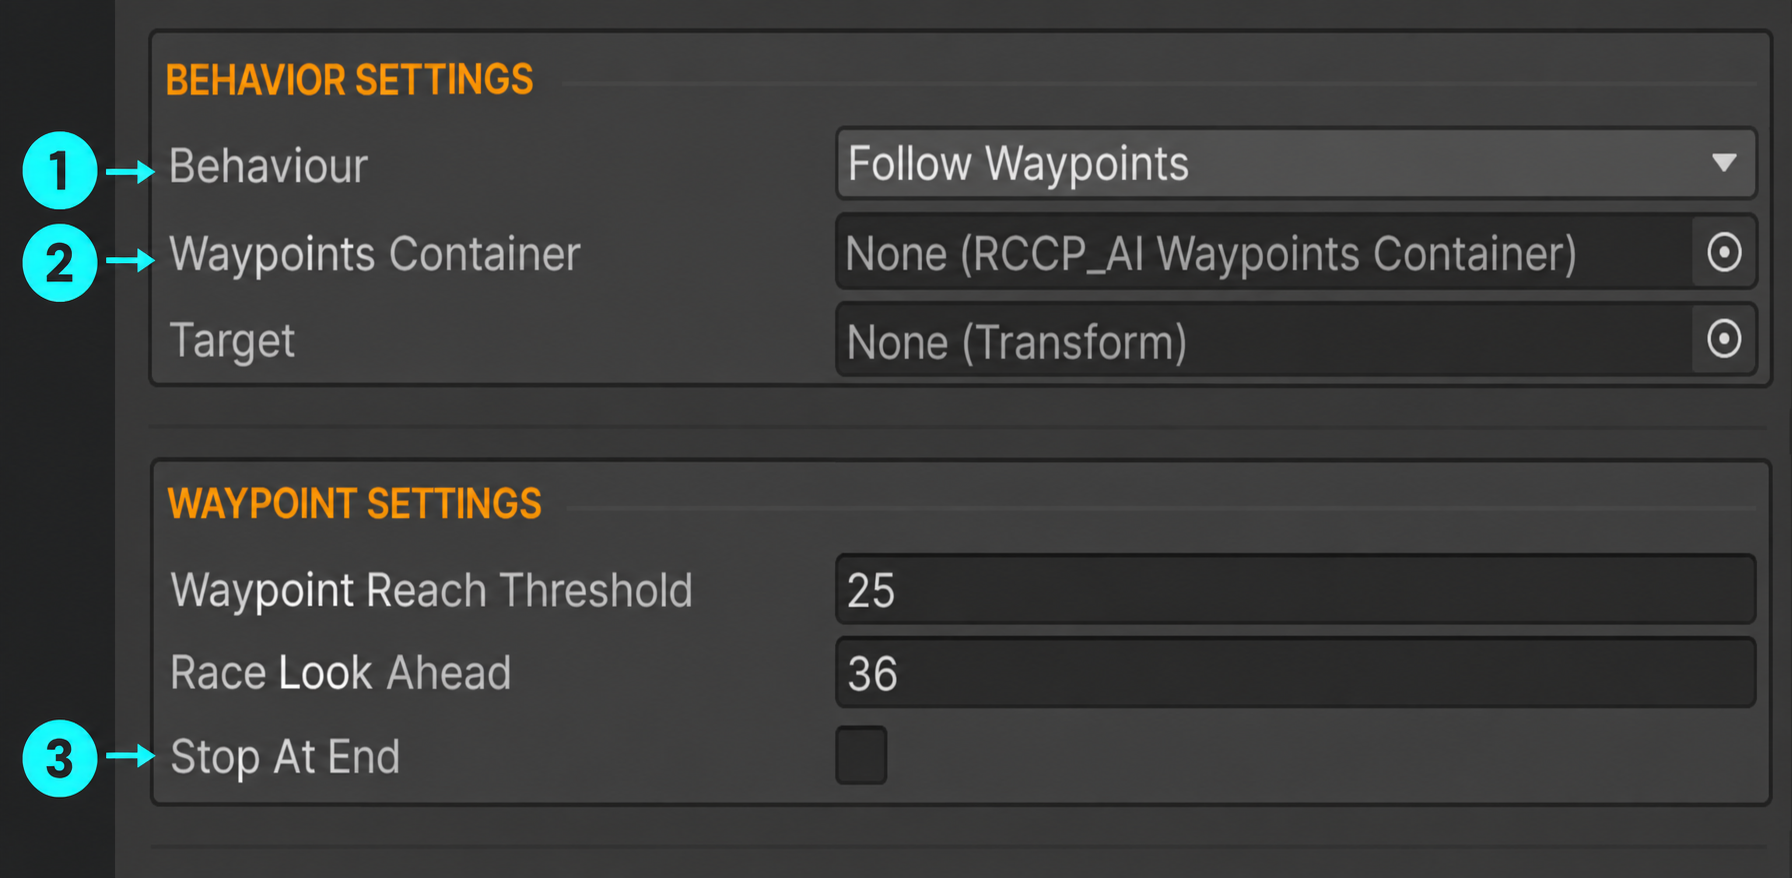
Open the screenshot at full size. 1 Choose Follow Waypoints (the Inspector displays the mode with spaces). 2 Drag your route container here; this setup example shows the slot before assignment. 3 Leave Stop At End off for a loop, or enable it to finish at the last point. The Target slot is for the target-following modes and can stay empty for this route. A baked NavMesh is still required.
3. Bake the drivable area
If your scene already has a valid baked NavMesh, check that it covers this route and the car's starting position. Otherwise, with Unity's AI Navigation package:
- Install AI Navigation through Package Manager if needed.
- Select the scene object you want to hold navigation data, then use Add Component > Navigation > NavMesh Surface.
- Set Collect Objects and Include Layers so the surface collects your road geometry. For a small practice scene, All Game Objects is a simple starting point; exclude geometry that should not be drivable.
- Use an Agent Type that matches the vehicle's NavMesh Agent. Choose the geometry source that describes the road, then click Bake.
- Check the NavMesh display in the Scene view. The road beneath the car and the route need connected coverage.
Check: the NavMesh Surface has a NavMesh Data asset and the car starts on its navigable area. An enabled surface is needed to load that data into navigation.
See Unity's NavMesh Surface reference for collection filters, agent types and bake settings. Re-bake after changing road geometry that affects the route.
4. Test one lap
- Save the scene and press Play.
- Watch the AI car in the Scene view with gizmos visible.
- Check that it reaches successive waypoints and completes the loop.
- Stop Play Mode before making permanent route or tuning changes.
Check: the car moves around the intended road without getting stuck or repeatedly missing the same turn. If it does not move, read the Console before changing speed settings. RCCP warns when the agent is not on a NavMesh.
Enable Stop At End to stop at the final waypoint instead of looping.
If the first route does not work
| What happens | What to check first |
|---|---|
| The car stays still | Check NavMesh coverage, agent type, assigned route, engine and Stop Now. |
| It heads toward the wrong route | Assign Waypoints Container instead of relying on automatic discovery. |
| It circles a waypoint | Check route direction, waypoint position and NavMesh connectivity. |
| It skips a tight corner | Lower Waypoint Reach Threshold, the distance at which a waypoint counts as reached. |
| It runs wide at speed | Lower Road Grip, which is the AI's estimate of available cornering grip, or add a brake zone. |
| It weaves on a straight | Reduce Steer Sensitivity or adjust look-ahead distance. Change one setting at a time. |
| It keeps reversing on a slow section | Review the route and Check Stuck recovery behavior. |
Optional: choose another driving mode
| Mode | Task | Required reference |
|---|---|---|
| FollowWaypoints | Follow the ordered route. | Waypoints Container. |
| RaceWaypoints | Drive the route using racing look-ahead. | Waypoints Container. |
| FollowTarget | Follow a target and stop near it. | Target. |
| ChaseTarget | Aim ahead of a moving target to intercept it. | Target. |
For a target mode, drag the target scene object into Target. Follow Target Distance sets the stopping distance for following. Chase Prediction Time controls how far ahead chase mode predicts; prediction reads the target's Rigidbody, so a target without one has no velocity-based prediction.
Optional: tune pace and cornering
Start with Road Grip, Agressiveness (the Inspector's spelling) and brake zones. Leave the Kp / Ki / Kd speed-controller internals until simpler adjustments have been tested.
| Setting | What to adjust |
|---|---|
| Road Grip | Raise cautiously for faster cornering, lower if it overruns corners. This does not add real tire grip. |
| Agressiveness | How strongly the AI pursues its target speed. |
| Max Throttle / Max Brake | Upper limits on the driving inputs it can request. |
| Steer Sensitivity | How strongly it turns toward its aim point. |
| Min Look Ahead / Look Ahead Per Kph | Aim distance at low speed and how it increases with speed. |
| Race Look Ahead | How far the racing behavior looks along the path. |
The AI temporarily configures counter-steering, steering limiter, automatic reverse and reverse-pedal swapping for its own use, restoring the previous settings when disabled. A handling preset changes the vehicle; it does not replace AI pace settings.
Optional: slow down at one corner
- Add AI Brake Zones from the same Add to Scene menu.
- Select the container, hold Shift and left-click the road in the Scene view.
- Size and rotate the created box to cover the braking area before the corner.
- Set Target Speed, then test the approach.
Check: the car brakes while its center is inside the zone. Make the box large enough and early enough to slow the car before the turn. A brake zone caps target speed; it cannot provide more braking grip than the car has.
Optional: avoid moving obstacles
Add RCCP AI Dynamic Obstacle Avoidance to the same object as the AI module, through Add Component > BoneCracker Games > Realistic Car Controller Pro > AI.
Set Dynamic Obstacle Layers to the layers used by other cars and obstacles. An empty mask detects nothing. Layers are Unity's categories for filtering objects; the object must actually use a selected layer.
| Controls | Purpose |
|---|---|
| Auto Detect Obstacles, Detection Radius, Pool Update Interval | What is discovered, how far away and how often. |
| Vehicle Width, Vehicle Length, Safety Margin | The space this car needs. Match these to the model. |
| Prediction Time, Risk Threshold | How early it reacts to a possible collision. |
| Emergency Brake Distance, Min Speed Threshold | Close-range braking and low-speed steering behavior. |
| Avoidance Steer Sensitivity | Strength of the additional avoidance steering; separate from the AI module's setting. |
Test against one obstacle first, then a field of vehicles. Avoidance adds braking to the AI's existing request and adds steering correction; it does not guarantee every collision can be avoided.
Optional: edit routes and recovery
Invert reverses a waypoint route. Delete Waypoints clears it. The component's context menu includes Smooth Waypoints and Place Waypoints Above Ground. Smoothing replaces the original waypoint objects: keep a copy of a route you may want to restore. Ground placement uses Ground Offset and Ground Layer Mask.
In Runtime Options, Stop Now holds the car, Reverse Now requests reverse and Check Stuck enables reverse recovery when the car requests forward motion but is not moving. Changing modes clears the stop/reverse requests. Runtime edits are useful for diagnosis; make lasting settings changes after stopping Play Mode.
Next step
- Scenes and Spawning — create more vehicles during a game.
- Cameras — watch an AI car without changing who drives it.
- Field Reference — individual AI settings.
- Scripting — write your own input-driven vehicle controller.